Enterprise apps often rely on Python backends—FastAPI, Django, Flask—for their APIs and dashboards. When selling to the enterprise, supporting Single Sign-On (SSO) becomes table stakes. Identity providers like Okta, OneLogin, and Microsoft Entra ID dominate the enterprise stack, and your app must speak their language. Scalekit helps you do that without the overhead of managing complex SAML or OIDC flows.
This guide walks through how to add secure SSO to your Python backend using FastAPI and Scalekit’s Python SDK. You’ll integrate login, handle callbacks, manage tokens, and test your setup using Scalekit’s IdP simulator. You’ll also see how SSO connects with concepts like user authentication, user accounts, and service provider configuration.
The case for SSO in Python-based backends
SSO streamlines enterprise logins. Users sign in once and access multiple tools without juggling passwords. For IT teams, it centralises access control. For developers, it introduces protocol complexity.
Python powers internal tools, APIs, and admin dashboards across industries. Whether you're building in Django or FastAPI, enterprise customers will ask for SSO support. Implementing it cleanly matters for user authentication, onboarding speed, and user experience.
The cost of doing SSO manually in Python
DevOrbit’s identity crisis
DevOrbit, a fictional analytics startup built on FastAPI, ran into trouble as soon as enterprise deals started rolling in. Each customer brought a different IdP: Okta, OneLogin, Microsoft Entra ID. DevOrbit tried to integrate each manually, wiring SAML assertions, mapping user attributes, and chasing token bugs. It didn’t scale.
Engineering cycles were spent debugging SSO flows instead of shipping the product. Their team had to manage configuration files, user records, and token logic manually. Onboarding dragged. Deals stalled. Imagine if DevOrbit switched to Scalekit: they could reduce their auth codebase to just a few lines of code.
Meet Scalekit: Protocol-agnostic SSO for Python apps
Scalekit removes the need to manage individual SAML or OIDC integrations. It acts as a bridge between your app and the enterprise service provider.
- Configure each identity provider once via the Scalekit dashboard
- Redirect users to Scalekit to initiate login
- Receive verified user profile details via callback, including the user object and user info
- Skip protocol-specific implementation (SAML, OAuth, OIDC)
- Use with FastAPI, Flask, or Django in your project directory
- Test using the built-in IdP Simulator for successful authentication
Scalekit simplifies the authentication flow, improves user management, and handles URL patterns and configuration details internally.
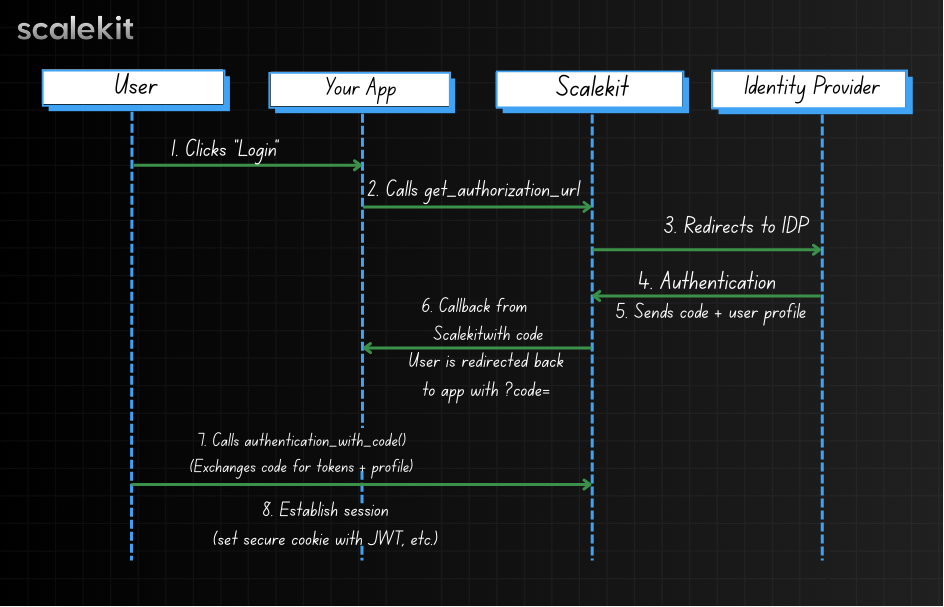
🔄 How SSO with Scalekit works
- User clicks “Login with SSO” in your app
- Your FastAPI backend calls get_authorization_url() to generate the authorization request
- User is redirected to their IdP (authentication service) via Scalekit
- After successful authentication, Scalekit redirects back with a code
- Your app exchanges the code for tokens and user info
- A session is established (e.g. JWT in cookie)

What you’ll build
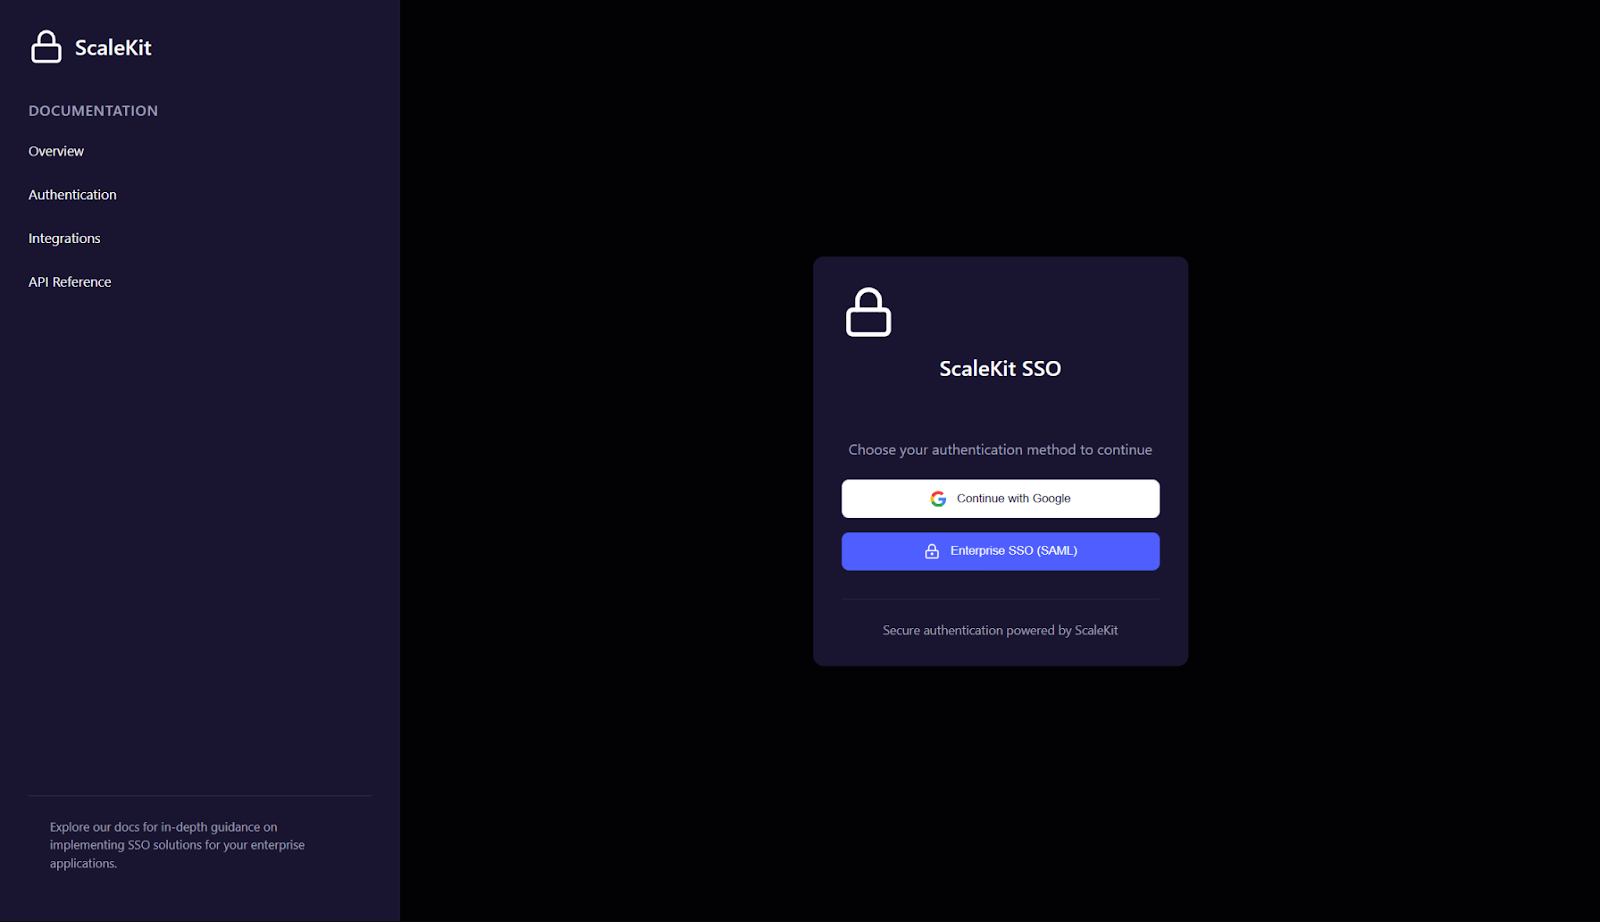
- A login endpoint that redirects users to their service provider
- A callback endpoint that handles the authentication flow and token exchange
- A JWT-based session flow in FastAPI to manage user accounts
- A working SSO prototype using Scalekit’s IdP simulator with SP-initiated SSO support
Hands-on: Setting up SSO in Python with FastAPI
🛠️ Install the SDK
Make sure to install it inside your virtual environment for clean dependency isolation.
⚙️ Set environment variables
These variables provide your authentication service with connection and configuration details.
🔐 Set up the Scalekit client
🔁 Create the login route
This route initiates SP-initiated SSO and sends the user to their service provider.
🔓 Handle the callback
This completes the authentication flow and stores user info securely.
▶️ Run the FastAPI app
Make sure your hosts file allows local development on localhost.
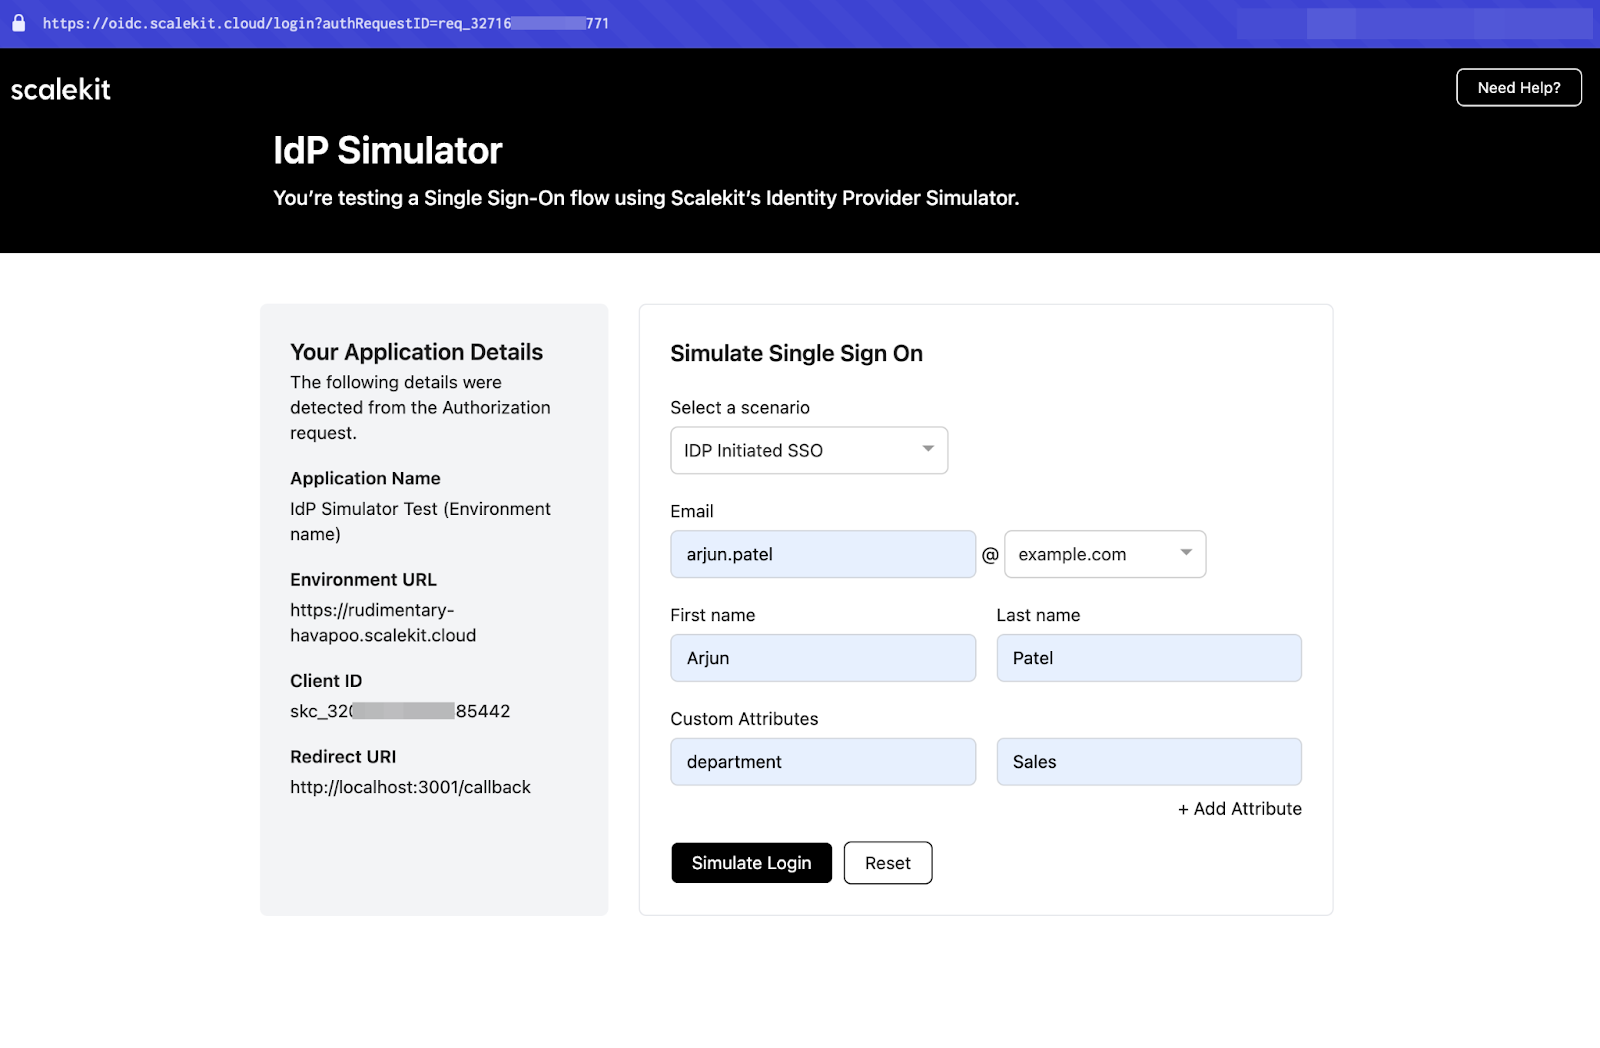
🧪 Use the IdP simulator for testing

- Use an @example.org test email to trigger the simulator
- No real IdP setup required
🚪 Run with real IdPs:
- Replace connection ID and credentials with production config
- Redirect users to their enterprise IdP with one line of code
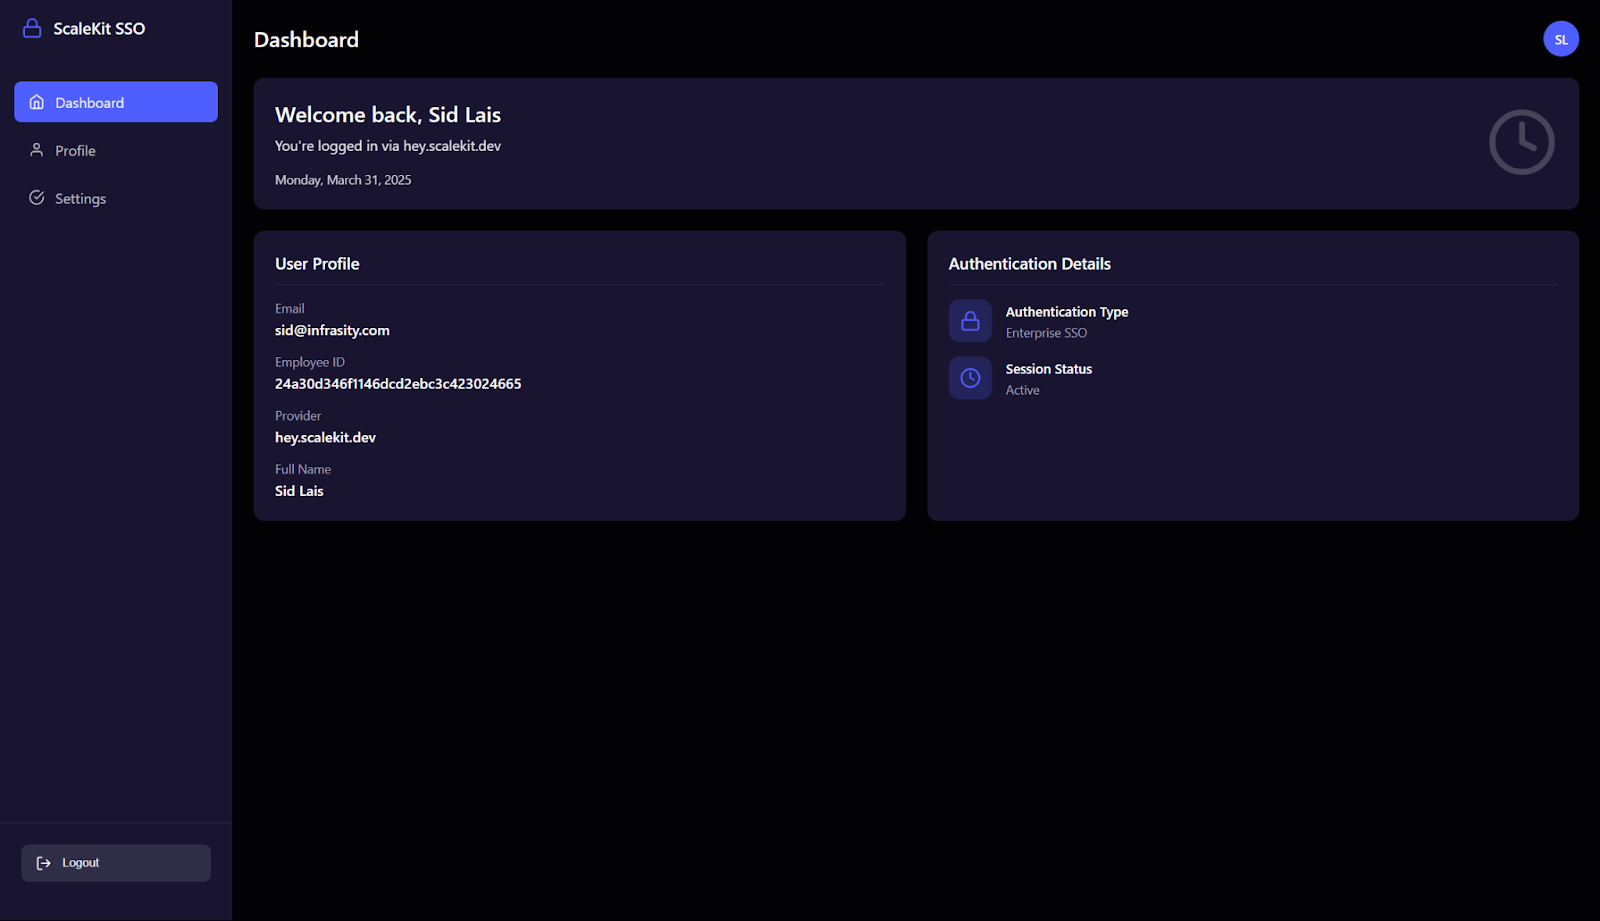
▶️ Run with actual config
Once the simulator is working, you can authenticate yourself. Use your actual config and try your app.


Managing secure sessions with JWT in Python
Use pyjwt to manage sessions after login:
- Issue access tokens with short expiry
- Store tokens in secure, HttpOnly cookies to protect against XSS attacks
- Implement refresh tokens if needed for long-lived sessions
- Avoid storing tokens in localStorage or client-accessible cookies
- Include claims like user ID or email address in the token payload
This approach provides user authentication persistence while maintaining security best practices.
Debugging SSO flows in Python
SSO bugs often stem from misconfigurations. Here’s how to trace them:
- Token errors: Check expiry, signature, and audience claim.
- Redirect loops: Verify redirect_uri and state parameter.
- ACS mismatches: Ensure the Assertion Consumer Service (ACS) URL matches what’s in the service provider settings.
- Missing configuration files: Check your project directory for the required environment or YAML config.
Use Scalekit logs to trace the authentication flow. You can also inspect token contents to confirm user attributes like email address or user ID.
Best practices for secure Python SSO deployment
- Enforce HTTPS for all callback and login routes
- Rotate keys used for signing JWTs
- Enable MFA at the IdP level
- Never store tokens in localStorage
- Set HttpOnly and Secure flags on cookies
- Validate all callback inputs
- Use centralized logging across Scalekit, your backend, and the authentication service
- Use version control to track configuration files and update default values securely
Wrapping Up: SSO without the overhead
This guide covered the entire lifecycle of implementing SSO in a Python backend—from understanding enterprise SSO needs, to setting up routes in FastAPI using Scalekit’s SDK, and securing sessions with JWT. You learned how to test with the IdP simulator, debug common issues, and apply best practices around token handling and cookie storage.
You also saw how SSO fits into broader backend concerns like user authentication, user experience, service provider integration, and secure handling of user info and user accounts.
Enterprise SSO doesn’t have to slow you down. With Scalekit, Python developers can ship secure, scalable authentication in hours, not weeks.
FAQ
Do I need to use Django or FastAPI to implement SSO with Scalekit?
No. The SDK works with any Python backend, including Flask. FastAPI and Django just happen to be the most popular frameworks.
Can I test the SSO flow without connecting a real IdP like Okta or Entra ID?
Yes. Scalekit offers a built-in Test IdP Simulator. Use any @example.org email address to trigger simulated flows.
How do I manage sessions after login in a Python app?
Use JWTs. Issue short-lived access tokens and store them in secure cookies. Optionally add refresh tokens for persistent sessions.
Can I connect multiple Identity Providers in one Python backend?
Yes. Each customer’s IdP can be configured in Scalekit. Use connection_id to route users correctly.
How to implement SSO in Python?
Use the scalekit-sdk-python package. Set up login and callback routes, configure your org in the dashboard, and test using the IdP simulator.

.png)
.png)


