Implementing SSO using OneLogin: A ReactJS developer’s guide


When creating SaaS applications for enterprises, it becomes vital to include Single Sign-On (SSO) functionality. OneLogin enables enterprises to establish secure employee access for the applications they use.
This tutorial explains how to integrate SSO login in your SaaS application through React and Node.js. By the end of this guide, you will understand how to authenticate enterprise users through OneLogin by providing a simple login process.
Why SSO matters
Without SSO, enterprise users need to remember different login credentials to access their daily apps like Outlook, Asana, Confluence and your app as well. Implementing SSO can streamline this process by allowing users to access multiple applications with a single set of credentials, thereby enhancing security and reducing user frustration.
SSO eliminates credential entry by allowing users to launch multiple applications from one unified sign-in experience. Hence, enterprises prefer applications that support SSO. It results in better security and streams the process of managing user access permissions. The tutorial demonstrates how to establish SSO functionality in Node.js + React applications through OneLogin authentication.
What you'll build
By the end of this guide, you'll learn how to:
- Detect the identity provider based on user's organization and verify their identity
- Manage the login process and handle session tokens
- Securely log users into your app using their OneLogin credentials
Let’s dive in!
You can follow along with the code in this GitHub repository. Check the README.md file for setup instructions to run it on your local machine.
Integrating OneLogin into your authentication flow
When enterprise users log into your app, the process is a bit different. Instead of entering a username and password directly, they click "Continue with SSO" and are redirected to OneLogin for authentication. This ensures a secure login process before they access your app.
Our sample app consists of two main parts-- backend (built with Node.js) and frontend (built with React.js). Here are the problems in our current approach:
- Your app needs to communicate with OneLogin using protocols like SAML or OIDC, which can be complex and time-consuming to implement. This slows down enterprise customer onboarding.
- The current setup is tightly integrated with OneLogin. If future customers use different identity providers like Microsoft Entra ID or Okta, adding support for them could require significant effort.
- Managing authentication manually increases friction between your app, OneLogin, and enterprise users. A poor implementation can lead to security risks.
Instead of dealing with these challenges manually, there’s a better way to handle authentication seamlessly. Let’s explore how!
Making authentication easier with Scalekit
Scalekit simplifies the authentication process by handling all the complexity for you. Instead of dealing directly with OneLogin, your app redirects enterprise users to Scalekit. Once they log in successfully, Scalekit sends back their profile details to your app.
Here’s how it looks:
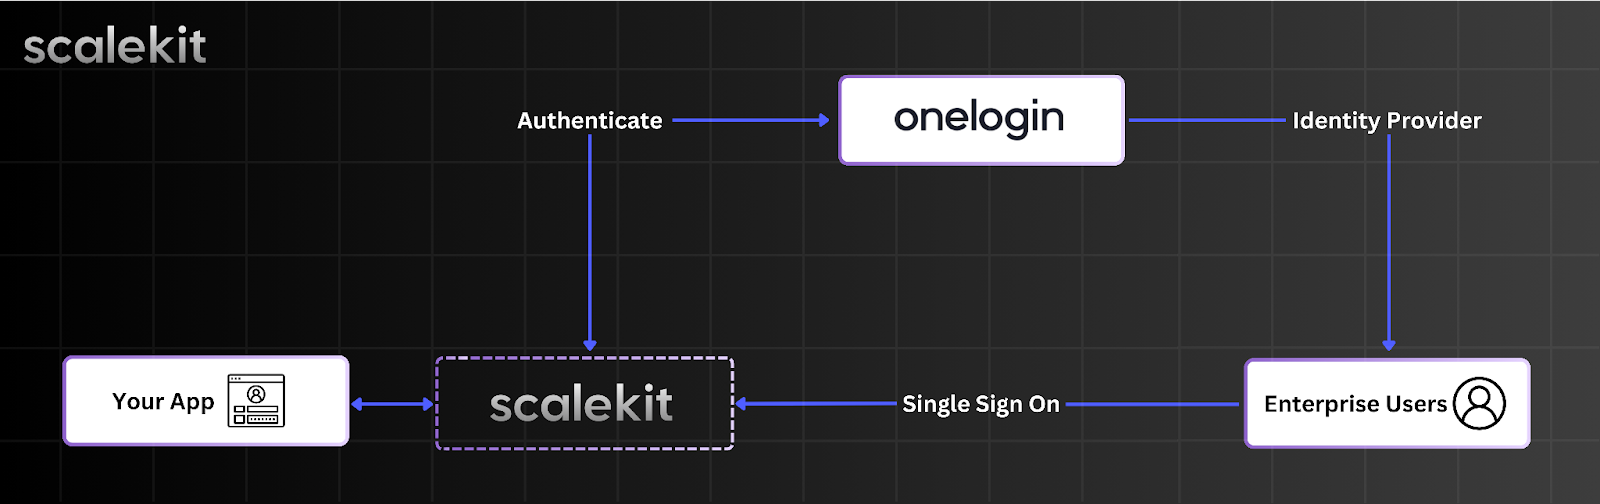
All the API interactions are scoped between your app and Scalekit. It reduces many security risks, and it’s way easier to ship SSO. Perhaps in hours!
Adding Scalekit to your project
To integrate Scalekit for authentication, you’ll need to install the Scalekit SDK and set up your environment variables.
🛠️ Install Scalekit SDK:
If you're using the example app, the backend's package.json already lists Scalekit as a dependency.
Run:
This installs all dependencies for both the frontend and backend.
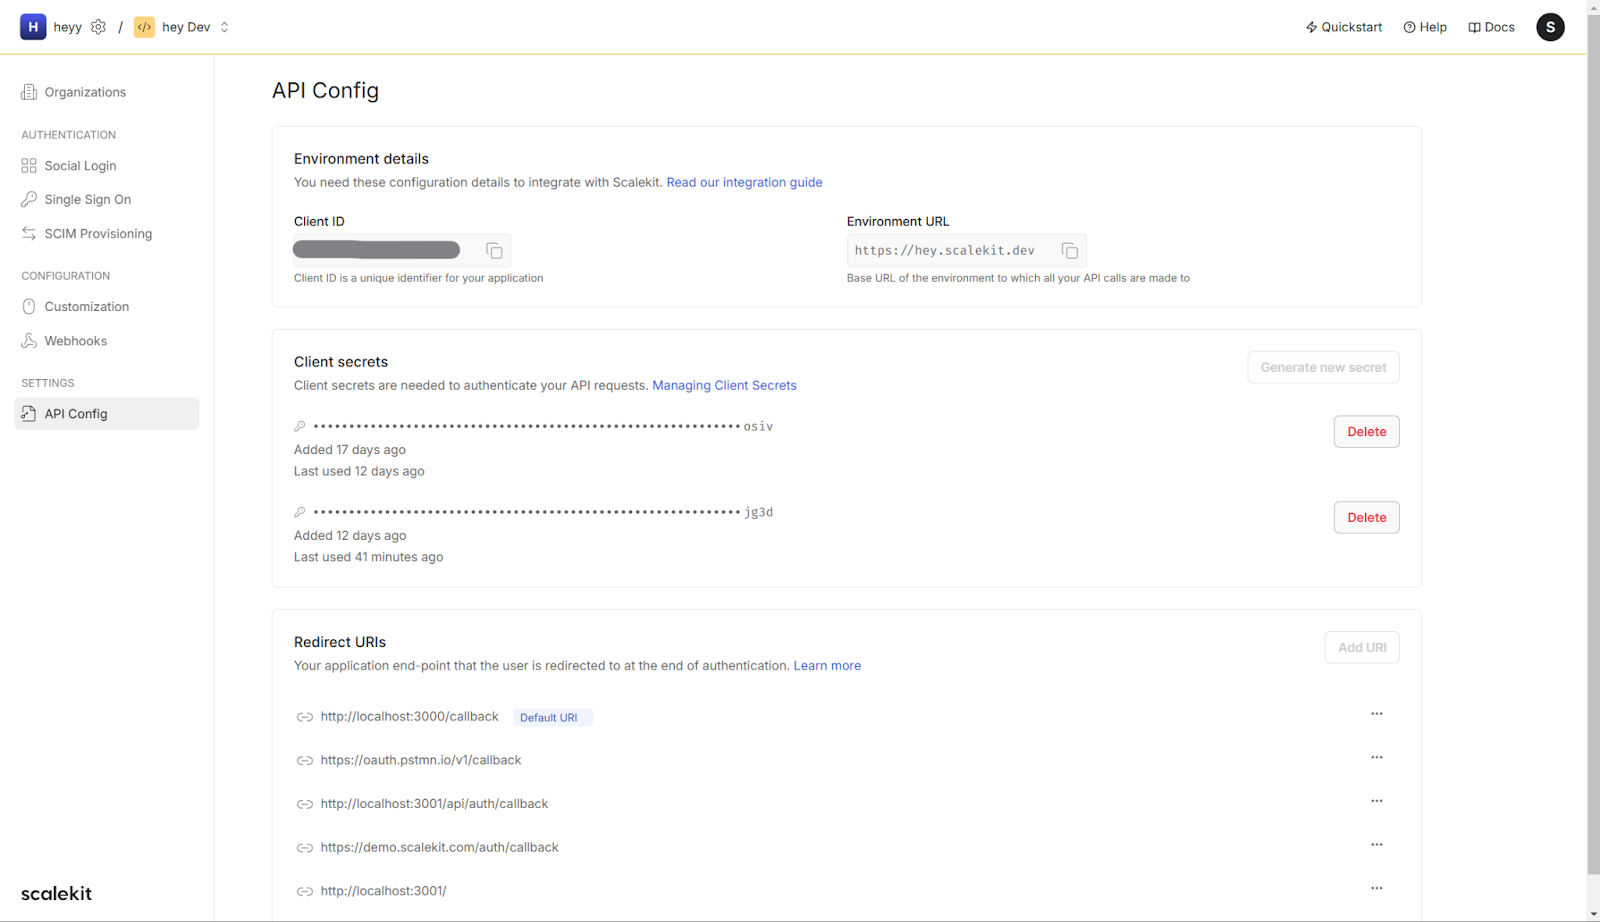
Set Up API credentials
Instantiate Scalekit SDK using API credentials. Follow these steps to get them from Scalekit app:
- Sign up for an account and get your API details from the API Config section.
- Rename the environment file to set up your credentials:
Update the .env template:
🛠️ Set up environment variables:
You can find these values on the Scalekit dashboard. Let’s use “Test Organization” for now as it is pre-configured, just to test our connection.
Overview of steps to implement SSO
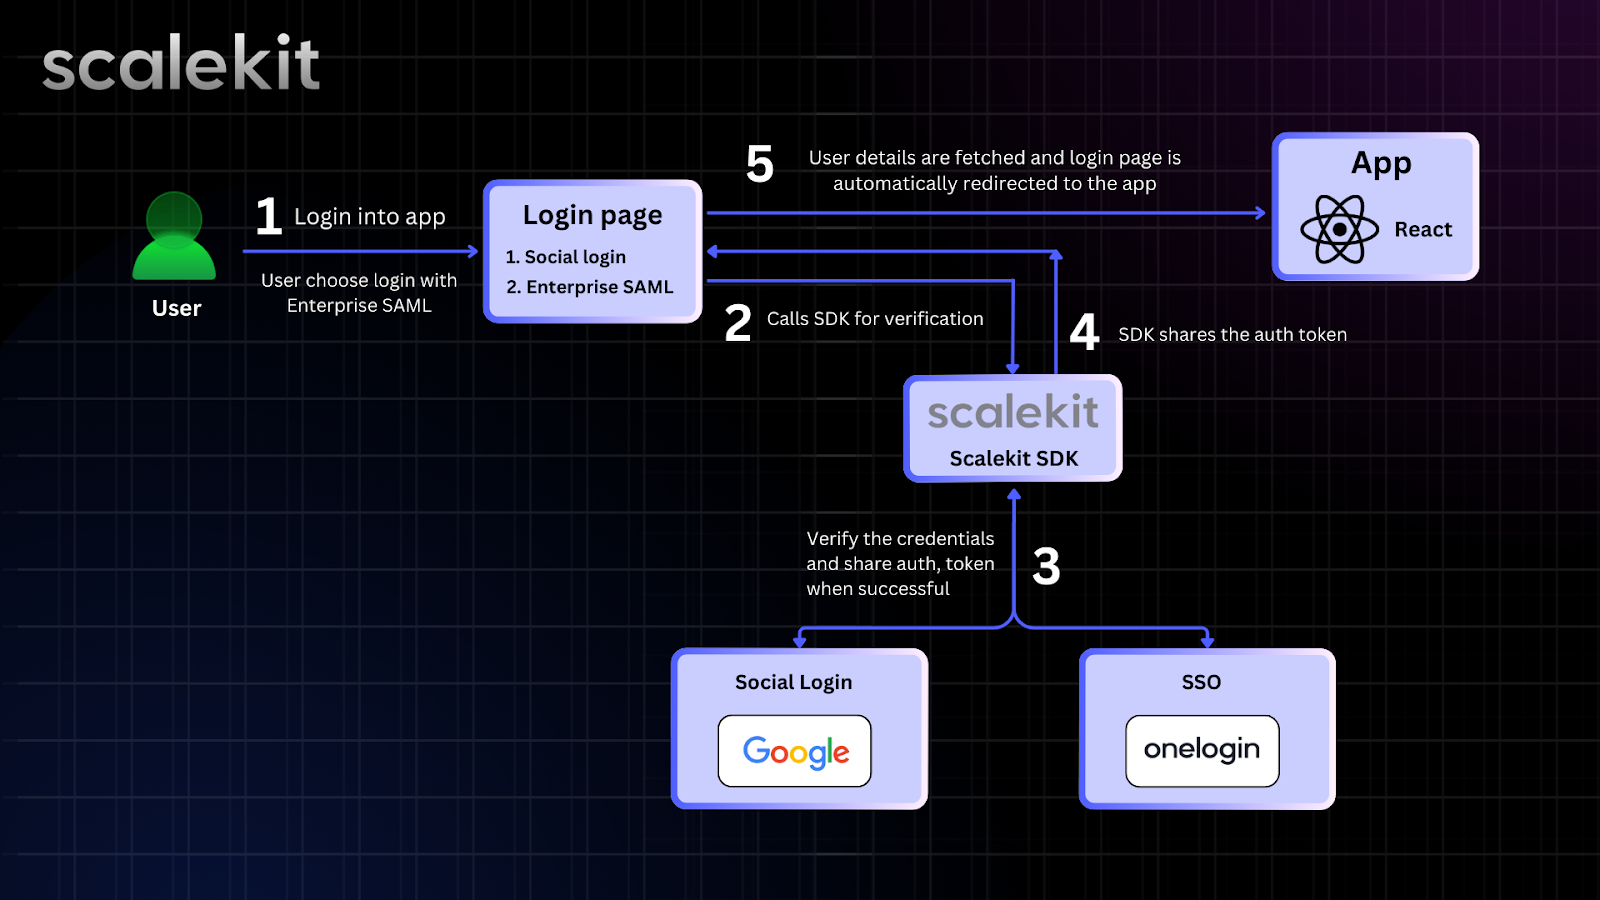
Scalekit manages the authentication flow for OneLogin, making SSO simpler. Here's how it works:
- Redirect the users to authorization endpoint. This is handled by React with additional identifiers passed.
- Scalekit identifies the user's IdP (OneLogin) and displays the required authentication method. Users then authenticate using the method set by their organization, with Scalekit facilitating the process.
- OneLogin sends the user’s profile details to your app after a successful login. This allows you to store their credentials securely.
Now, let's implement the authorization URL and handle successful callbacks.
Handling user authentication with Scalekit
In your backend/routes/index.ts, the /login route generates a special authorization URL using the Scalekit SDK. This URL redirects users to OneLogin (or another Identity Provider) to handle authentication.
To create a destination URL, you need to pass the redirect URI and a couple of options to Scalekit’s getAuthorizationUrl() method.
Any ONE of connectionId, organizationId or loginHint must be passed in order to initiate Single Sign-on. These are available once you create an organization from Scalekit Dashboard. These resemble your customers. For ease of testing for developers, you can use a default “Test Organization”.
Note that the redirect URI you will pass should be registered in the Scalekit Dashboard > API Config.
For demonstration purposes, the example app takes these details as part of environment variables. In real-time, these identifiers will be used at the runtime based on your app’s business use-case.
While connectionId and organizationId are the identifiers that Scalekit gives to your app at the runtime, a user can give his/her email address, for instance john@example.org. We will later see React frontend sending these details to the backend.
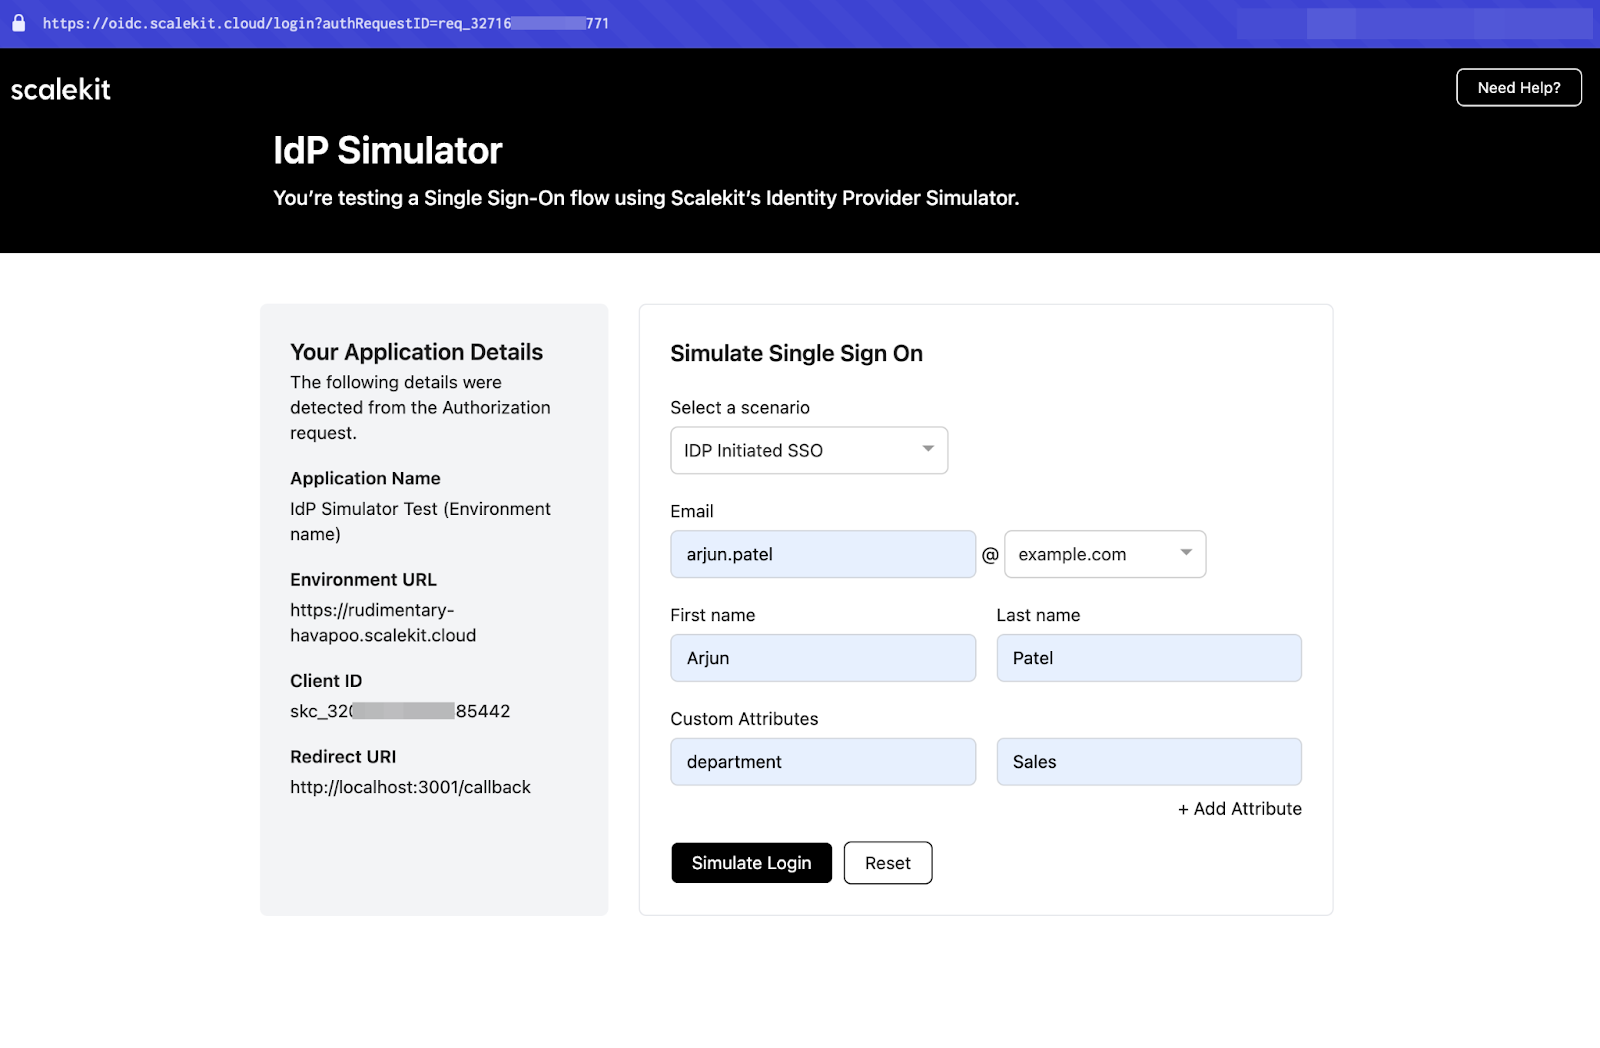
💡 Pro tip: If you test with @example.com or @example.org emails, Scalekit will use an IdP Simulator instead of a real OneLogin setup. This helps simulate SSO authentication during development.
Once a user successfully logs in, Scalekit sends a callback request to your app with an authorization code. Your app then exchanges this code for user profile details.
This is a simplified version of the actual implementation in backend/routes/index.ts.
Your app can now securely store the user profile details. This example uses browser session storage which may not be ideal for all production scenarios.
Initiate SSO at the React login
Now that our /login endpoint is ready to redirect users for authentication, let’s update the React UI to initiate the login process.
Go to frontend/src/components/Login.jsx
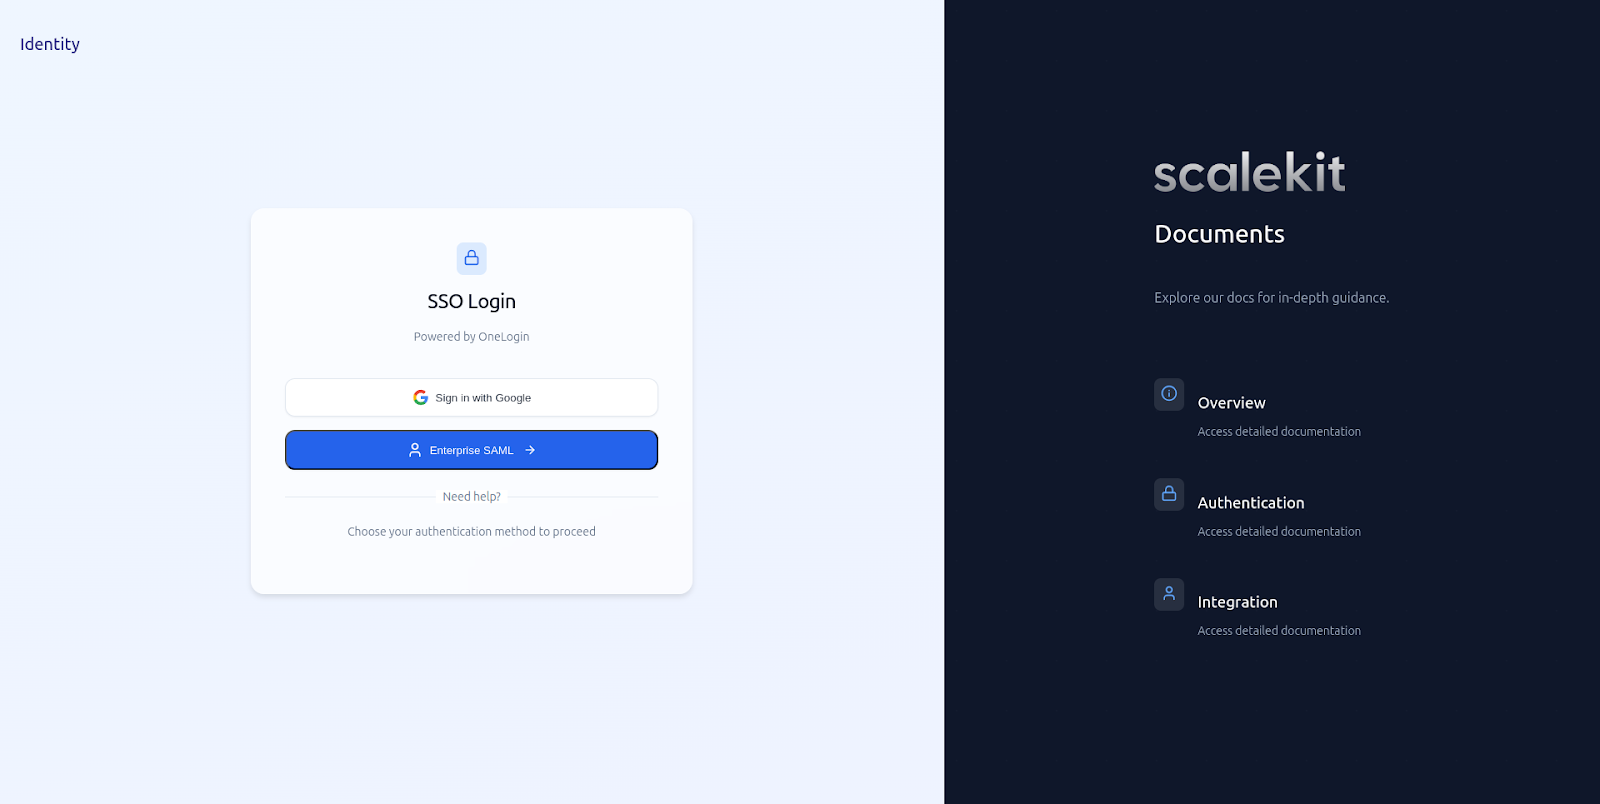
Make a call to the /login endpoint and redirect the user by changing window.location.href at runtime.
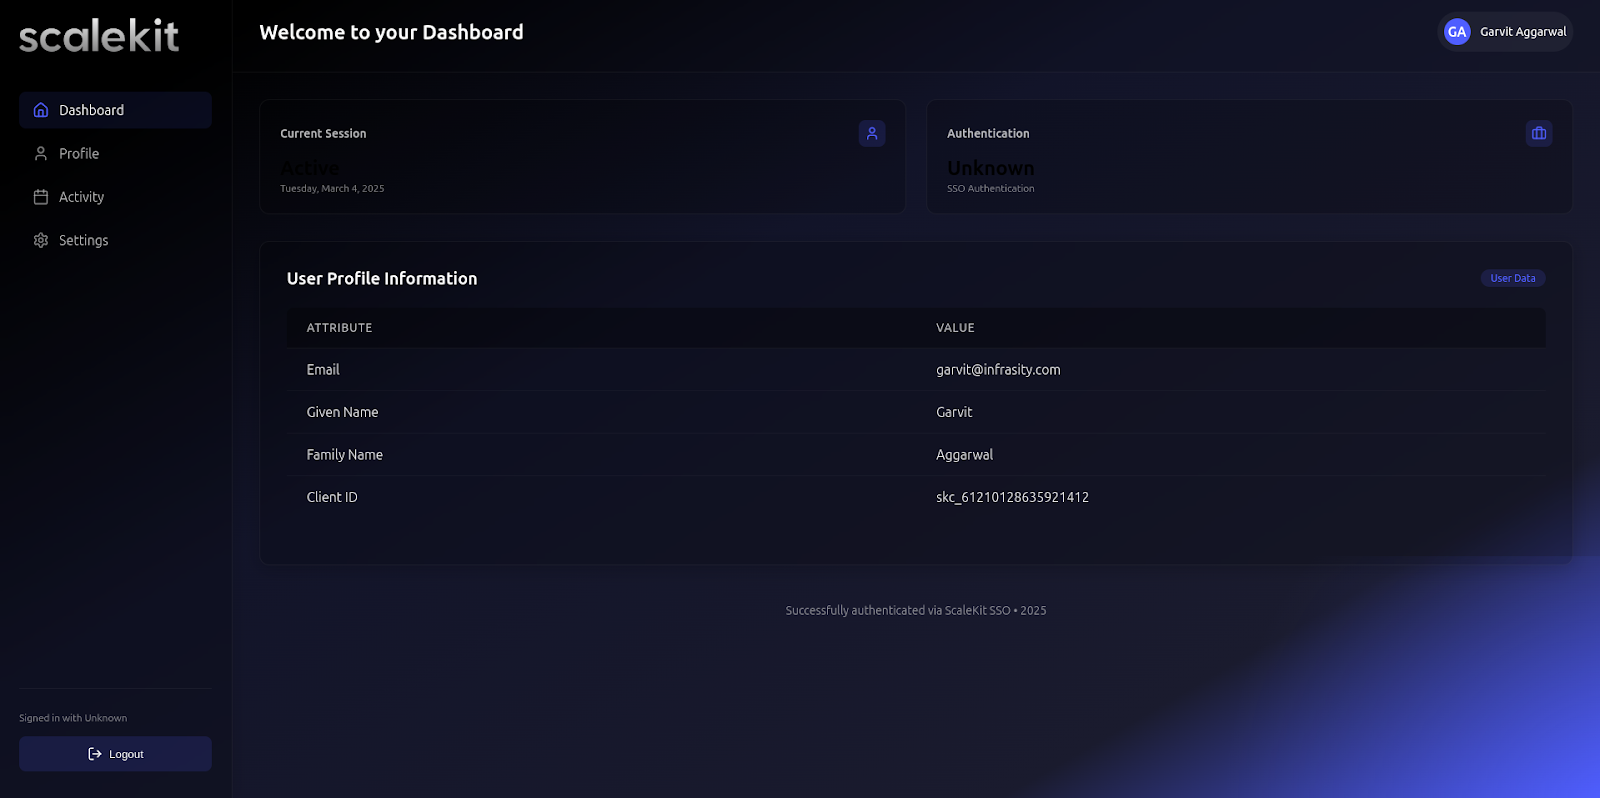
Once SSO is complete, the example app displays the user profile details. See frontend/src/pages/Dashboard.jsx on how it renders this information.
Configuring Scalekit for OneLogin
Step-by-step setup in Scalekit
Before adding OneLogin to your app, you need to configure Scalekit properly. Follow these steps:
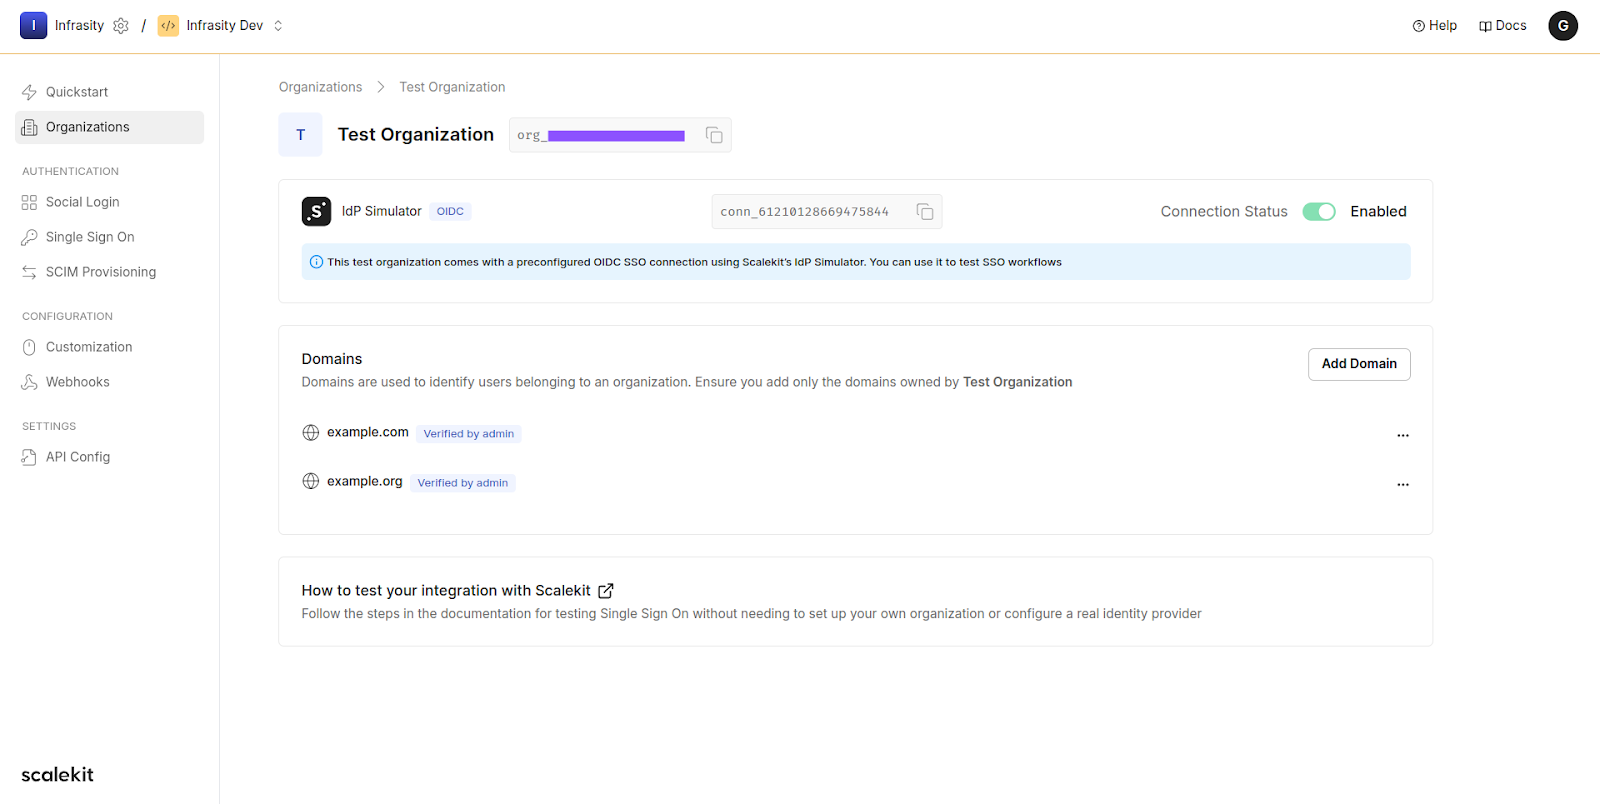
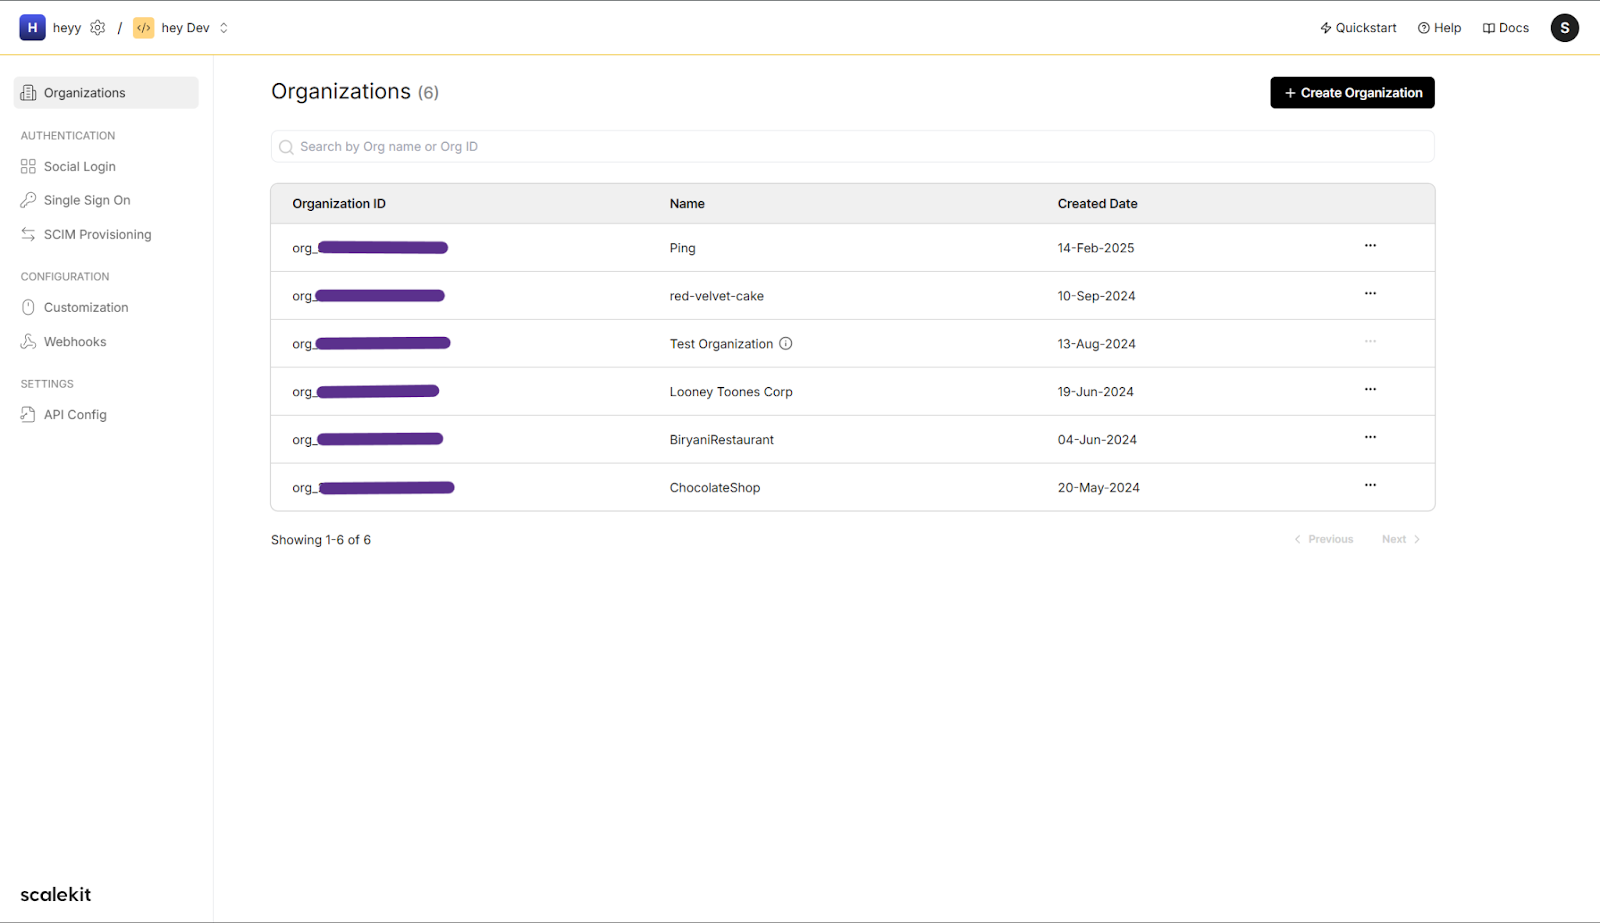
1. Create an Organization in Scalekit
- Log in to your Scalekit Dashboard.
- Go to Organizations and click Create Organization.
- Copy the Organization ID for later use.
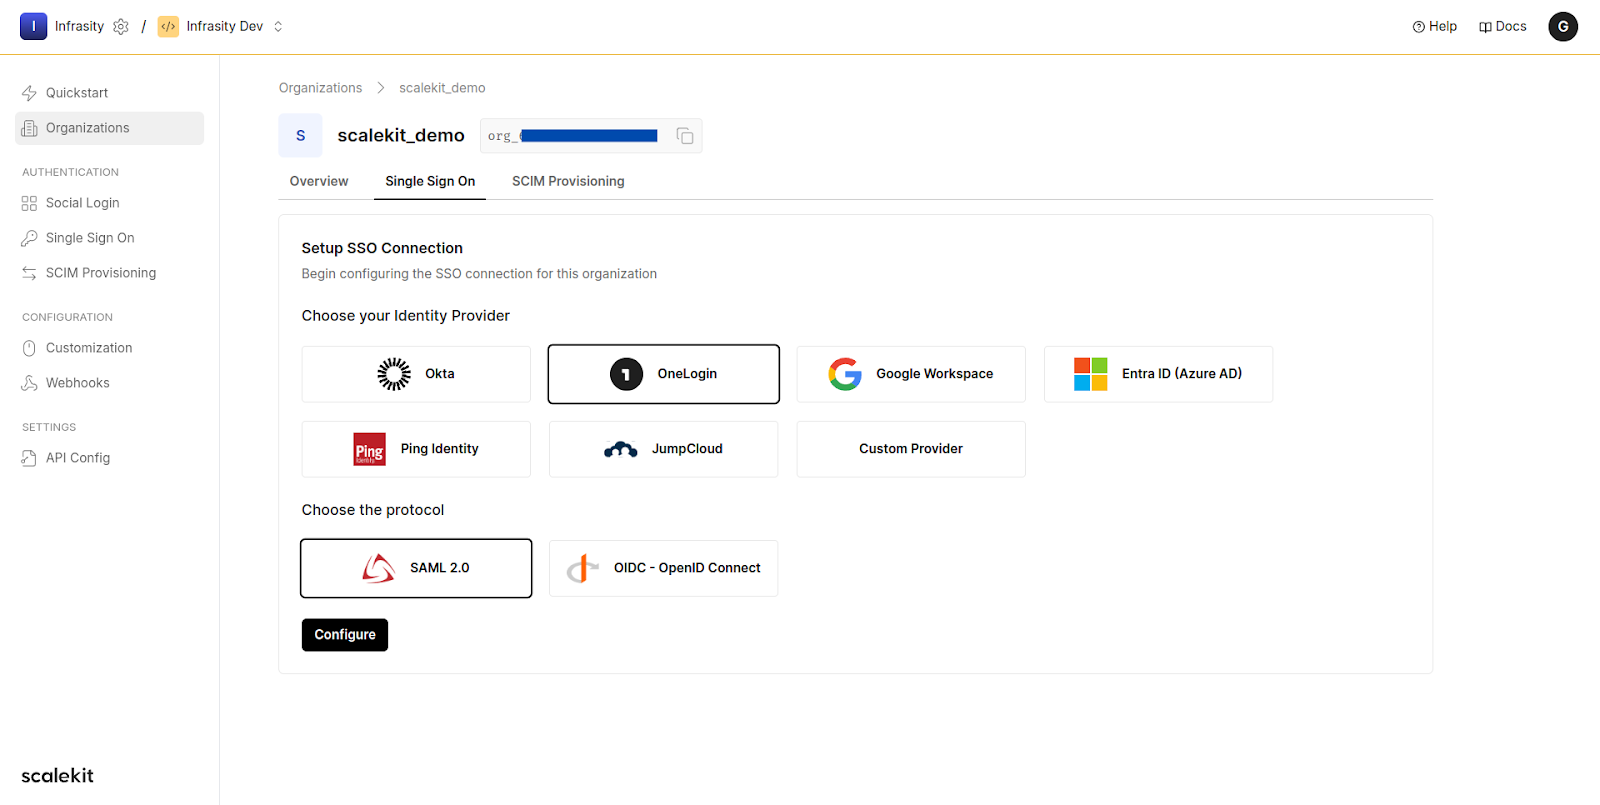
2. Register OneLogin as an Identity Provider
- Navigate to your newly created Organization in the dashboard.
- Click on Single Sign On and select OneLogin as the IdP and SAML as the protocol. This will help in securely managing users’ digital identities.
- Follow the steps shown and configure the IdP.
3. Whitelist redirect URI
- Navigate to API Config in Scalekit.
- Add your app’s redirect URI (http://localhost:3000 for local development).
- Save changes.
4. Retrieve API credentials
- In API Config, copy the Client ID and Client Secret.
- Add these credentials to your file.
5. Administrator configuration
- Retrieve configuration details such as the SAML Metadata URL, Client ID, and Redirect URI from the Scalekit Dashboard.
- Enter these details into OneLogin, allowing it to recognize and authenticate users for your application.
- Define user access policies within OneLogin to control which users can log in through SSO.
Check Scalekit’s documentation for configuring OneLogin for SSO. With these steps completed, enterprise users will be able to authenticate through OneLogin and access your application securely.
.gif)
Onboard the enterprise
Your application is all set up to handle SSO authentication with OneLogin.

Now, it’s time to connect Scalekit with OneLogin for your enterprise customer. This step is typically handled by an IT administrator, who configures the connection by entering specific details into OneLogin.
Successful implementation
You’ve successfully implemented SSO with OneLogin in your React and Node.js app using Scalekit. Your application successfully identifies enterprise users, handles authentication, and securely logs them in—all in just a few seconds.
Scalekit provides separate environments for testing and production. So you can test your integration safely before rolling it out. Once everything works as expected, you can switch to production from Workspace > Environment in the top navigation menu.
💡 Pro tip: Notice idp_initiated_login in the example code? Read this guide to allow enterprise users to log in to your app directly from the OneLogin applications list.
Common authentication issues and fixes
Even with a correct setup, SSO authentication can fail due to misconfigurations or permission issues. Below are some common SSO errors, their causes, and how to fix them.
FAQ
What is SSO OneLogin?
Single Sign On (SSO) and Identity Access Management (IAM) solution OneLogin provides users with secure multi-application access through a single login authentication.
Does OneLogin use SAML?
Authentication through SAML (Security Assertion Markup Language) is one of the protocols supported by OneLogin alongside OAuth, OpenID Connect and alternative protocols.
What is the SSO login method?
When users authenticate a single time against OneLogin they can instantly access multiple applications without additional logins using SSO.
Is SSO an IAM?
IAM features SSO as one of its main functions. The Identity and Access Management solution contains SSO as well as multi-factor authentication (MFA) and user access controls.
Is OneLogin an IdP?
Yes, the IdP tag can be given to OneLogin because it both authenticates users and enables safe application access.
Want to add enterprise SSO to your React app without the overhead? Sign up for a Free Forever account with Scalekit and get OneLogin SSO working in minutes. Need help wiring it into your stack? Book time with our auth experts.


