SCIM implementation using Okta: Step-by-step guide
.png)


Today, companies deal with multiple clients, with hundreds of employees needing platform access. Traditionally, when new employees join, leave, or change roles, IT admins manually create, update, and delete user accounts across different applications. This time-consuming and error-prone process leads to employee access issues and potential security risks. With SCIM, user accounts and groups can be automatically created and provisioned, reducing manual effort and minimizing errors.
For instance, new hires may experience delays accessing necessary tools. When employees leave, the IT admin may forget to deactivate their account across integrated applications, which leads to exposing sensitive company data. With SCIM (System for Cross-domain Identity Management), user accounts are automatically provisioned and deprovisioned, ensuring only authorized users are provisioned.
SCIM automates user provisioning and deprovisioning between identity providers, like Okta, and your SaaS applications. This post walks B2B developers through implementing SCIM with Okta to streamline identity management and improve security across your business applications.
SCIM 101
SCIM is an open standard that simplifies user identity management across different platforms and applications. It allows organizations to create users, update user accounts, and delete user accounts between platforms in an automated way.
At the core, there’s an identity provider (In this case, Okta), a service provider (your SaaS app), and a standard schema for user data. SCIM relies on REST APIs to sync user data, and SCIM connectors and endpoints send and receive this user information. When a change occurs in the directory (adding or deleting a user), SCIM automatically pushes the update to the connected applications and ensures that the data stays up-to-date.
With automated SCIM provisioning, IT administrators can avoid manual errors and ensure that user roles, permissions, and access are synchronized across business-critical tools, improving security and operational efficiency.
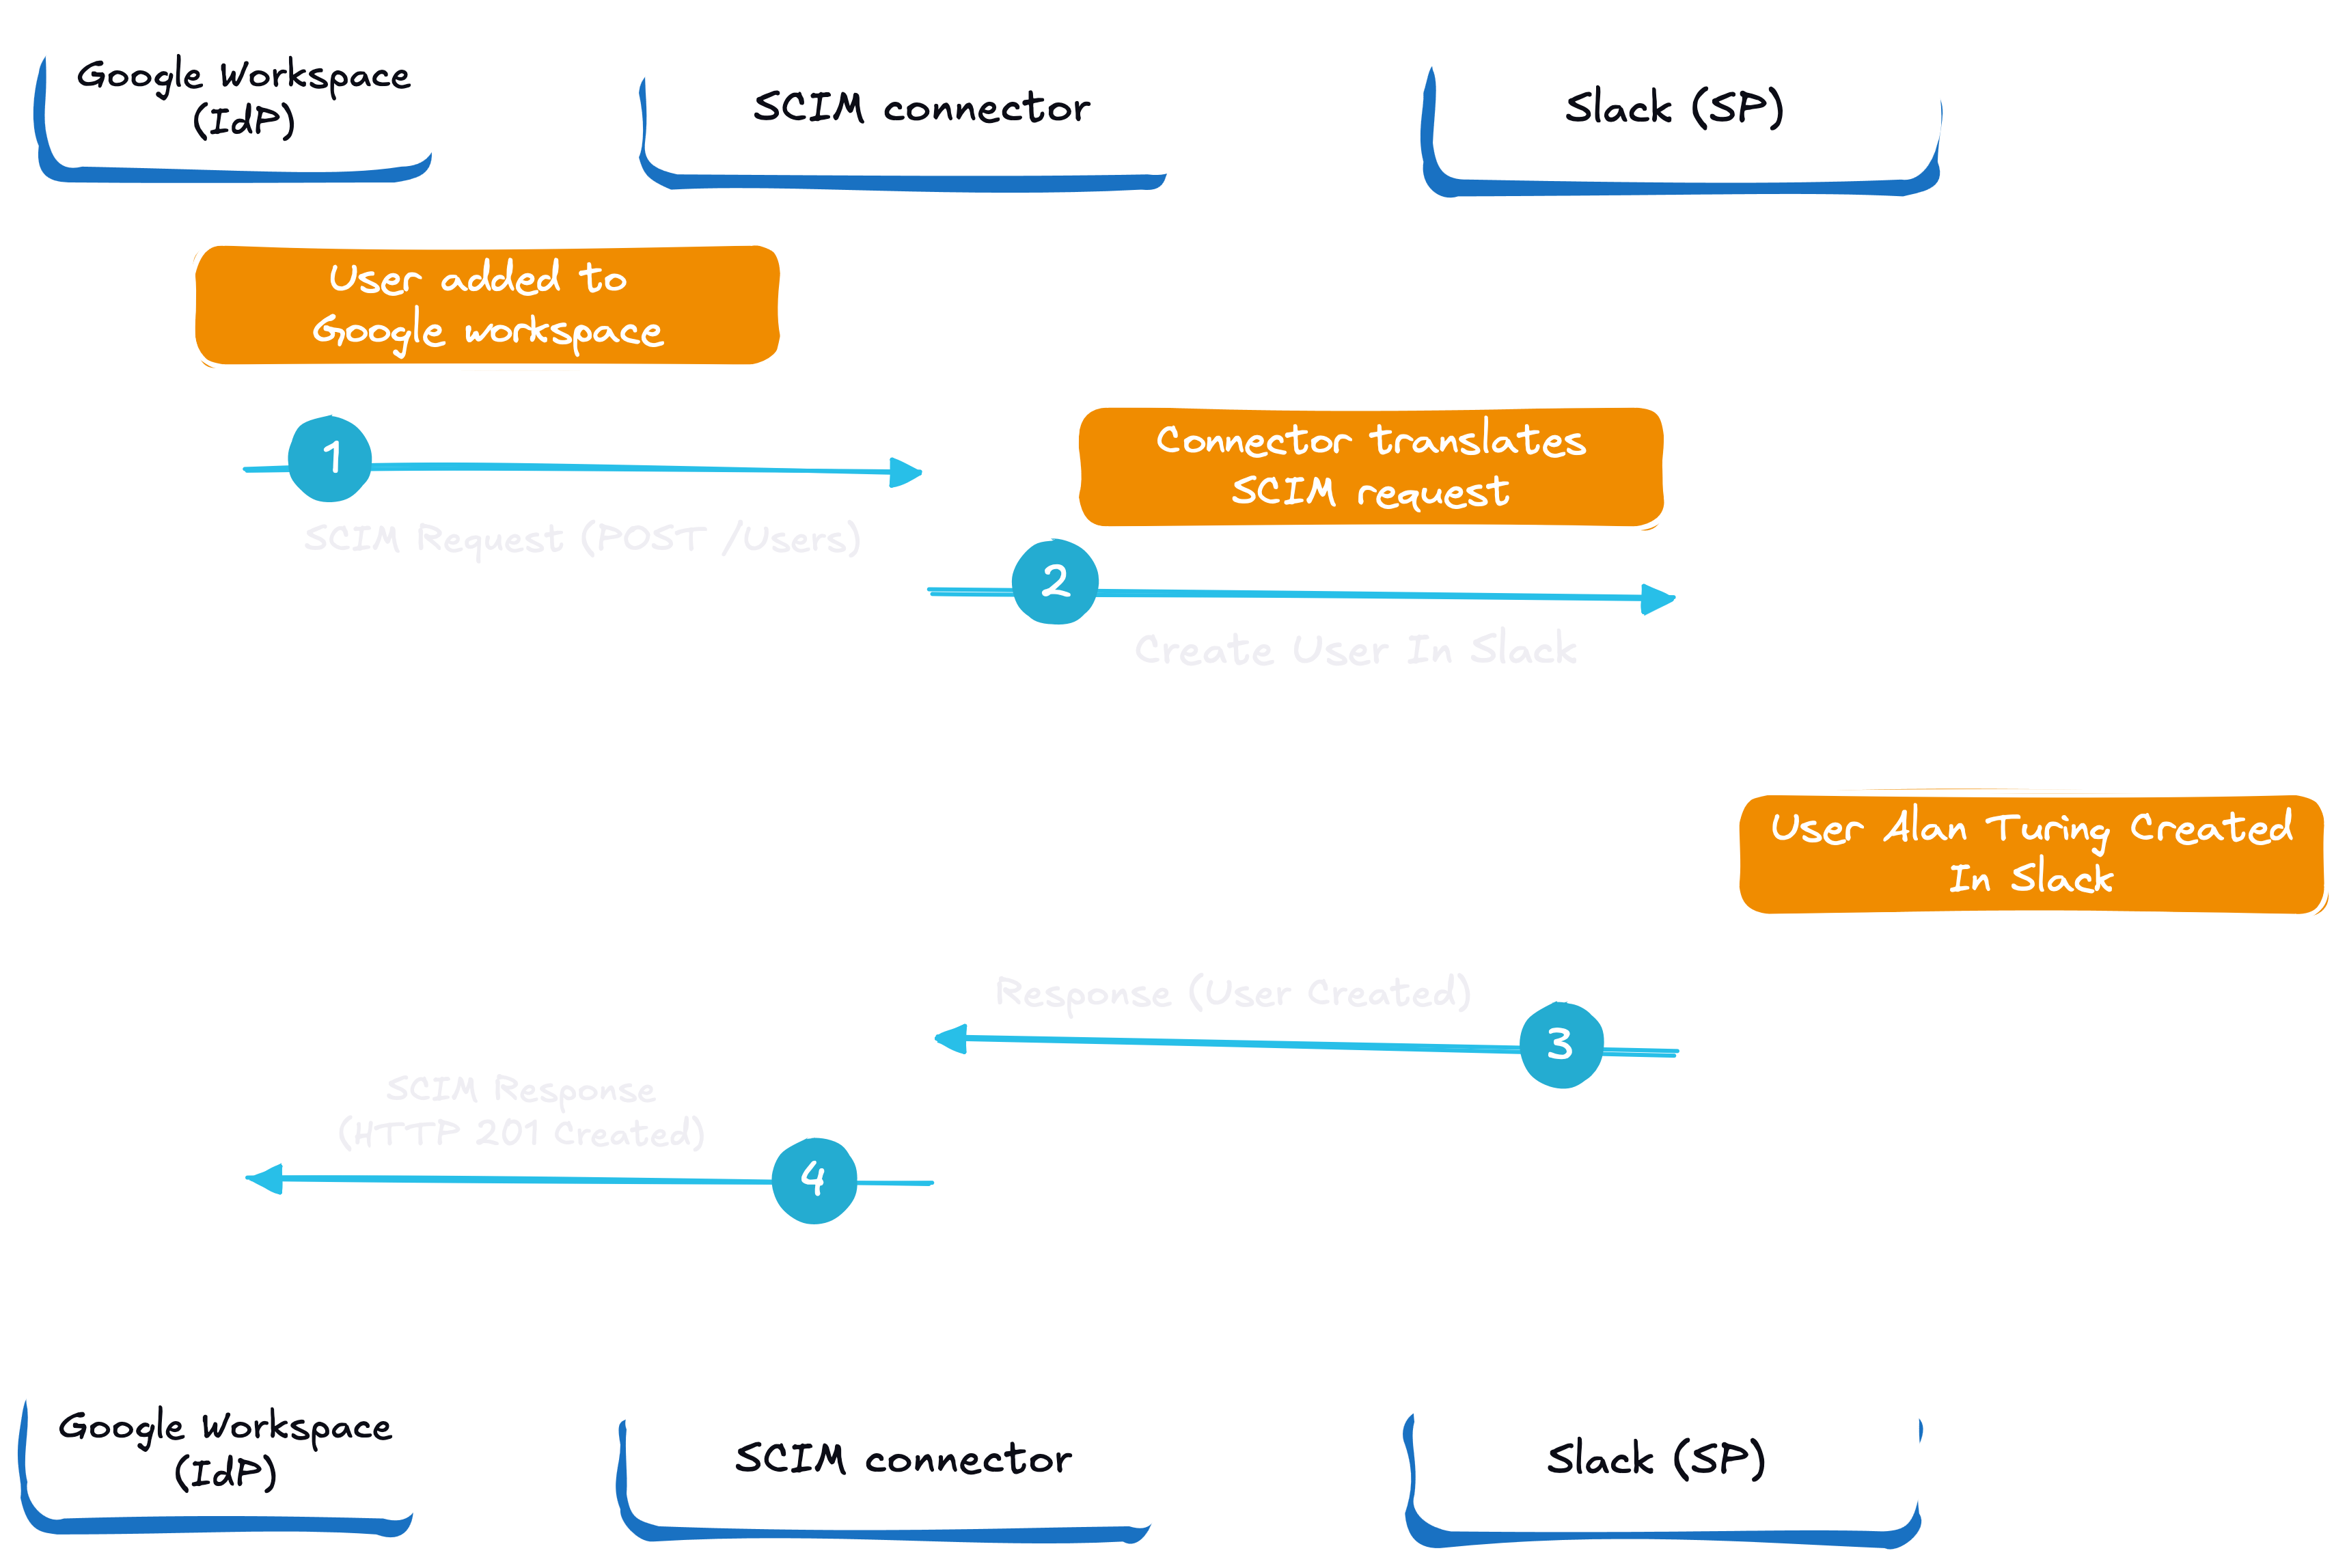
The above image explains SCIM using Google Workspace as an IdP and Slack as SP and how user attributes are synced across platforms.
To dive deeper, check out our comprehensive SCIM guide and directory sync setup guide for step-by-step instructions.
Preparation for SCIM implementation
Before diving into the technical setup, it’s important to lay the groundwork for a smooth SCIM implementation with Okta. Start by familiarizing yourself with the principles of SCIM and how it automates user provisioning and deprovisioning between your identity provider (Okta) and service provider (your application).
A successful SCIM integration begins with configuring Okta as your identity provider and setting up a SCIM server to handle user accounts and user attributes. The Okta Integration Network (OIN) offers detailed resources and best practices for building a SCIM-compliant API server, ensuring your system for cross domain identity management is robust and scalable.
Before you begin coding, decide which Okta provisioning features your integration will support. Common actions include creating users, updating user attributes, and deactivating users. Planning your SCIM API is crucial—define your base URL, choose an authentication method (such as HTTP Header or OAuth 2.0), and establish a unique identifier for each SCIM resource. This preparation ensures your SCIM implementation is secure, efficient, and ready to support automated user provisioning across your organization.
SCIM implementation with OKTA
In this section, we'll walk through implementing SCIM with Okta, focusing on production-grade implementation for B2B applications. The goal is to automate user provisioning and sync with minimal setup.
We’ll build a Python-based web app that stores users in a local database. To make this accessible over the internet, we’ll use Tailscale to expose the app securely. Next, we’ll configure an Okta SAML app, enabling provisioning for seamless SCIM integration. The Okta application is configured to automate user provisioning and synchronization with the custom app, streamlining group and membership management. Finally, we’ll add a new user in Okta and watch as that user is automatically reflected in our local app, demonstrating the power of SCIM.
This example will demonstrate how large teams can be seamlessly onboarded, deprovisioned, and managed within your application, reducing the burden on IT administrators.
You can find the code for this sample application in this repository.
Building The Python app
The first step is to build the Python application. This is a simple Flask application with a front end and SQLite as the data store. The application exposes SCIM-compliant REST endpoints for performing various CRUD operations.
First, we import all the required modules and configure the SCIM_BASE_PATH, which will be appended to the root URL for all the API calls.
Below is the User schema that we store in our database.
We store the userName, firstName, lastName, email, and an auto-generated ID.
For security (and for configuring Okta), we add functionality to validate tokens to ensure that only authenticated requests can access the endpoints and modify the data. The authentication process uses an access token, which is required for API authentication between Okta and the app. There’s also a token-gen.py file that generates a dummy token you can store as an environment variable and in the token. It’s understood that this shouldn’t be done for a production setup.
We then create various endpoints for performing various operations.SCIM uses the standard REST methods to synchronize users. Here’s a method for creating a user with a POST request.
REST methods are crucial in this process as they provide a standardized way to perform CRUD (Create, Read, Update, Delete) operations on user data. In this case, Okta will reach the endpoints in our application and perform updates or sync whenever necessary. For instance, it does a GET call to get a list of users to validate the list of users at its end and updates the list accordingly. This setup enables seamless API integration for automated user provisioning between Okta and the application.
Similarly, we add all the required methods for adding, updating, and deleting users. To keep it simple, we don’t have any methods for dealing with groups. Have a look at the complete app.py file here.
We then create an index.html file under the templates folder, which is just the front end and lists everything in the database. While it’s unnecessary, having a dashboard where you can see the list of users rather than always running a command is easier.
With this, our Python application is ready to integrate with Okta.
Configuring Tailscale
Since our Python application is running locally, we need to expose the application to the internet so that Okta can access it and send requests. This is possible with many tools, and we’ll be using Tailscale. Tailscale sets up a reverse tunnel that allows us to access the server on our machine via the internet securely.
Set up a Tailscale account and configure your machine. You can follow their installation guide to get started in 4 simple steps.
Once installed, run your Python application using python app.py. In a new terminal window, execute tailscale funnel 5000. This will expose your application to the internet and give you a public URL. Note: don’t close the terminal window.
We’ll use this URL to configure Okta.
Configuring Okta
Note: You must have admin access to your Okta account to perform these actions.
To configure Okta, you first need to register for a developer account. The free developer account allows you to create a certain number of applications and users, which is perfect for building POCs and demos.
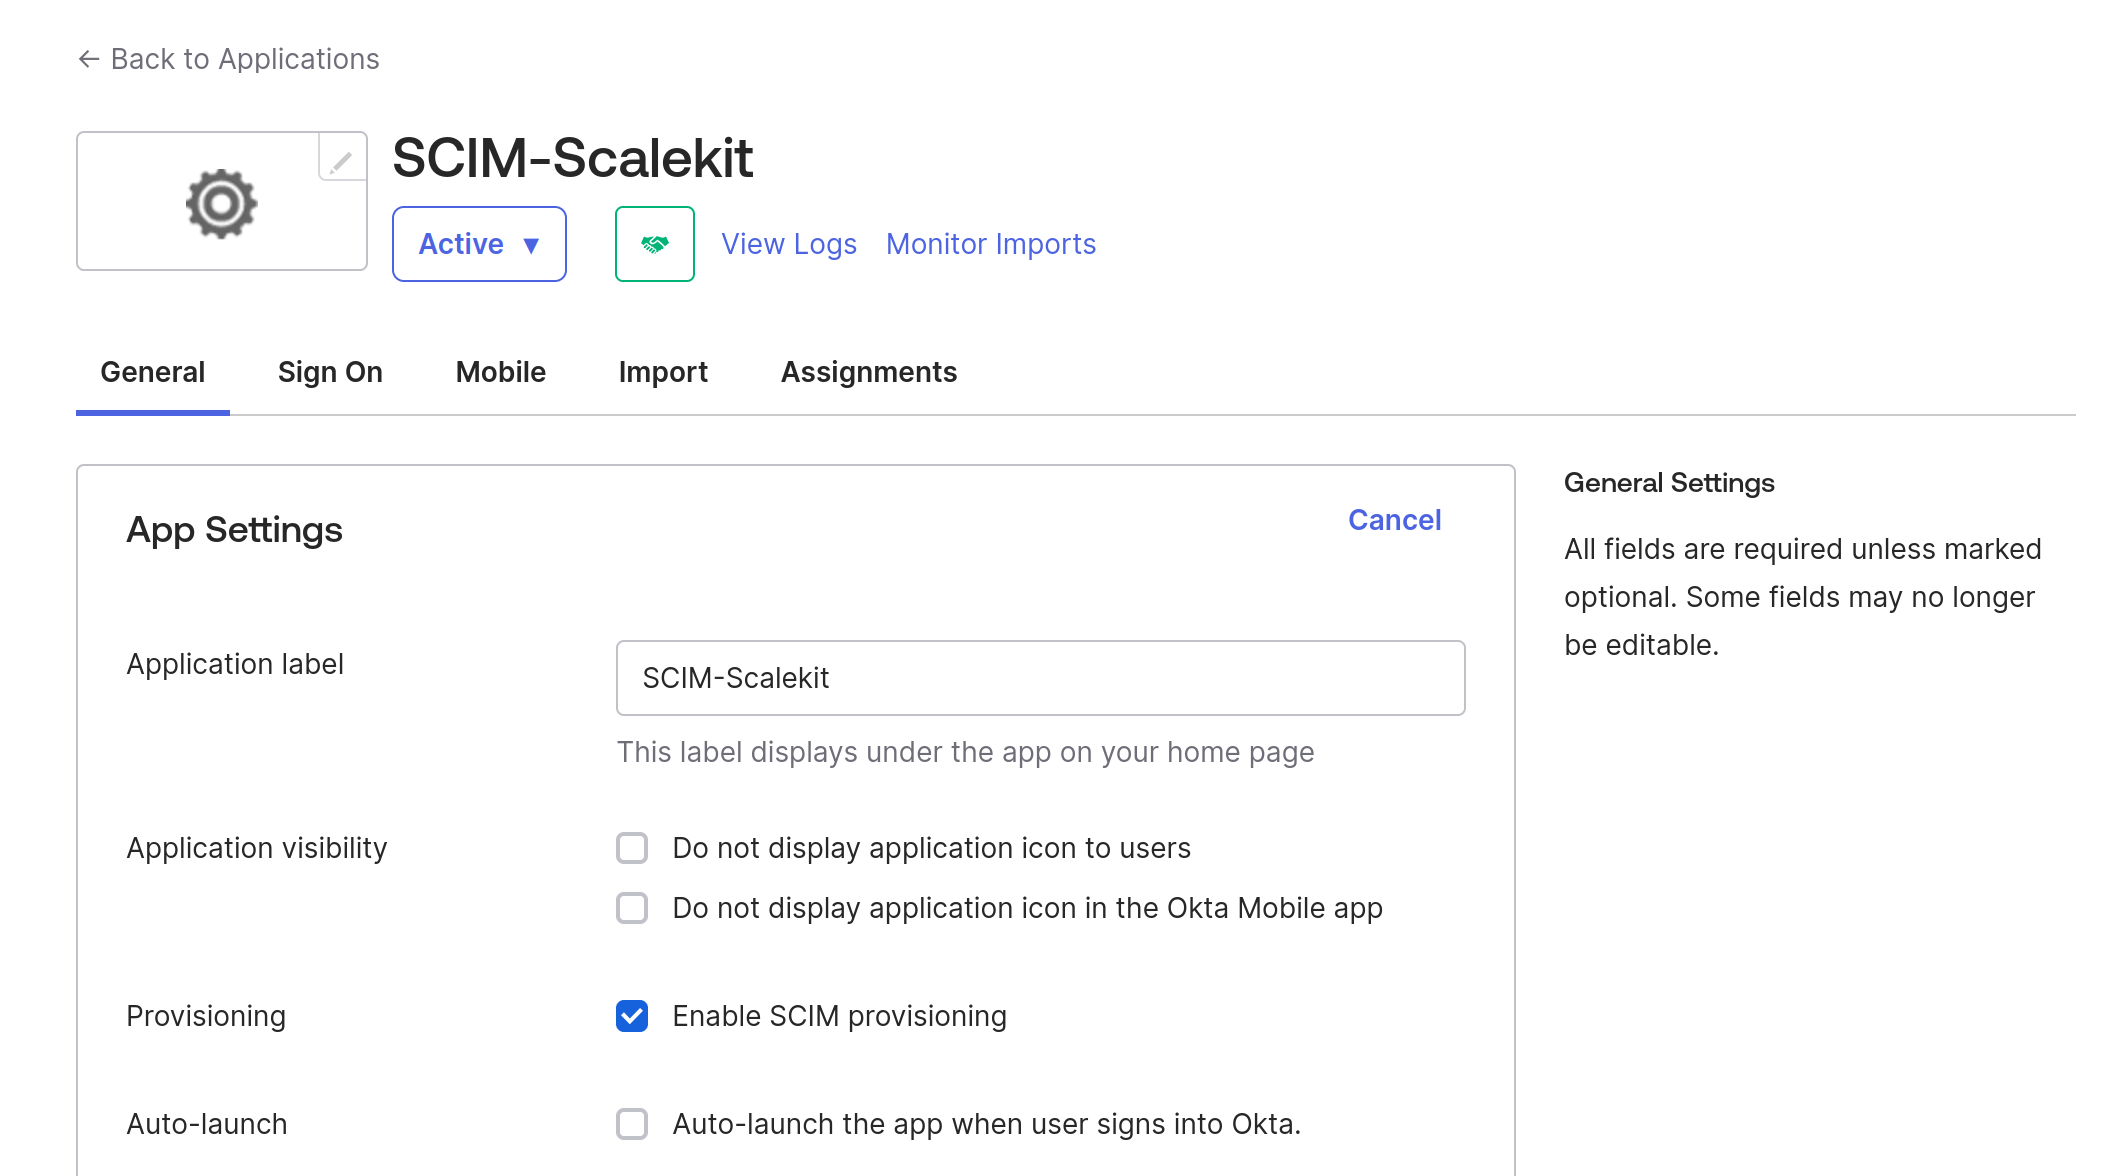
After registering, navigate to the app settings and open the settings menu in the Okta admin console. When creating a new application, make sure to configure the SAML settings as part of the setup.
To enable provisioning, go to the provisioning tab and select SCIM as the provisioning method. Begin enabling SCIM and Okta SCIM integration for your application. Click Configure API integration to set up the connection parameters. If you need to modify any configuration options, click Edit, make your changes, and then click Save to apply them.
Next, click Test Connector Configuration to test the SCIM connector. Enter and test API credentials. After a successful test, a verification message will appear confirming the setup.
Within the provisioning tab, enable actions such as update user attributes, profile updates, and deactivate users to manage user account lifecycles. For group management, configure Okta groups and pushed groups to automate group provisioning and synchronization.
By following these steps, you will have completed enabling SCIM and Okta SCIM integration for your application.
Create a User
Log in to your Okta account and navigate to “Directory” -> “People” and click on “Add Person”.
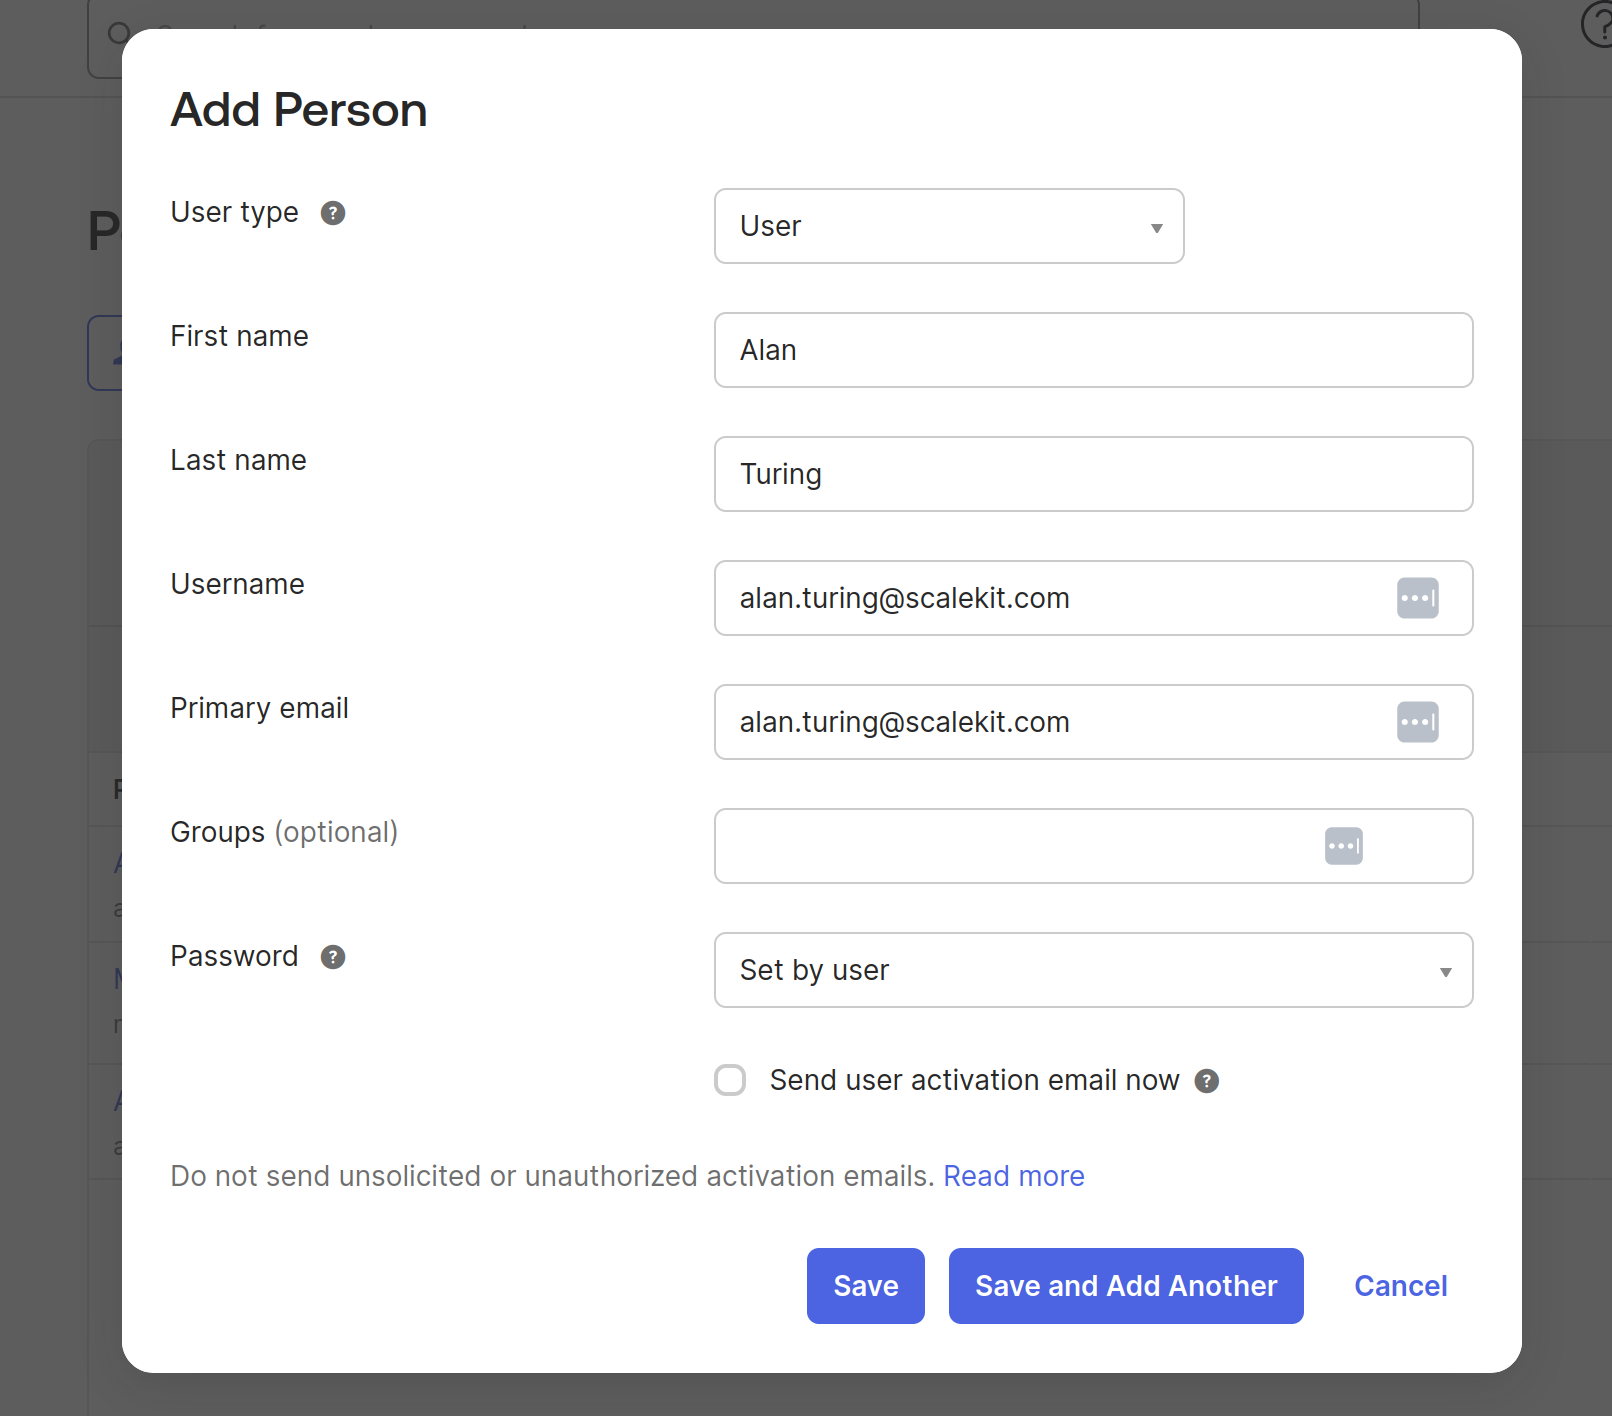
Fill in the details like first name, last name, username, and email, and save the user.
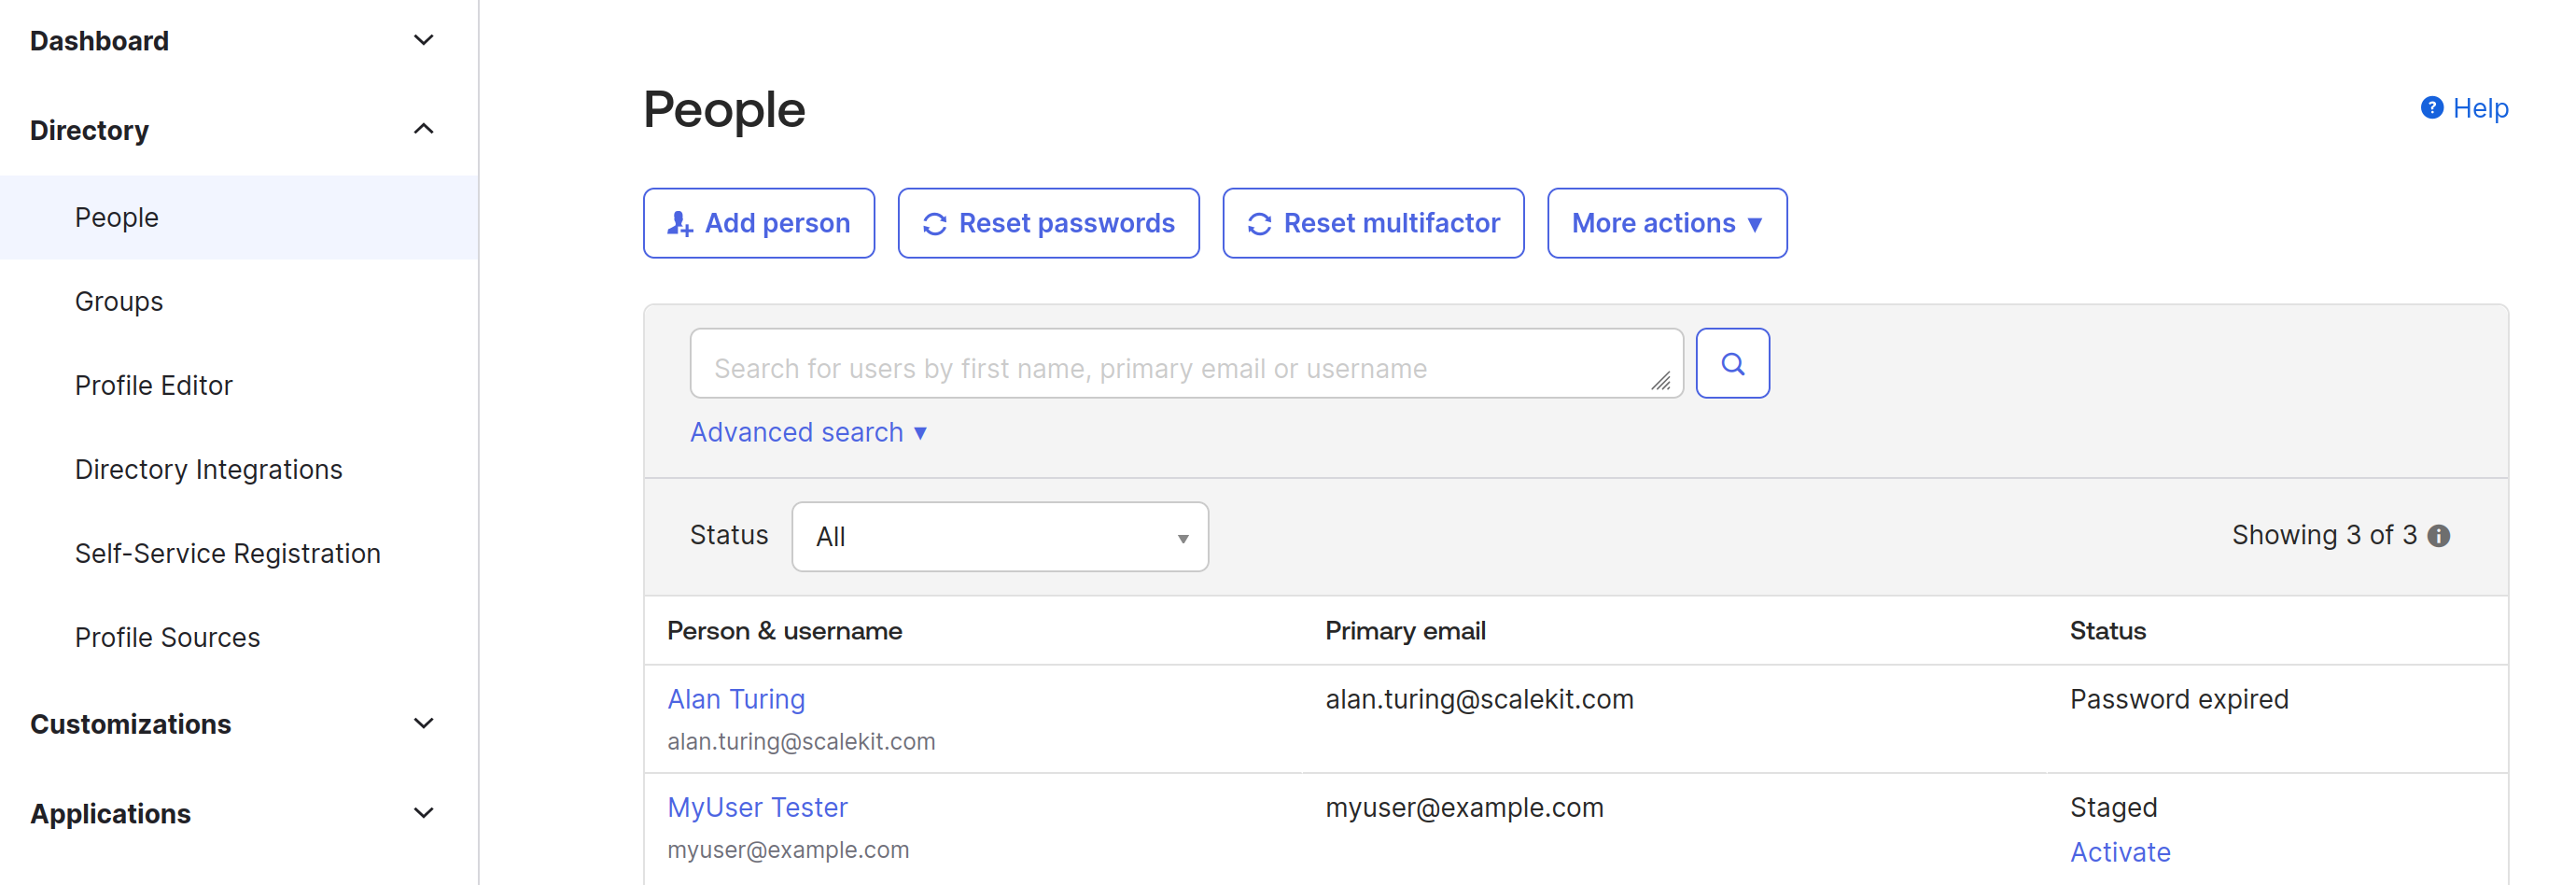
Once the user is created, we can assign it to the application.
Create an application
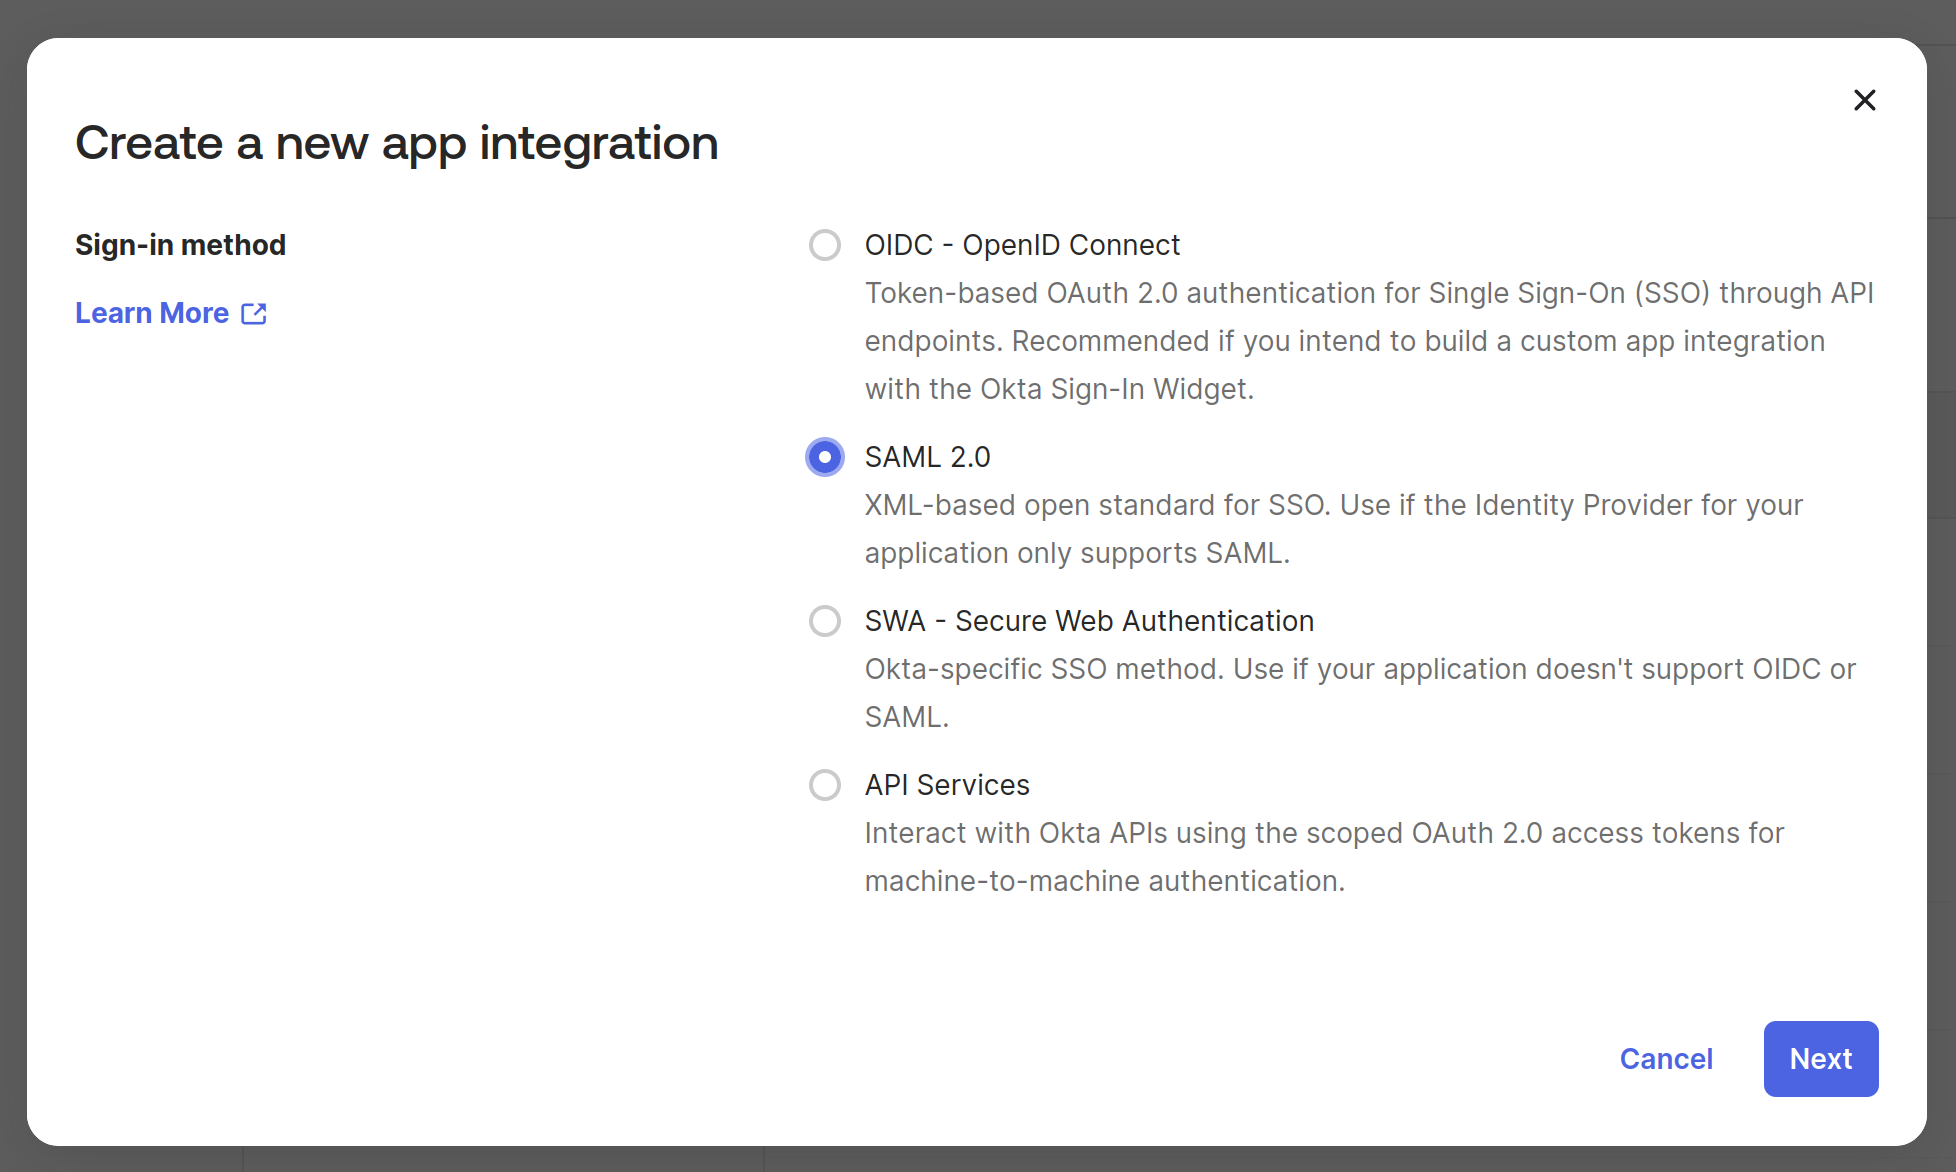
To create an application, navigate to “Applications” in the same dashboard and click on “Create App Integration.”
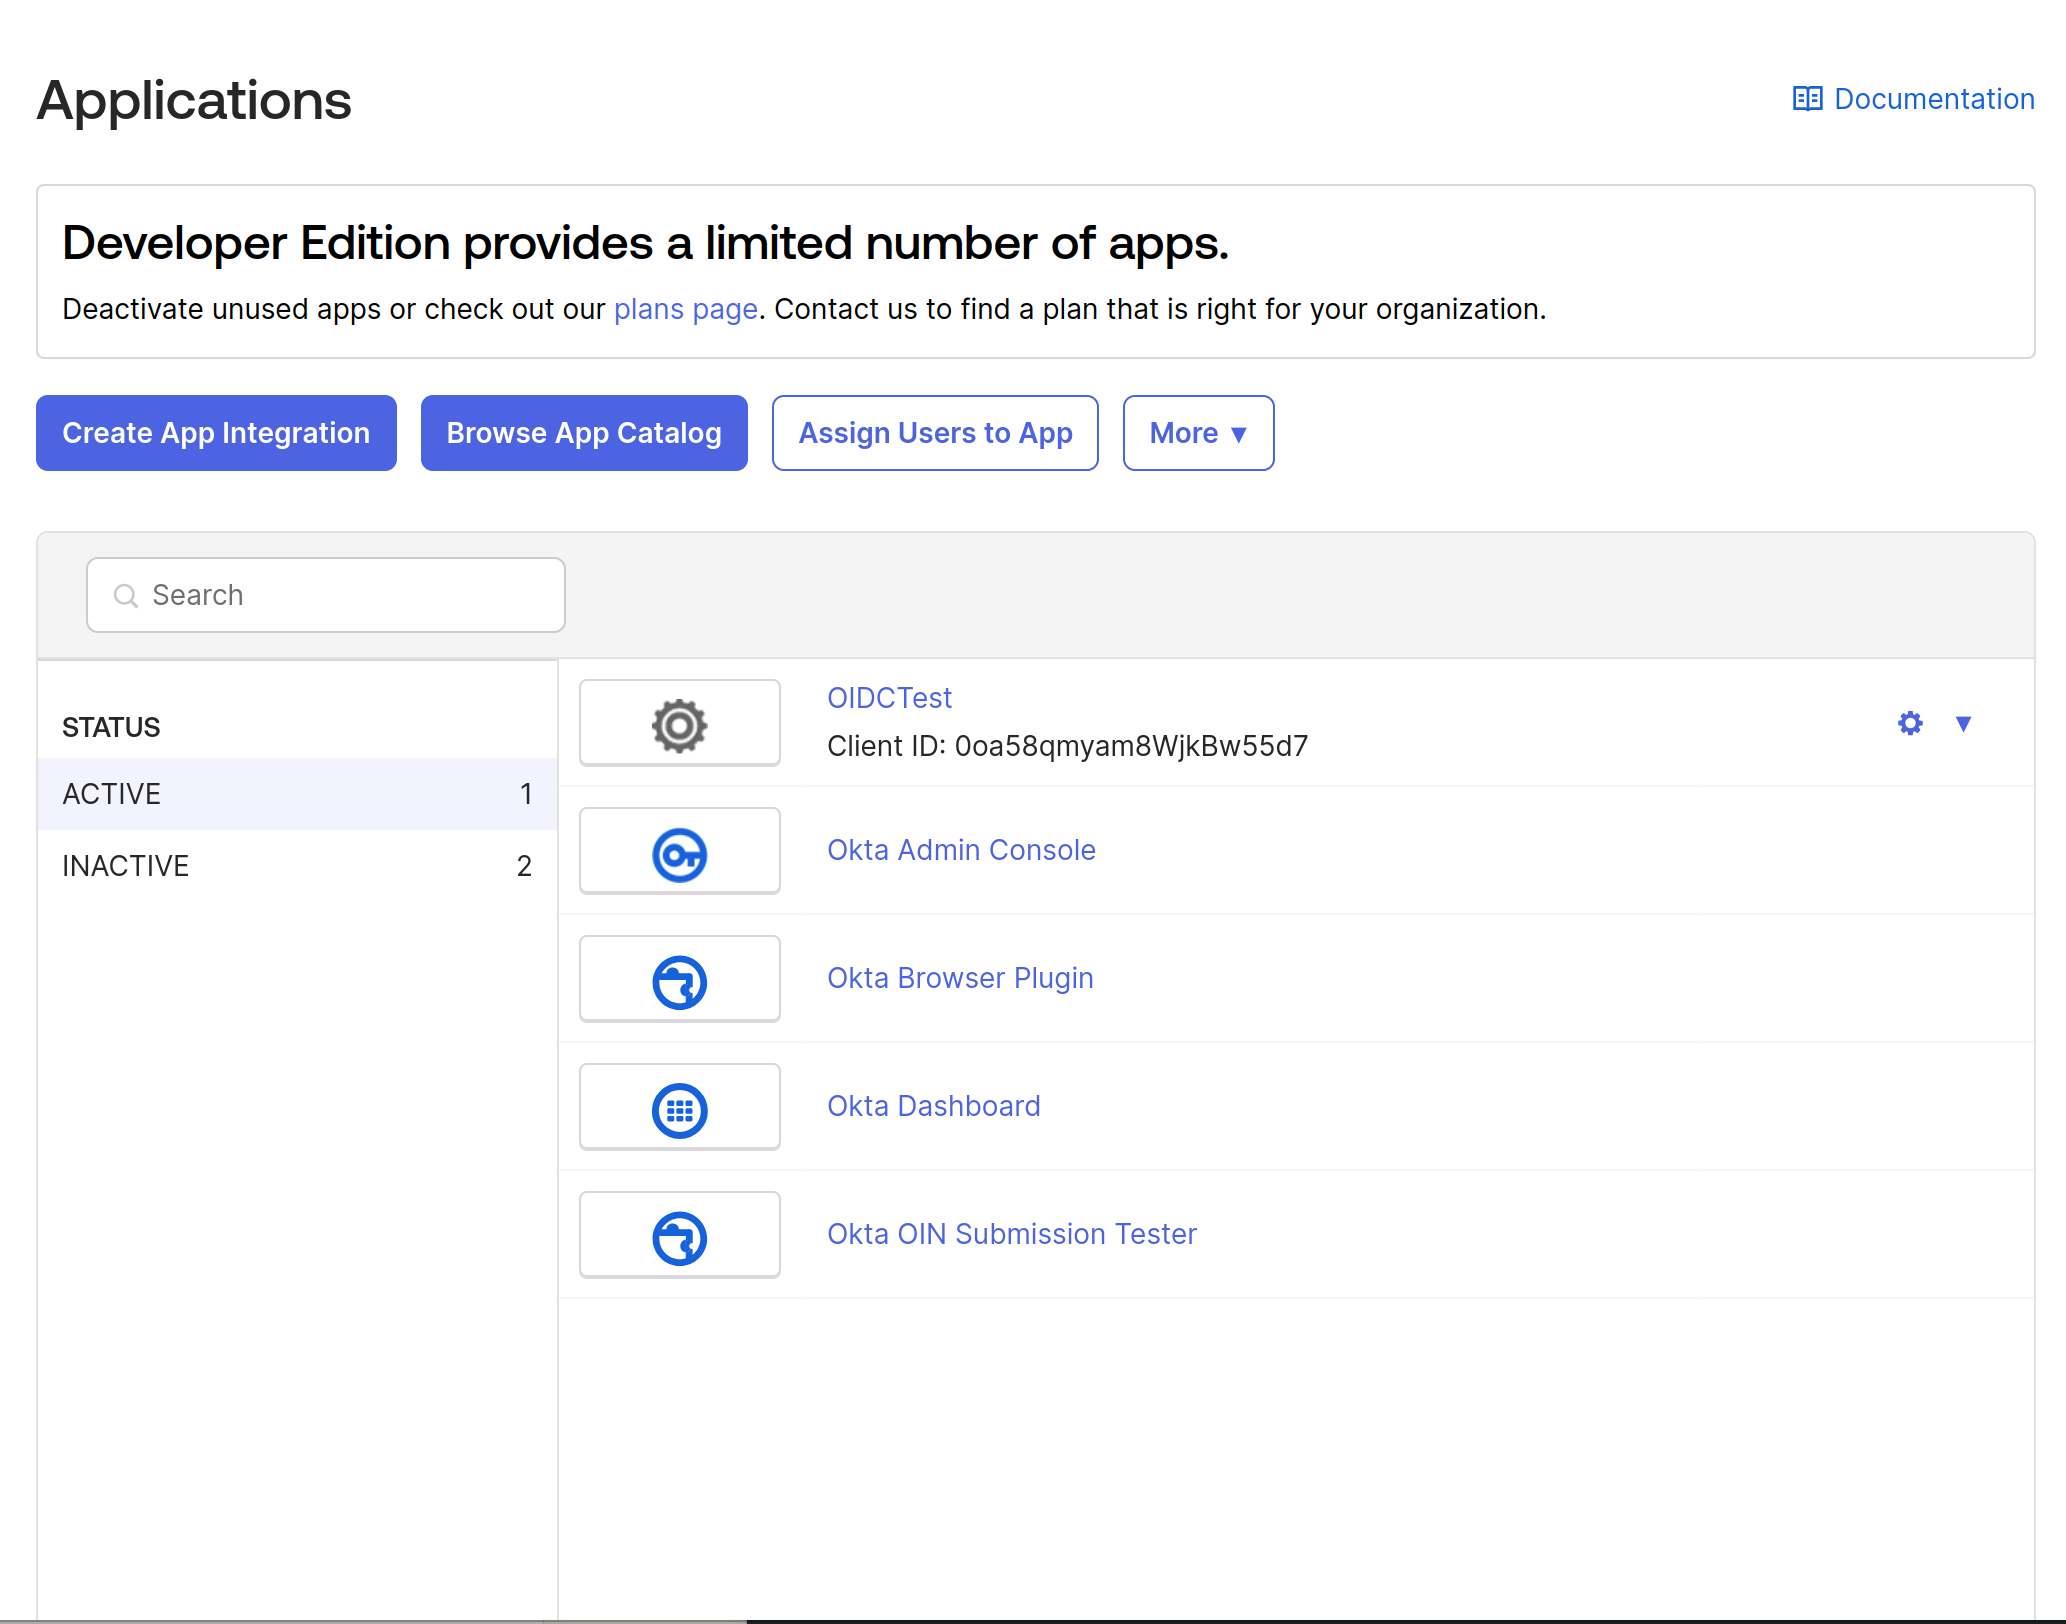
It opens up a dialog box for you to choose the type of application. In this case, we’ll choose SAML.
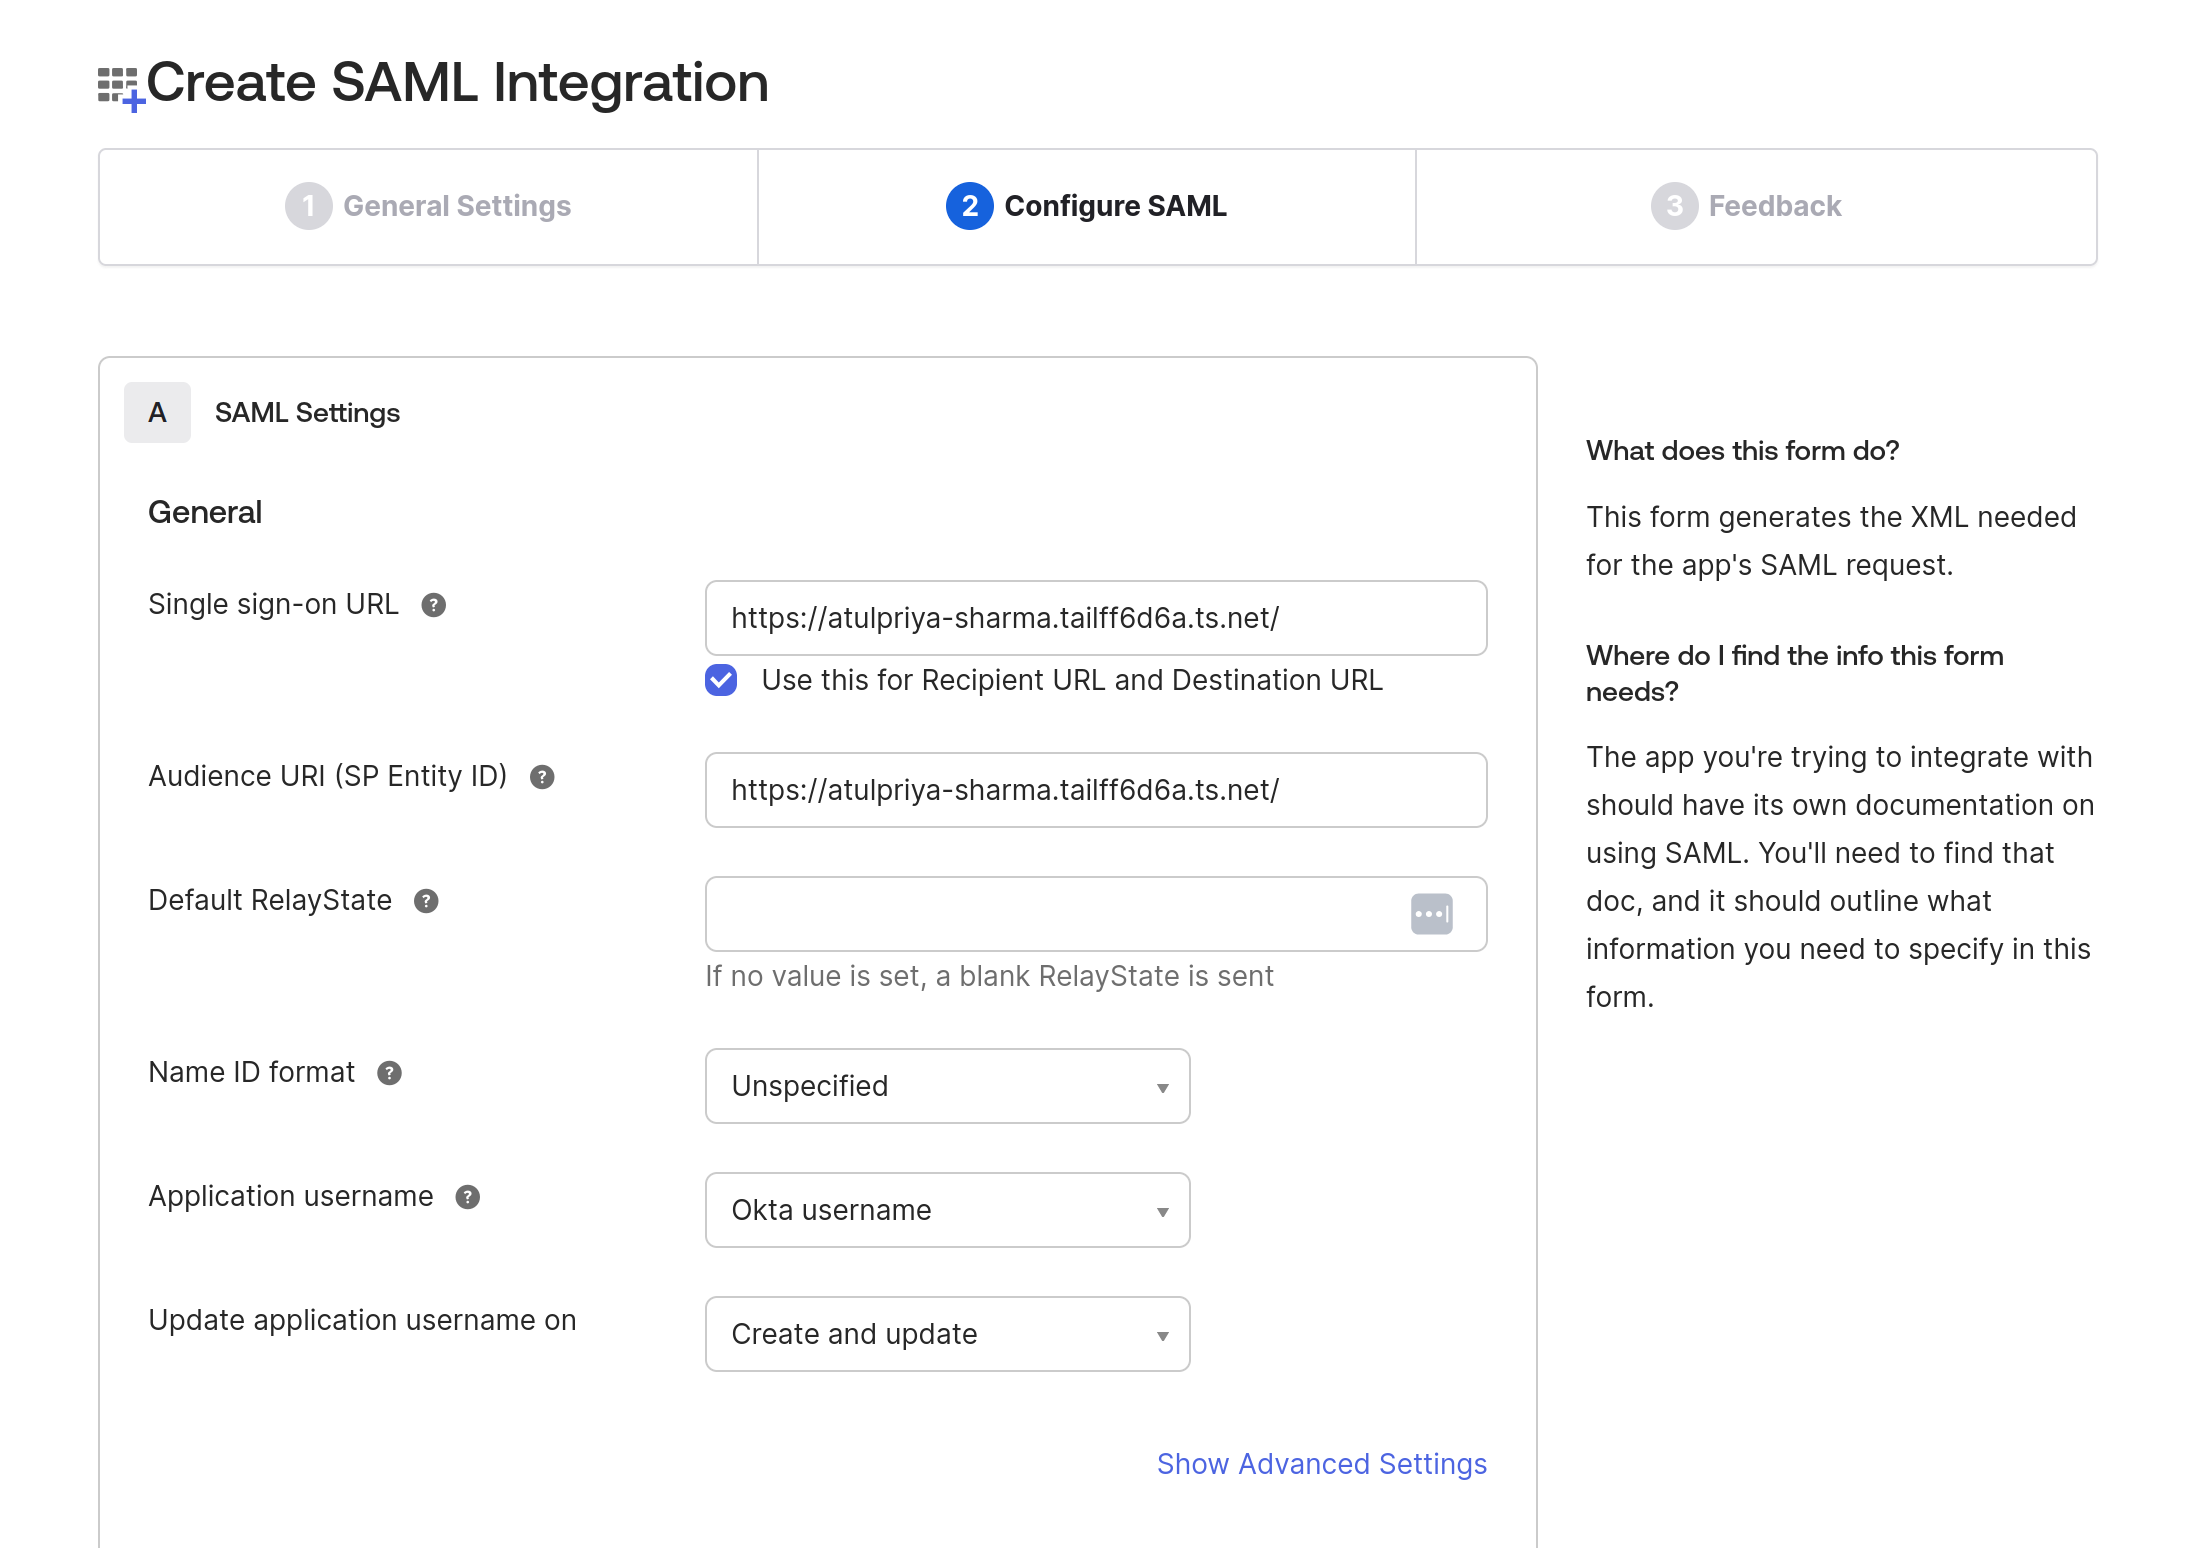
Provide a name for the application and click “Next.” Provide the Single Sign-On (SSO) URL and the SP Entity ID. We’ll use the application's tail-scale URL here. Please note that we are not going to configure SSO. We’ll just showcase SCIM and directory sync capabilities.
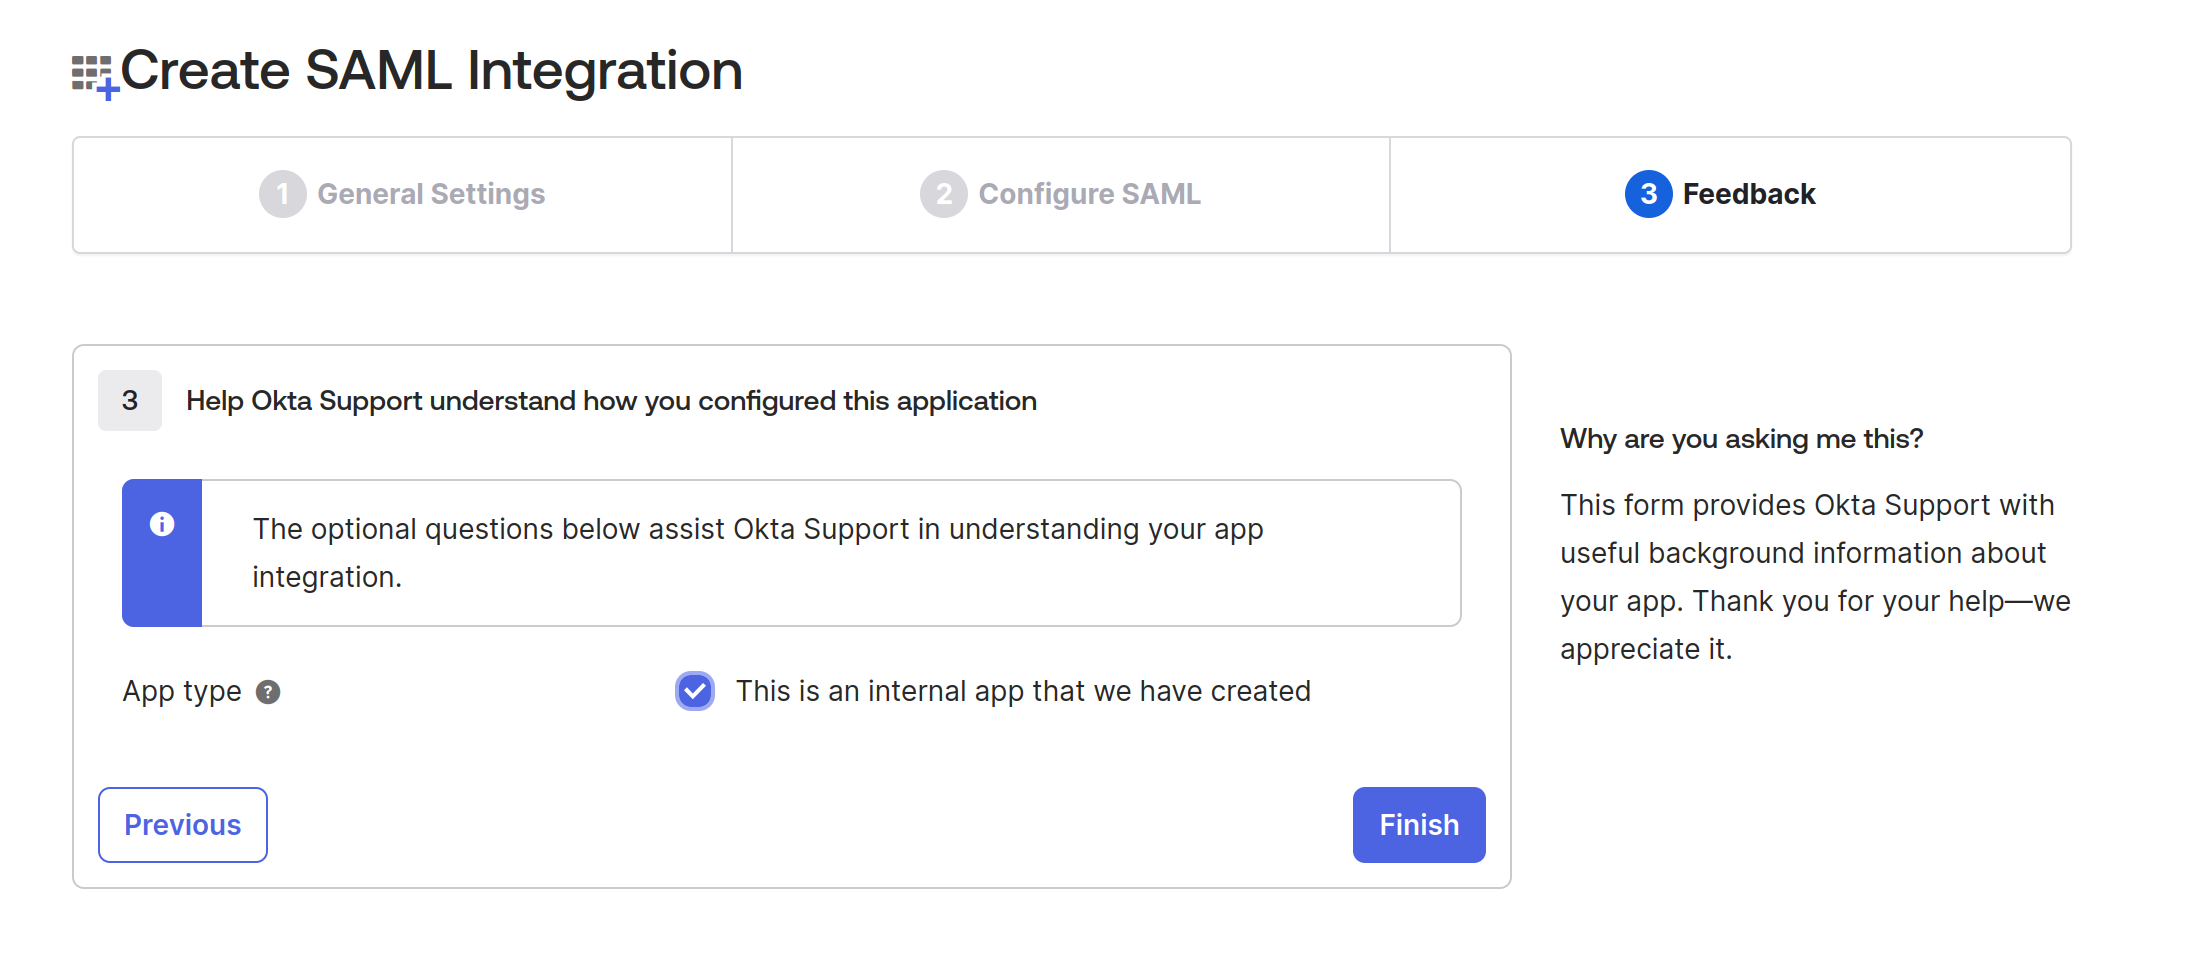
Update that this is an internal application and Save it. This will create a new application for you.
Configure directory sync
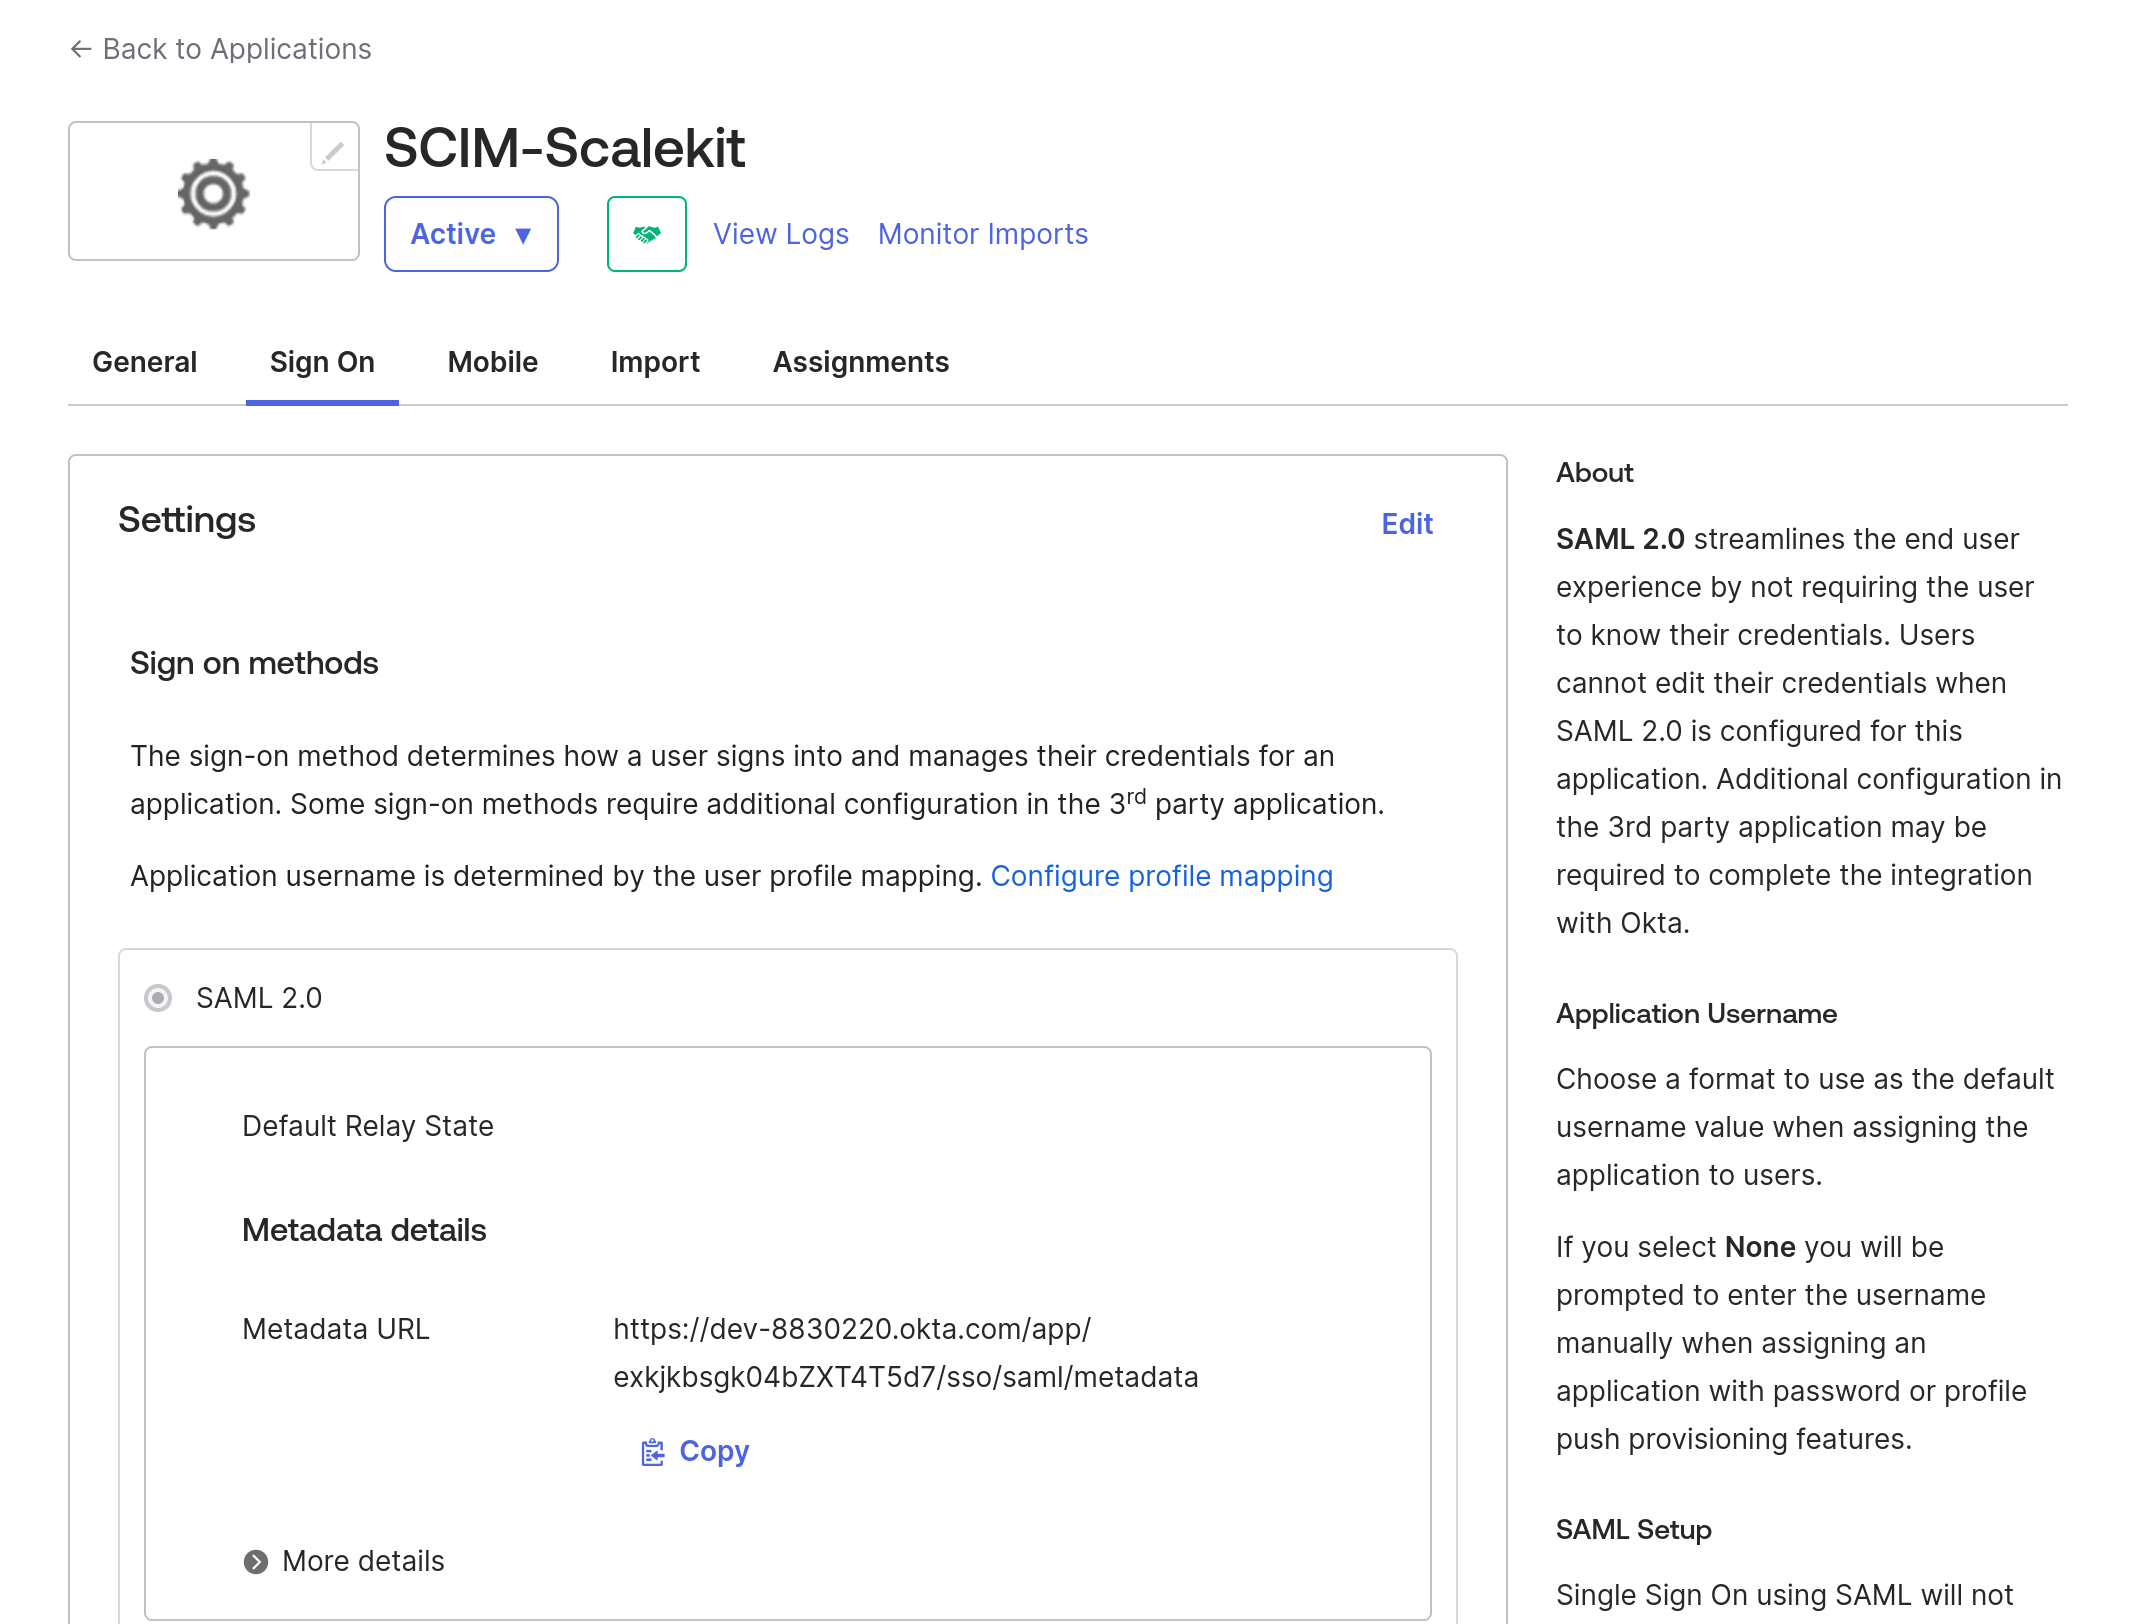
After you’ve created the application, navigate to the “General” tab and check the “Provisioning” checkbox to enable SCIM provisioning.
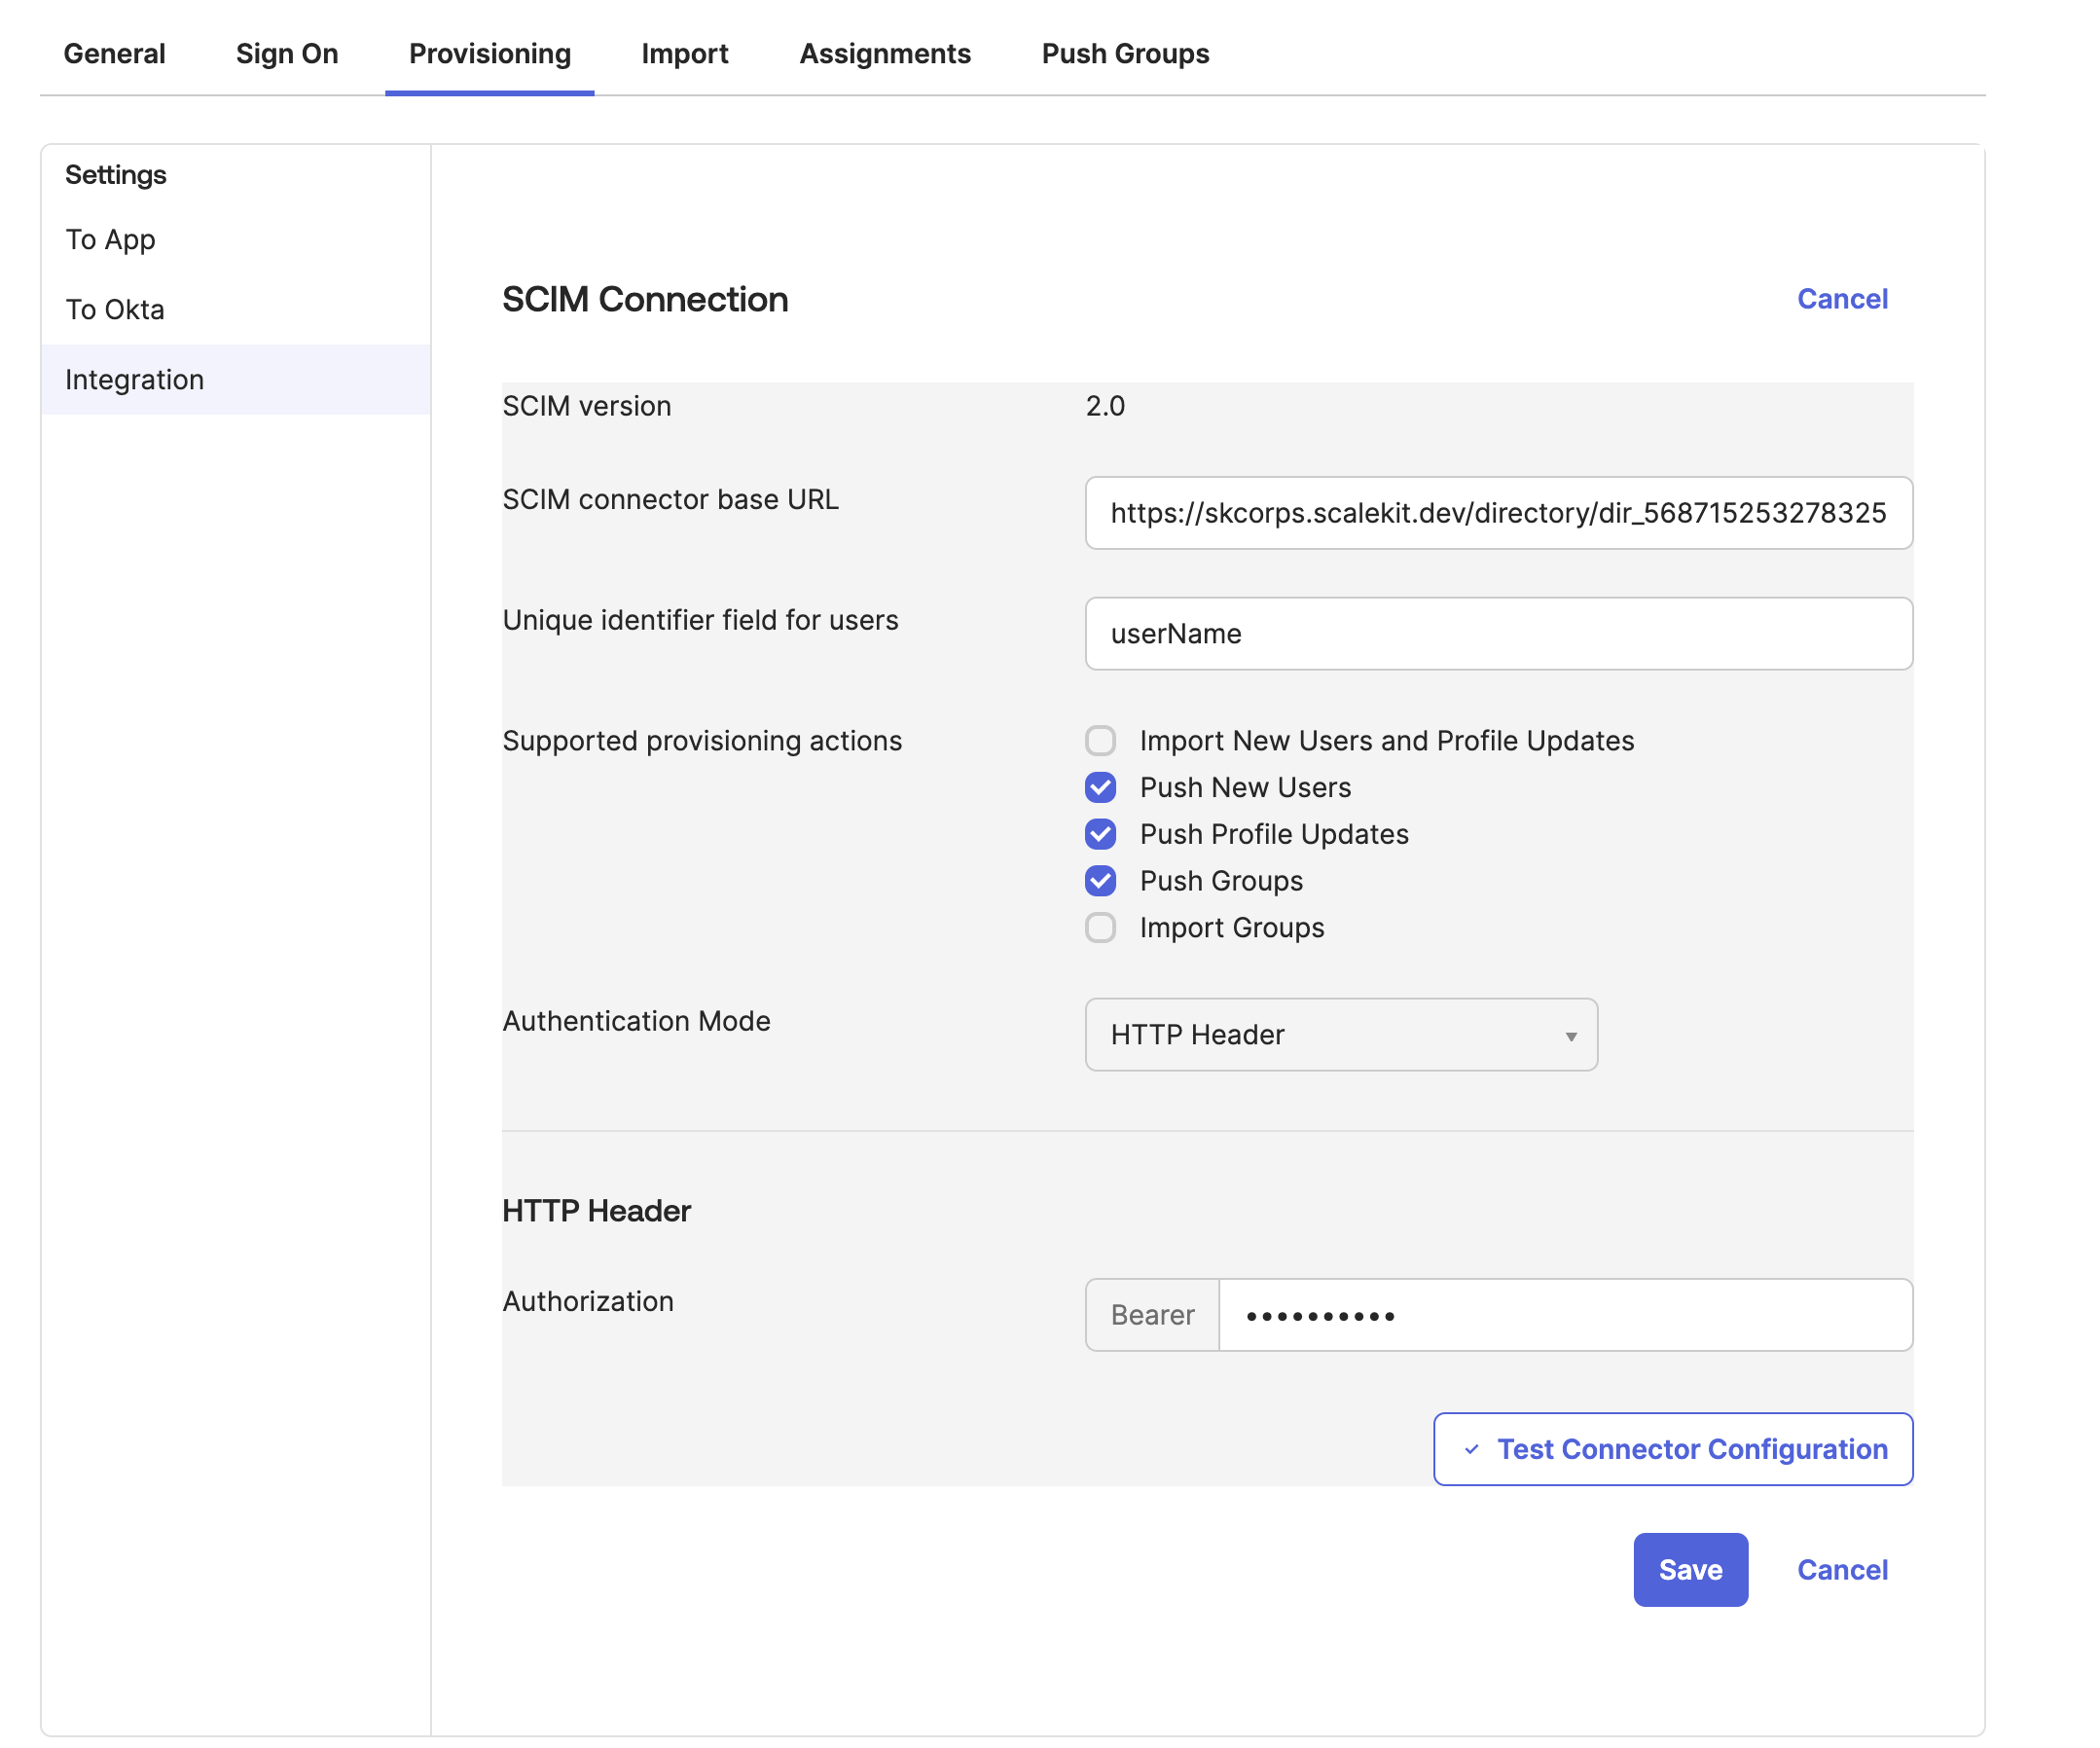
You’ll now see a “Provision” tab. Navigate to it to configure directory sync. You need to provide the following details:
- SCIM Version: v2
- SCIM connector base URL: Provide your application's URL. In our case, it’s the Tailscale URL and the SCIM_BASE_URL we configured in our app.py.
- Supported Provisioning Actions: This is the list of operations you want to enable as part of SCIM. We’ll check all of them, though we only have user-related endpoints.
- Authentication mode: It provides you with different authentication options. We’ll choose HTTP Header.
- Authorization: Since we chose the authentication mechanism as HTTP Header, we have to provide a token. Paste the same token that you configured in your app.py. This is not recommended for production scenarios.
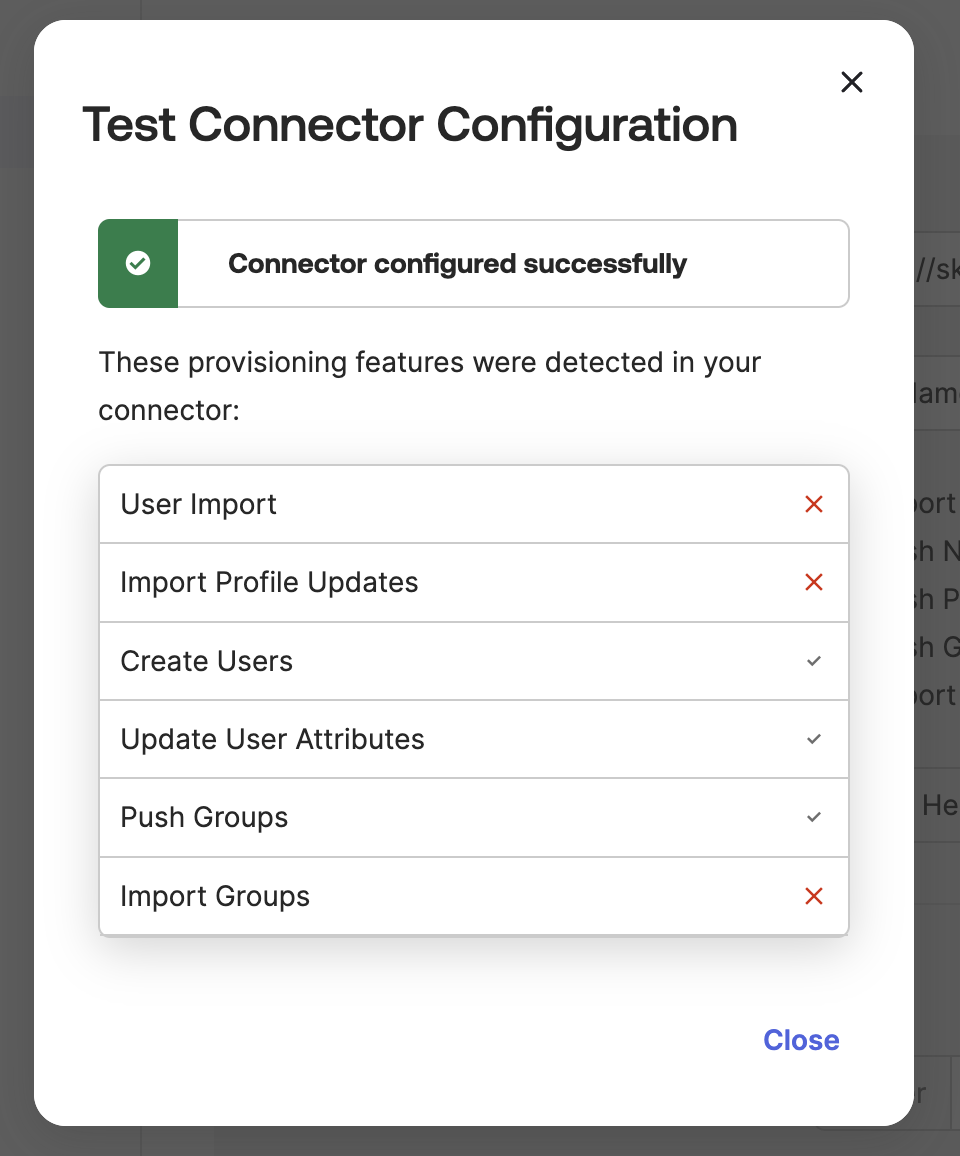
After entering all the details, click on “Test Connector Configuration”. If everything is configured correctly, the dialog box “Connector configured successfully” will display, with a checkbox for all the provisioning actions we chose during configuration.
After that, click on the “Activate” button to enable the integration. At this point, we have successfully integrated Okta’s SCIM provisioning with your custom Python application.
Testing the integration
To test the integration, navigate to the “Assignments” tab and click on “Assign” -> “Assign to People” option.
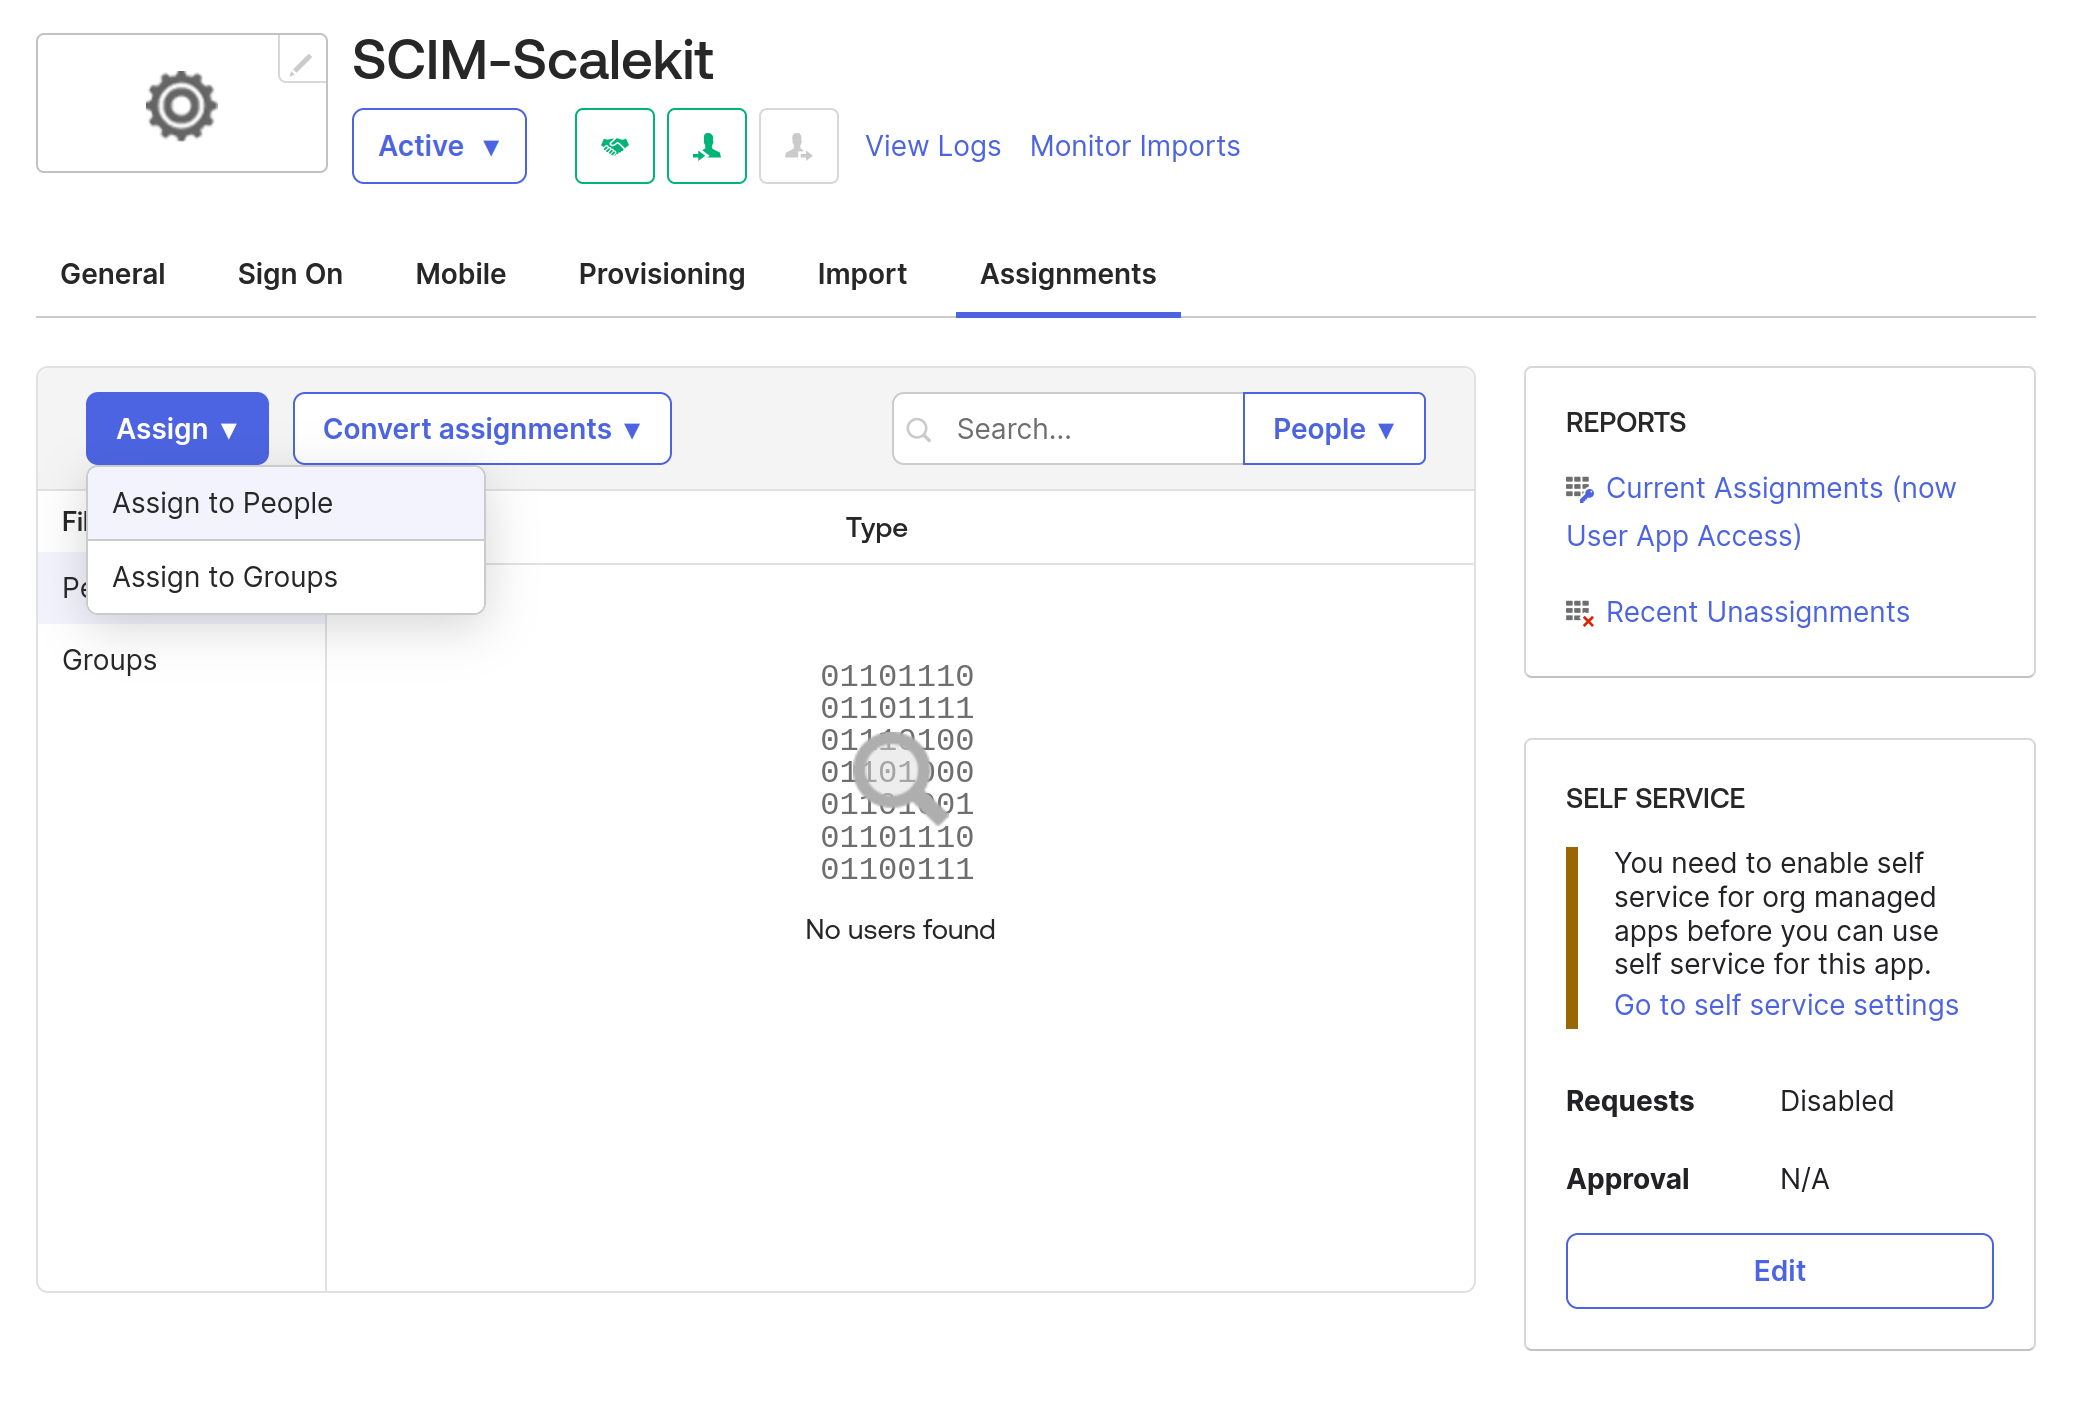
It will open the list of users. Choose the user we created earlier, Alan in this case.
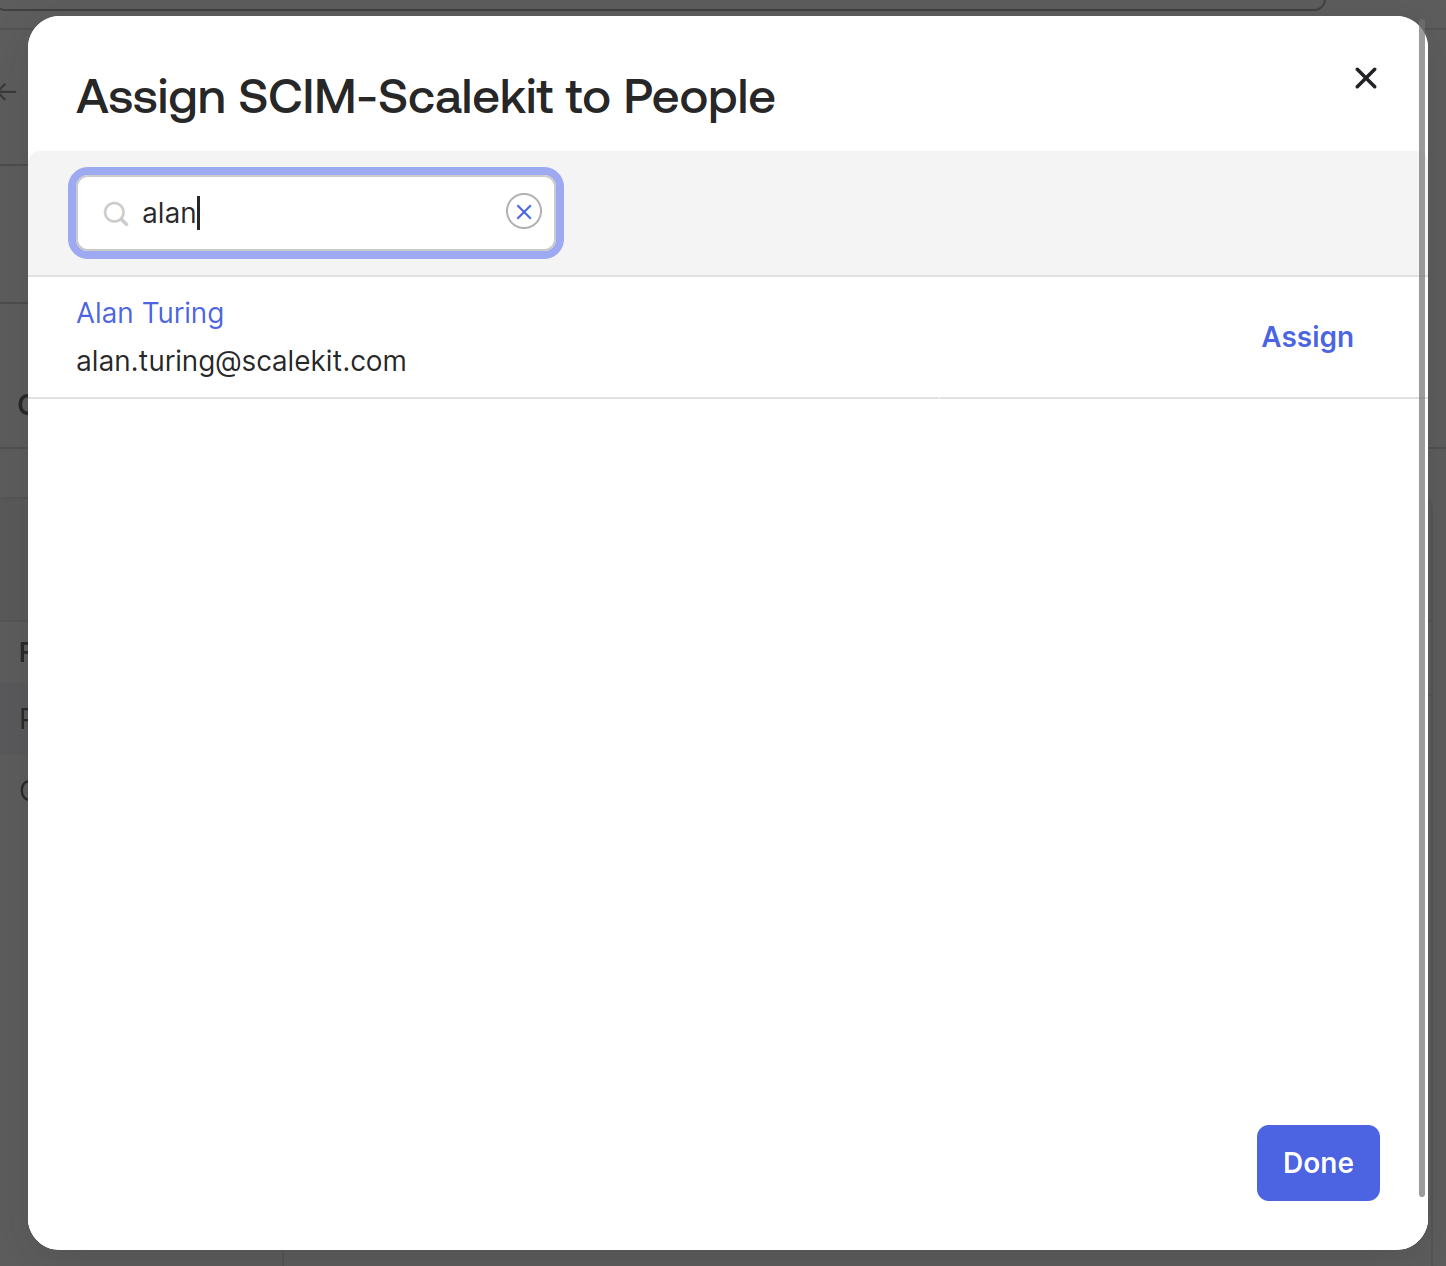
Click on “Assign”, this will open a dialog box for you to provide more details for the user. You can validate if the existing details are correct and click “Done”.
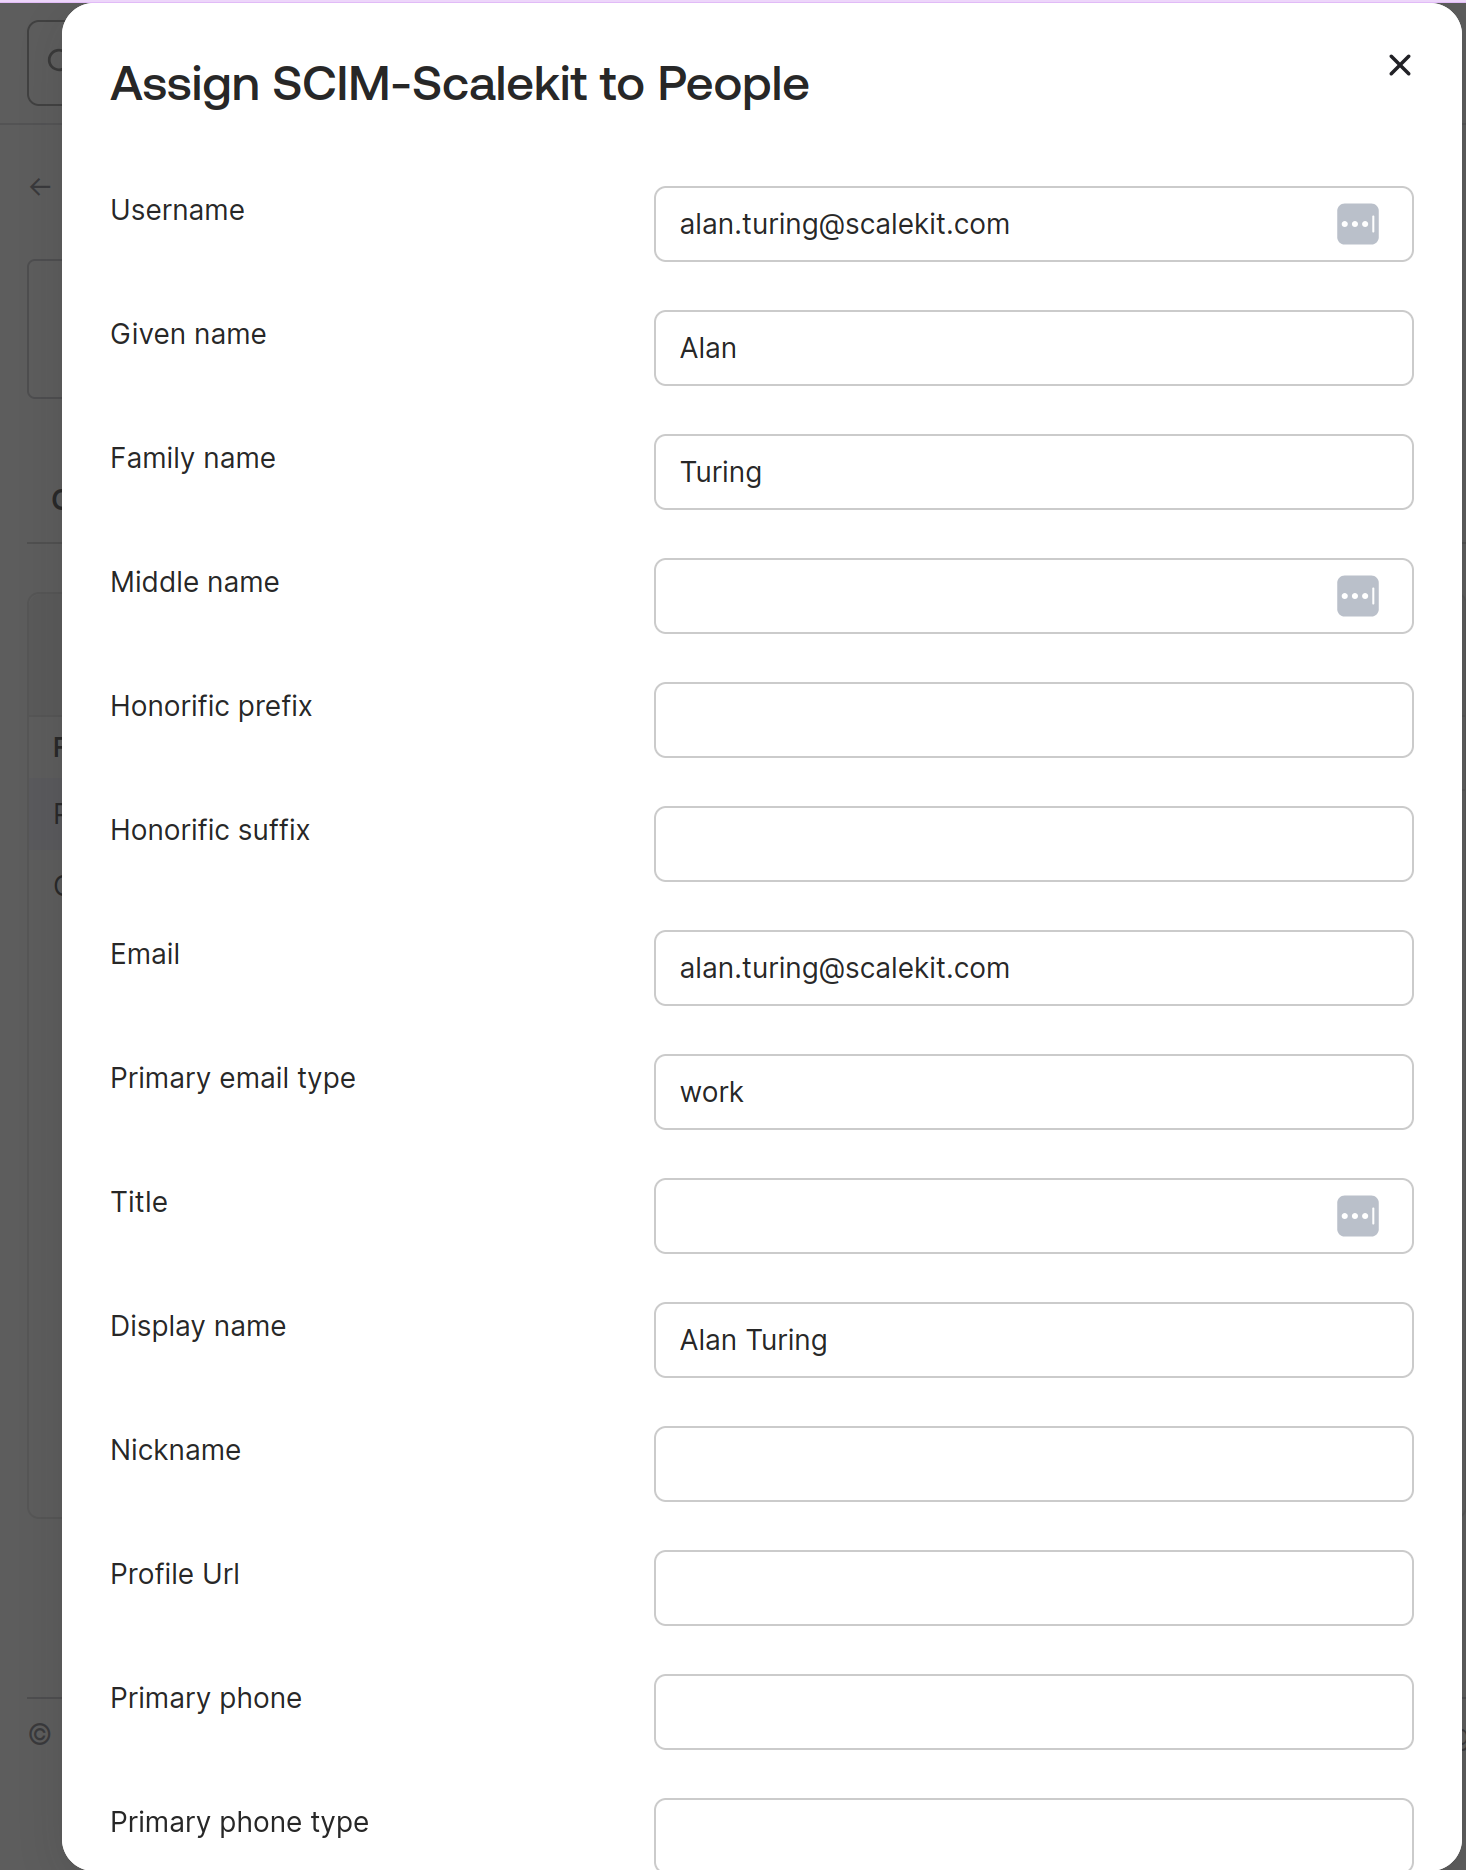
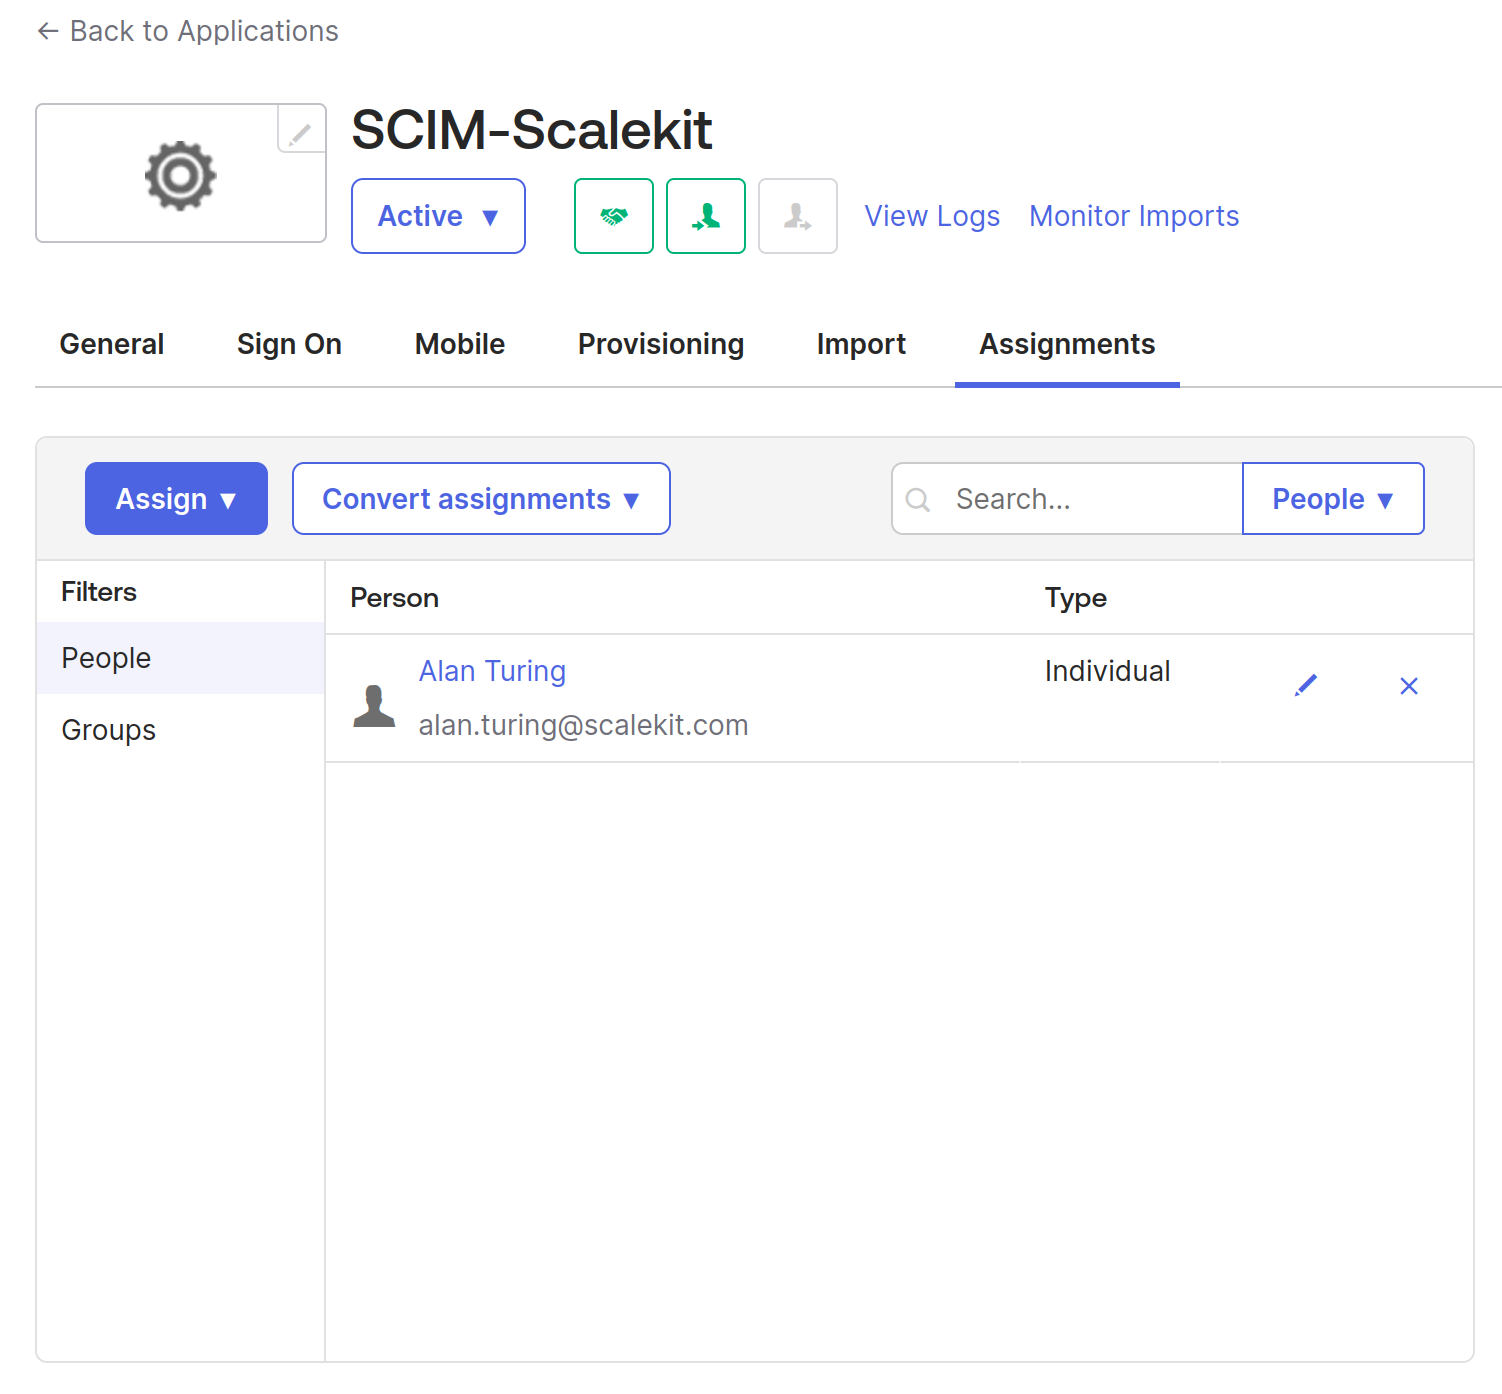
You’ll see that the user “Alan Turing” is successfully assigned to the application.Click on “Assign”, this will open a dialog box for you to provide more details for the user. You can validate if the existing details are correct and click “Done”.
At the same time, navigate to the Python application's logs, and you’ll see the following request sent by Okta to your application.
This is a POST call made to the application with a SCIM object that includes the user details like username, name, and email. The request hits our “Users” endpoint, and the create_user method first authenticates the request and then adds the details to the user database.
You can also validate it in the UI we created. Locally, navigate to http://127.0.0.1:5000 or use the Tailscale URL to access the dashboard. You’ll see the user Alan Turing being added to the database.

Similarly, we can configure Okta so that when we add or delete a user in our application, the user is also added or removed from Okta.
By configuring Okta and enabling provisioning, our local app seamlessly reflected new users added to Okta in real time. This setup showcases the simplicity and efficiency SCIM brings to identity management, reducing manual tasks and errors and improving security.
Group management
Managing groups is a vital part of any SCIM implementation, as it enables automated control over group membership and access to resources. With Okta’s SCIM integration, you can create, update, and delete groups, as well as assign users to specific groups for streamlined user management.
The Push Groups tab in Okta’s admin console allows you to push groups directly to your SCIM server, ensuring that group memberships are always up to date. When pushing groups, it’s important to maintain unique group names between Okta and your SCIM server to prevent conflicts and errors. Okta also supports assigning roles to users within groups, giving you granular control over access and permissions.
By automating group management through SCIM, organizations can simplify the process of assigning users to groups, reduce manual intervention, and enhance security. This approach ensures that users always have the right level of access, and that changes in group membership are reflected instantly across integrated systems.
Security and authentication
Securing your SCIM implementation is essential to protect sensitive user data and prevent unauthorized access. The SCIM API should always be protected with Transport Layer Security (TLS) to encrypt data in transit. Okta supports several authentication modes for SCIM, including OAuth 2.0 and HTTP Header authentication, allowing you to choose the method that best fits your security requirements.
When using OAuth 2.0, ensure your SCIM API authorization server is configured to issue both access tokens and refresh tokens, providing secure and seamless authentication for Okta’s provisioning actions. If you opt for HTTP Header authentication, generate a strong API token and configure it in both your SCIM server and the Okta admin console.
It’s important to test your authentication setup thoroughly. Okta provides tools within the admin console to test connector configuration and verify that your SCIM API is properly secured. For ongoing monitoring, consider using tools like Runscope to track API activity and detect potential issues. By following these best practices for security and authentication, you can ensure your SCIM with Okta integration is both secure and reliable, safeguarding your user accounts and provisioning workflows.
Advanced configurations
For enterprise-level applications, PATCH operations, and filtering can enhance your SCIM implementation by allowing more granular control over user data.
PATCH
One of the major reasons SCIM uses REST APIs is for standardization and simplicity. However, the PATCH operation can be tricky to deal with. Since PATCH only updates certain attributes, the exact behaviors vary among IdPs.
To control this, SCIM spec recommends a /ServiceProviderConfig endpoint that allows your application to inform the IdP of operations it supports. For instance, you can declare if PATCH is supported by your SCIM server as follows.
By setting PATCH supported to FALSE, IdPs can tweak their behavior to work with your application. In this case, it could be replacing PATCH with PUT. Implementing this endpoint in your application is good practice.
Filter
Apart from just the CRUD operations, SCIM also provides the ability to filter the results, which is very handy for large-scale user management. You can create endpoints to enable filtering, as this will significantly enhance the flexibility and power of your SCIM API and make the entire process efficient.
For instance, A SCIM Client can invoke the following endpoint to find all users with "Turing" in their family name and who also have an employee number. The 'co' operator means "contains", and 'pr' means "present".
These advanced configurations make SCIM an excellent choice for simple to fine-grained use cases.
Summary
In the complex application setup that we work with, manual user management is inefficient and leads to errors and security risks. SCIM offers a solution by automating the user provisioning and deprovisioning process between identity and service providers.
In this post, we looked at the need for SCIM and how it simplifies directory sync operations. We also looked at a demo of integrating SCIM with a custom Python app, showcasing how user data is seamlessly synced using Okta’s provisioning capabilities.
By adopting SCIM, companies can enhance security, streamline user management, and reduce the overhead on IT teams.
Want to automate user provisioning with OKTA and SCIM right away? Sign up for a Free Forever account with Scalekit and get SCIM built-in with secure, production-grade connectors. Have questions or need help adapting this setup? Book time with our auth experts.
FAQs
Why is SCIM essential for B2B SaaS application growth?
SCIM automates user identity management across different platforms and applications. For B2B SaaS providers, manual provisioning is error prone and slows down customer onboarding. By implementing SCIM, you allow enterprise IT admins to sync their directory, such as Okta, directly with your app. This automation ensures that as companies scale, user accounts are created, updated, and deleted in real time. It reduces the operational burden on IT teams while providing a seamless experience for end users. Ultimately, SCIM is a core requirement for any enterprise ready B2B application looking to simplify identity management and improve overall business efficiency.
How does SCIM improve security during employee offboarding?
Security risks often peak when employees leave an organization and their access to various SaaS tools remains active. Traditionally, IT admins had to manually deactivate accounts across hundreds of applications, which is a process prone to oversight. SCIM solves this by enabling automated deprovisioning. When an identity provider like Okta removes a user from their directory, a SCIM request is instantly sent to the service provider to deactivate the account. This immediate synchronization ensures that former employees cannot access sensitive company data, significantly reducing the attack surface and maintaining a robust security posture for the entire organization during critical transitions.
What authentication methods secure the SCIM API connection?
Securing the SCIM API is critical because it handles sensitive user identity data. The SCIM standard recommends using Transport Layer Security to encrypt all data in transit. For authentication between the identity provider and your application, Okta supports several robust methods including OAuth 2.0 and HTTP Header authentication. While using a static bearer token in an HTTP header is common for proof of concept projects, production environments should utilize OAuth 2.0 for better security. This setup ensures that only authorized identity providers can trigger provisioning actions, protecting your application from unauthorized user modifications or potential data breaches during the synchronization process.
Why should developers implement the ServiceProviderConfig endpoint?
The ServiceProviderConfig endpoint is a vital component of a mature SCIM implementation. It allows your application to programmatically inform the identity provider about the specific operations and features your SCIM server supports. For example, if your application does not support complex PATCH operations, you can declare this in the configuration. The identity provider, such as Okta, will then adjust its behavior, perhaps by using PUT requests instead. This discoverability prevents integration errors and ensures compatibility between different identity providers and your service provider, leading to a more reliable and interoperable identity management ecosystem that simplifies complex enterprise client setups.
How do PATCH operations function within a SCIM implementation?
PATCH operations in SCIM allow for granular updates to specific user attributes without replacing the entire user resource. While standard RESTful POST and PUT methods handle creation and full updates, PATCH is highly efficient for minor changes like updating an email or changing a last name. However, implementing PATCH can be complex because different identity providers may have varying behaviors. If your application finds PATCH difficult to support, you can utilize the ServiceProviderConfig to signal this to the identity provider. This flexibility ensures that user data remains synchronized across systems while allowing developers to choose the most appropriate update strategy for their architecture.
What role does Tailscale play in SCIM development workflows?
During the development of a SCIM integration, your application often runs on a local server that is not accessible to the public internet. Since identity providers like Okta need to reach your SCIM endpoints to send provisioning requests, you need a way to expose your local environment securely. Tailscale provides a funnel or reverse tunnel that creates a public URL for your local application. This allows Okta to communicate with your Flask or Python app as if it were in production. It is an essential tool for testing directory sync, authentication, and user lifecycle events before finalizing your production ready cloud deployment.
Can SCIM automate group management and role assignments?
Yes, SCIM is designed to handle more than just individual user accounts. It effectively manages groups and their memberships, which is crucial for B2B applications that rely on role based access control. Through the Push Groups feature in Okta, IT admins can synchronize entire groups from their directory to your application. This ensures that when a user is added to a specific department or team in Okta, they automatically receive the corresponding permissions in your app. Automating group management reduces manual intervention and ensures that users always have the correct access levels based on their current organizational roles and defined business responsibilities.
How does SCIM handle large-scale user directory filtering?
For enterprise applications with thousands of users, retrieving the entire directory for synchronization is inefficient. SCIM addresses this by providing advanced filtering capabilities using the GET method. Developers can implement endpoints that support filter parameters, allowing identity providers to query specific subsets of users based on attributes like family name or employee number. For example, an IdP can request only users whose email contains a specific domain. This makes the synchronization process much faster and reduces the load on both the identity provider and the service provider, ensuring high performance even in large scale enterprise environments with high volumes of data.
Why choose SCIM over manual user account provisioning?
Manual user provisioning is a significant bottleneck for growing companies, leading to onboarding delays and security vulnerabilities. Every manual entry increases the risk of human error, such as typos in email addresses or incorrect role assignments. SCIM replaces these manual processes with a standardized, automated workflow. It ensures that user data is consistent across all integrated business tools and reflects real time changes in the central directory. For engineering managers and CISOs, SCIM provides a scalable and secure way to manage identity, allowing teams to focus on core product features rather than spending valuable time on tedious and error prone administrative tasks.


