OIDC implementation in B2B SaaS: A Step-by-Step Guide for Developers


Organizations today use multiple applications, from employee portals to customer and vendor portals. Each app often manages access separately, requiring users to remember multiple passwords and deal with password recovery processes. This leads to a poor user experience.
Users frequently use weak or the same passwords for all applications, posing significant security risks. Therefore, a solution that is both secure and user-friendly is essential.
Centralized authentication and authorization mechanisms, such as single sign-on (SSO), mitigate these risks and enhance the user experience. OpenID Connect (OIDC) is a modern protocol that supports SSO authentication, allowing users to remember only one set of credentials.
In this post, we’ll explore OIDC’s role in B2B SaaS applications and provide a step-by-step guide on implementing OIDC using Google.
OIDC: Back to basics
With the adoption of cloud-based solutions and software-as-a-service (SaaS) products, the need for standardized authentication and authorization became evident. This led to the development of frameworks like OAuth 2.0 and protocols like OIDC. Before getting into the implementation of OIDC details, let's revisit the basics.
Overview of OAuth
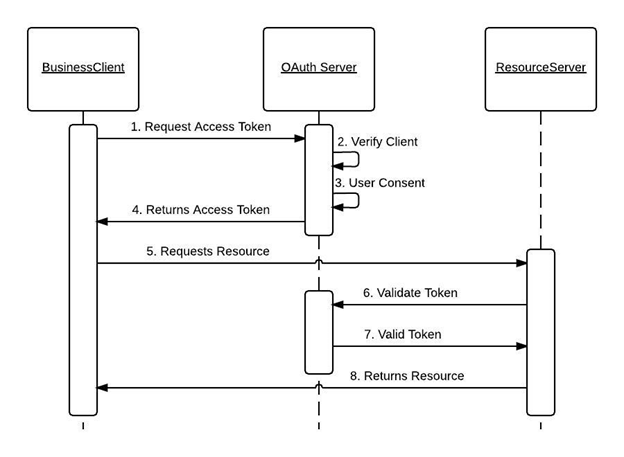
OAuth is an authorization framework that allows users to grant third-party applications access to their data without sharing credentials. OAuth 2.0 is a complete rewrite of OAuth 1.0, maintaining the same overall goals and user experience.
The OAuth 2.0 framework includes four main components:
- Client: The client application requests access to the user’s resources on a Resource Server.
- Resource Server: This application stores and manages the user’s data.
- Resource Owner: The entity that owns the resources on the Resource Server. This is usually a user.
- Authorization Server: The server responsible for managing and issuing access tokens to the clients.
Below are a few concepts associated with OAuth that define the scope and mechanism for obtaining an access token:
- OAuth Grant Type: Defines how the Client and the Authorization Server exchange user information. Popular grant types are authorization code, refresh token, device code, and client credentials
- Access Token: A token provided by the Authorization Server
- Refresh Token: Used to generate new Access Tokens when the previous one expires
Once a client obtains an Access Token from the Authorization Server, it can access the user’s resources on the Resource Server based on the granted permissions.
Overview of OIDC
While OAuth 2.0 focuses on granting third-party applications access to users' resources, OpenID Connect (OIDC) is an identity authentication protocol built on top of OAuth 2.0 that standardizes the authentication process for users logging in to access third-party applications.
OIDC introduces additional components and concepts for authentication while inheriting the robust security features of OAuth 2.0. Key components of OIDC include:
- OpenID Provider (OP): Similar to the Authorization Server in OAuth, it is responsible for authenticating users and issuing tokens.
- End-user: The user whose information is contained within the ID token.
- Relying Party (RP): Similar to a client in OAuth, it relies on the OP to authenticate and retrieve user information.
- ID Token: A JSON Web Token (JWT) issued by the OP, containing user information (claims) about the authenticated End-user.
- Claim: The End-user's properties, such as their name and email, that helps the RP identify the user.
OIDC leverages OAuth 2.0 to securely enable user authentication and identity management, simplifying the process for both users and applications. It provides a consistent experience across different platforms and services.
Building an OIDC flow with Google
To simplify and enhance the login process, many web applications implement login with popular OIDC providers like Google, Microsoft, and GitHub. In this section, we’ll examine Google’s OIDC services and build an OIDC flow using a sample application.
Use case
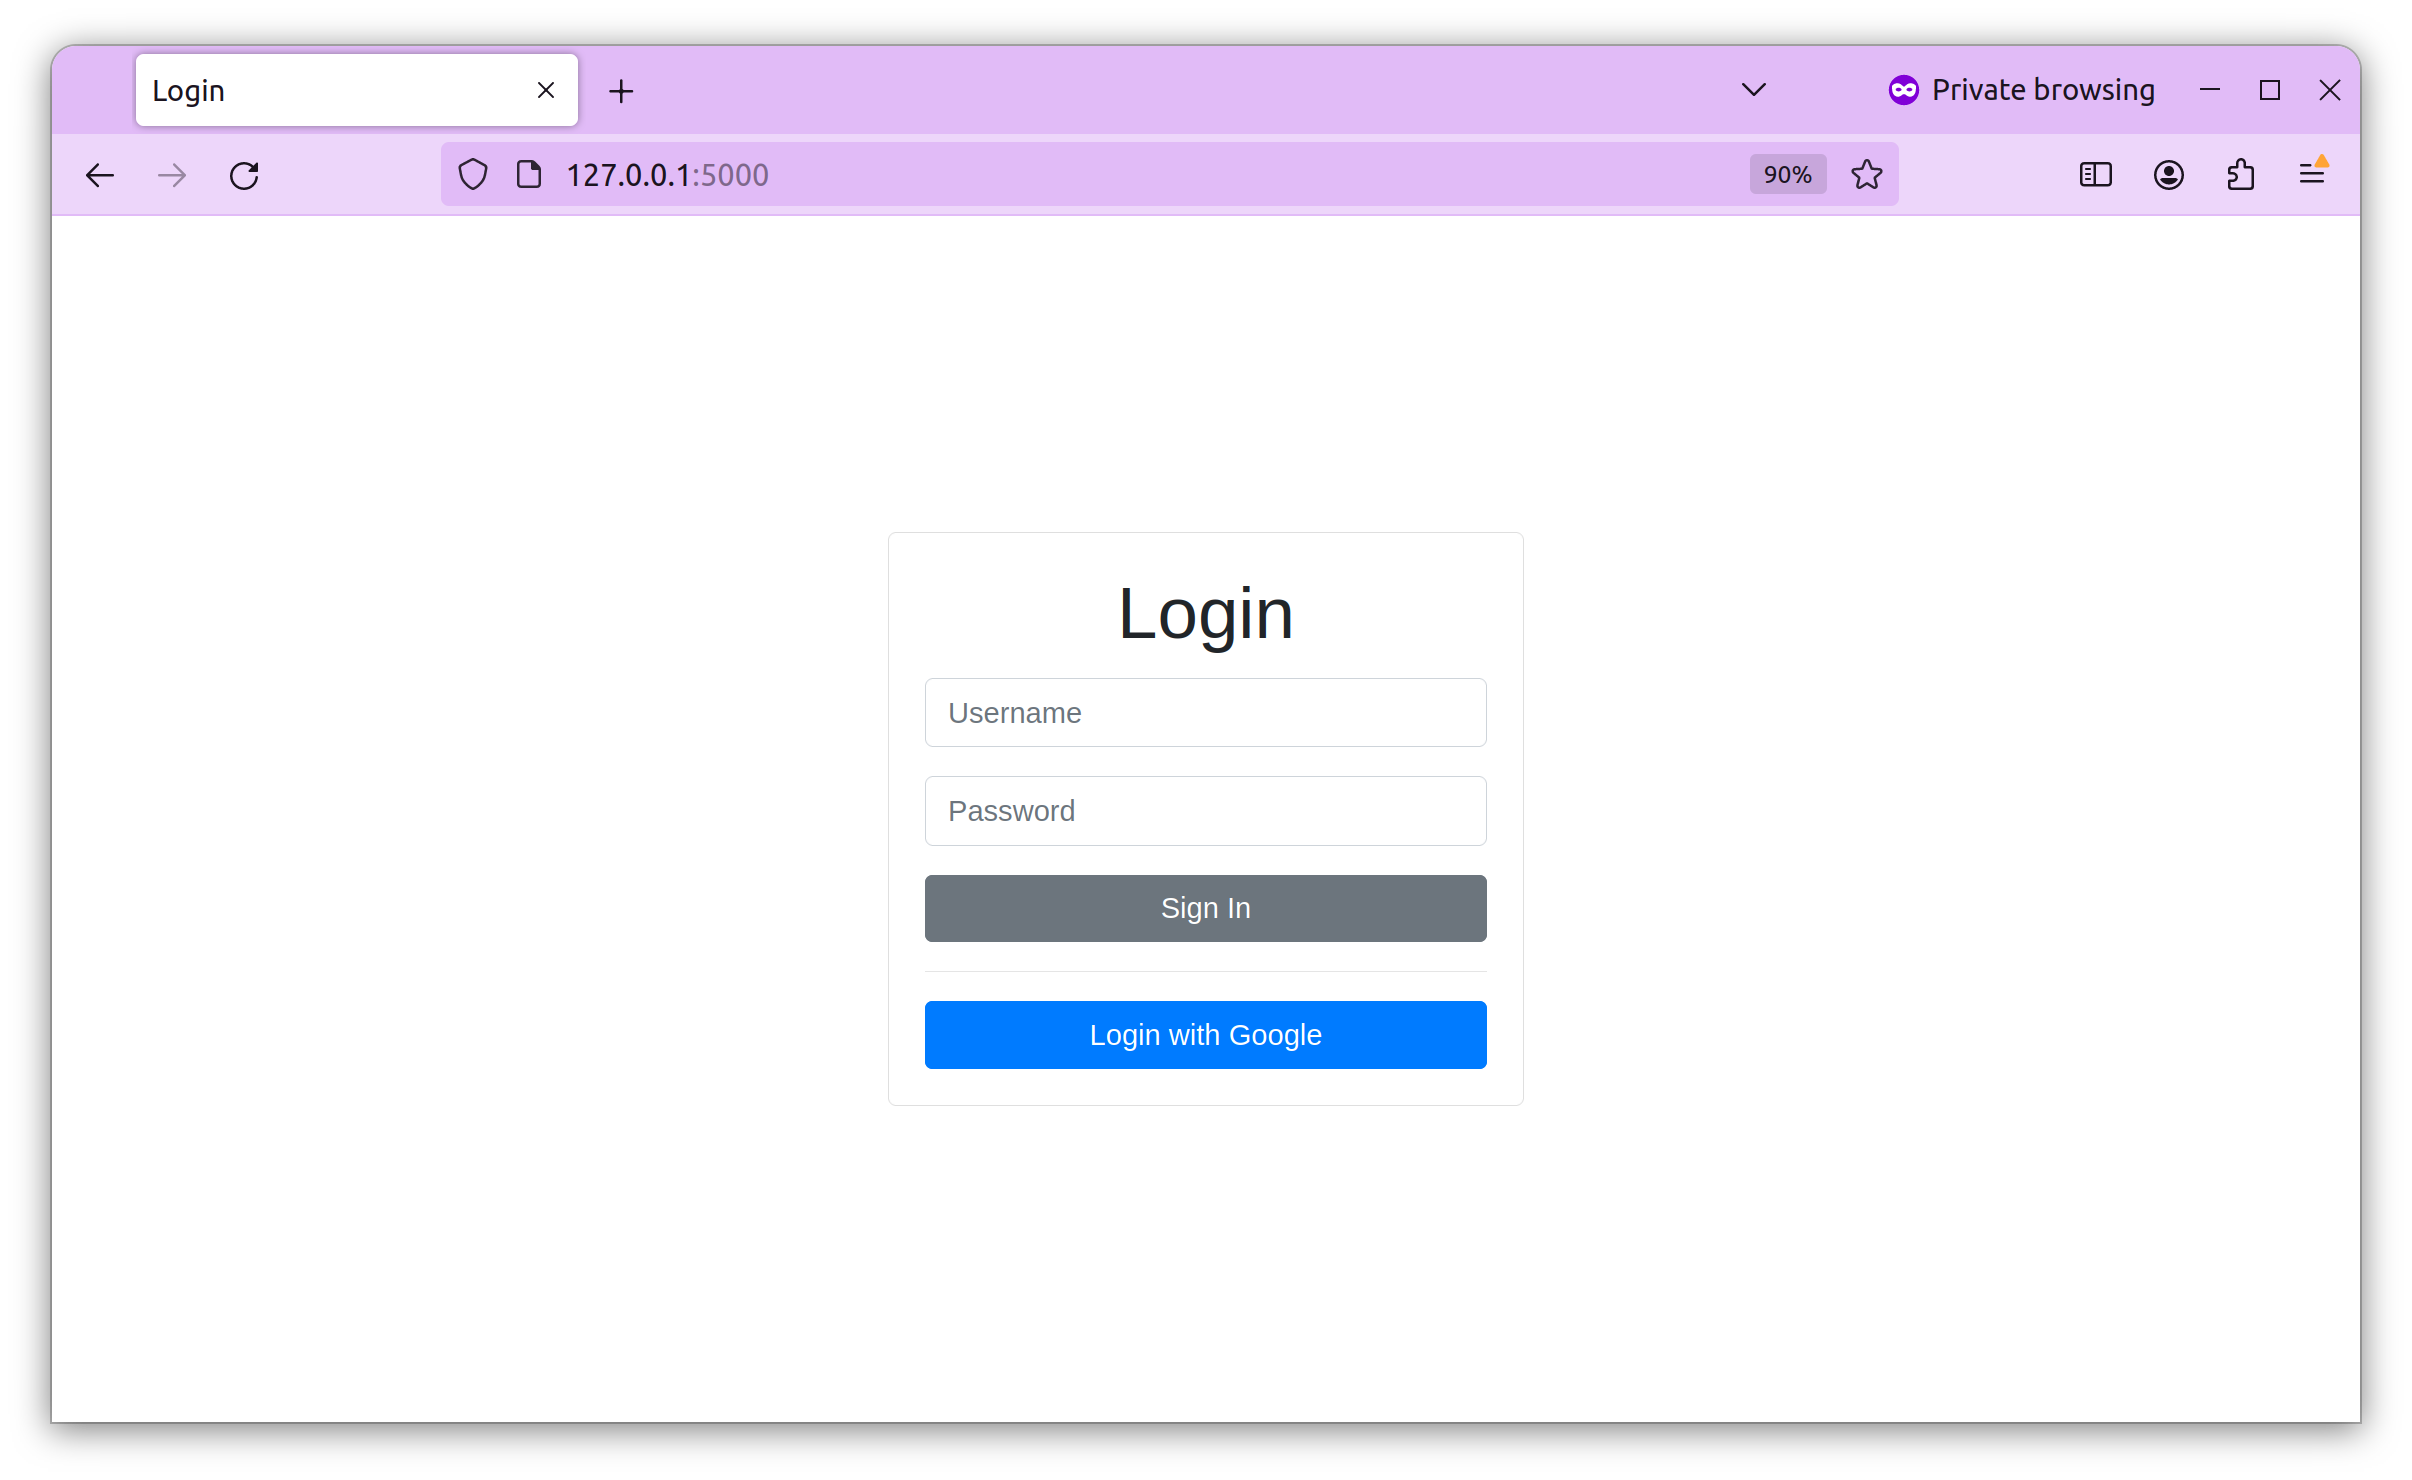
We’ll build a simple web application with two pages: Login and Profile.
- Login page will have a regular login form and a “Login With Google” button.
- Profile page will display the profile picture, full name, first name, last name, and email.
We’ll use Google OIDC to create a client application and configure it with our application. Upon successful integration, any user can log in to our application using their Google account and view the profile page showing their details such as profile picture, full name, first name, last name, and email associated with their Google account.
Curious how OIDC compares with SAML? Read our SAML vs OIDC blog
Before getting started
Building an OIDC workflow using Google, based on the use case discussed above, requires the following prerequisites:
- A web application with a login page: We’ve built one using Python and Flask; you can use the same tools to build one for yourself. You can find our application in this GitHub repo.
- Google Cloud Account: Sign up for a Google Cloud Account if you don’t have one.
To build the above use case, you need to configure: a) Google OIDC and b) the client application. The following sections describe them.
The next step is to configure the OAuth consent screen, which will be displayed to users when they log in using Google on your application. Go to APIs & Services > OAuth consent screen.
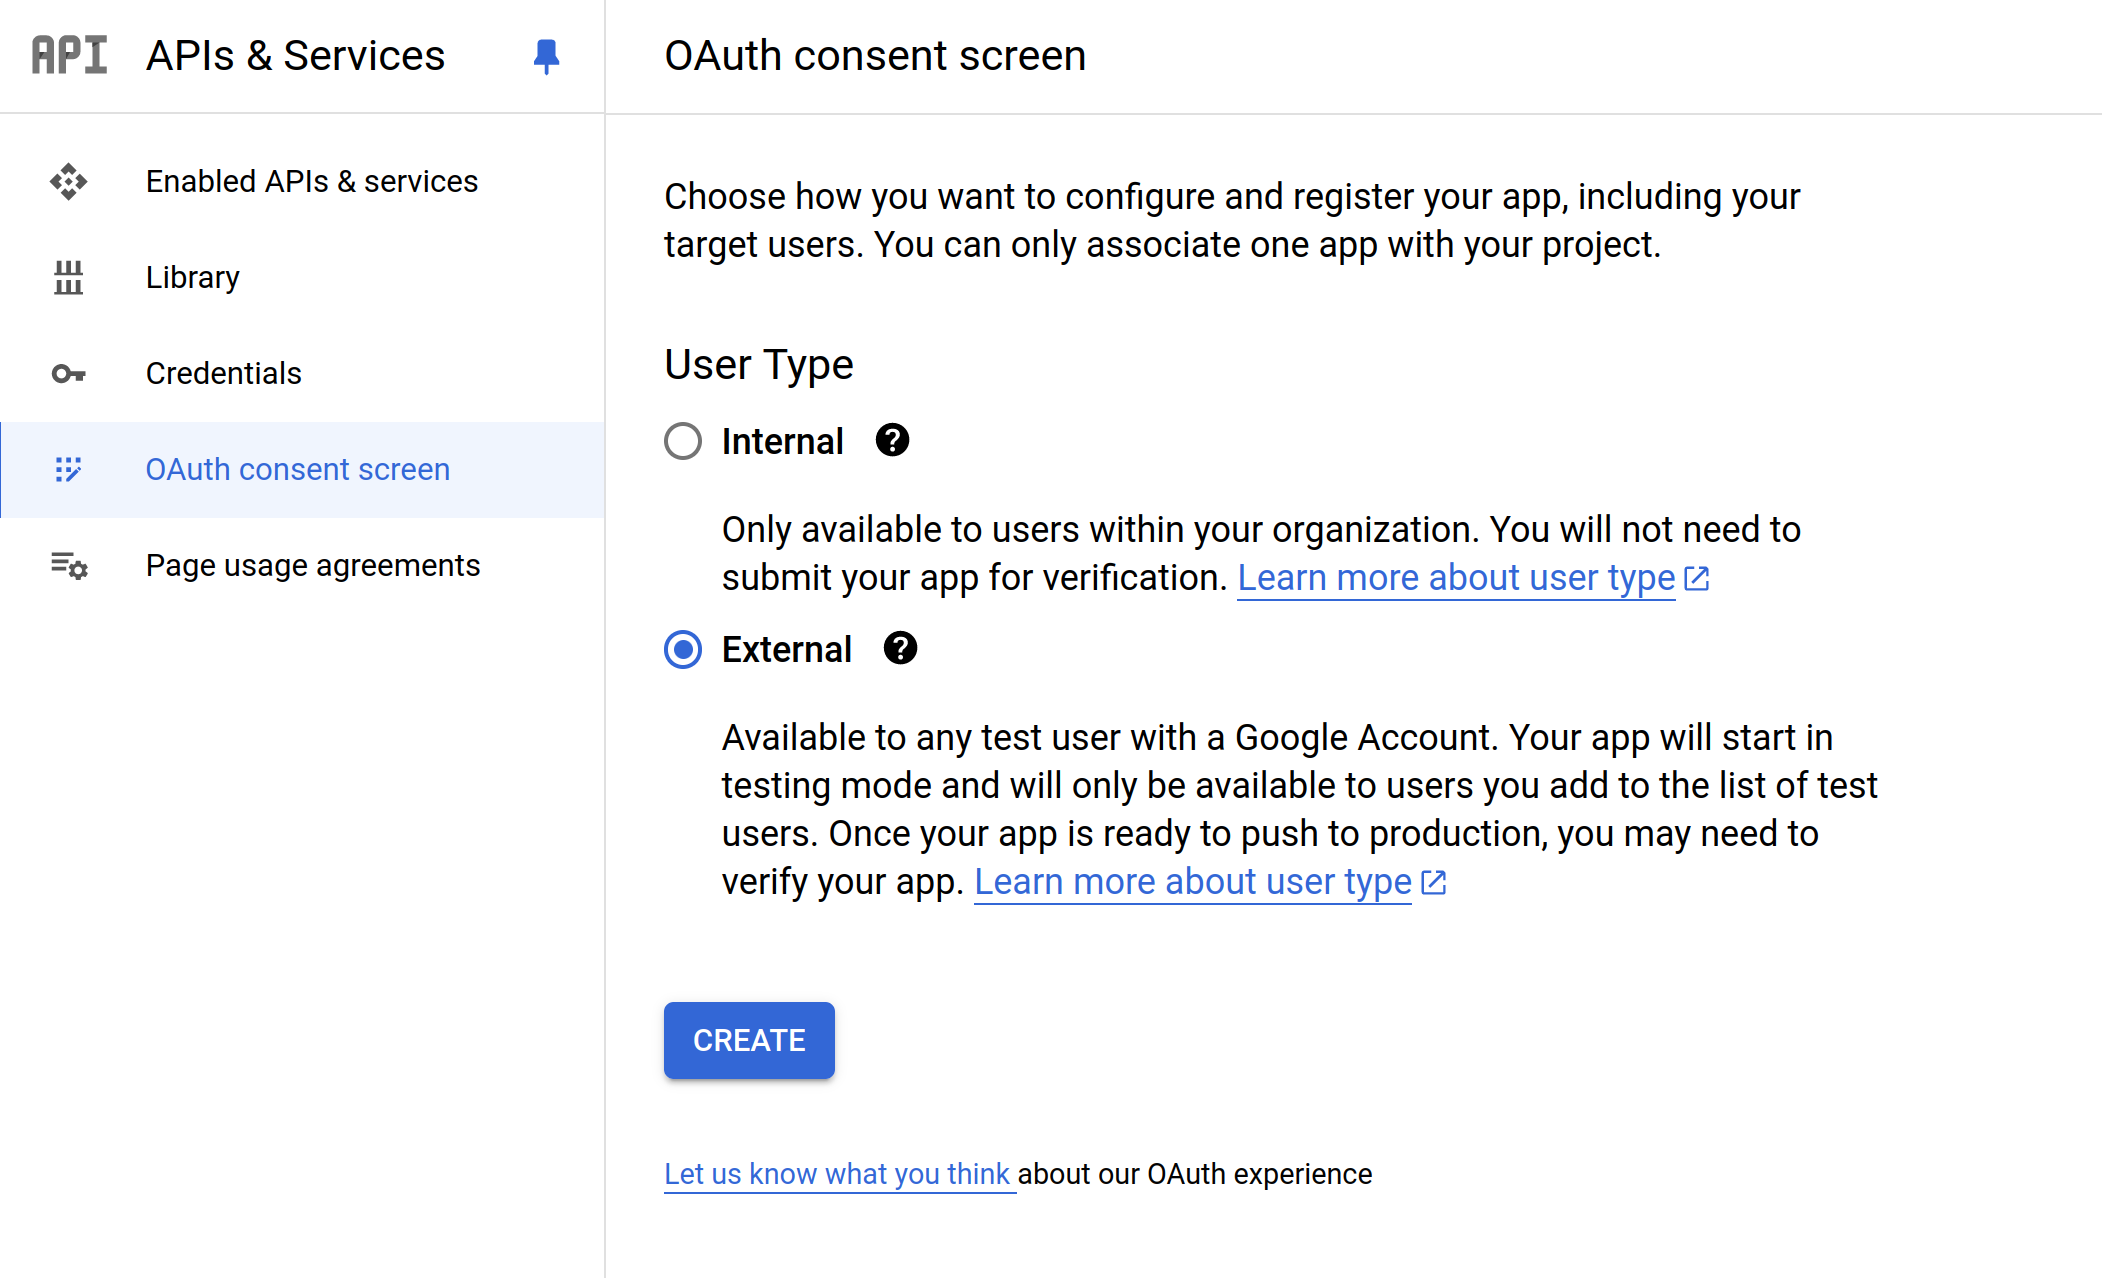
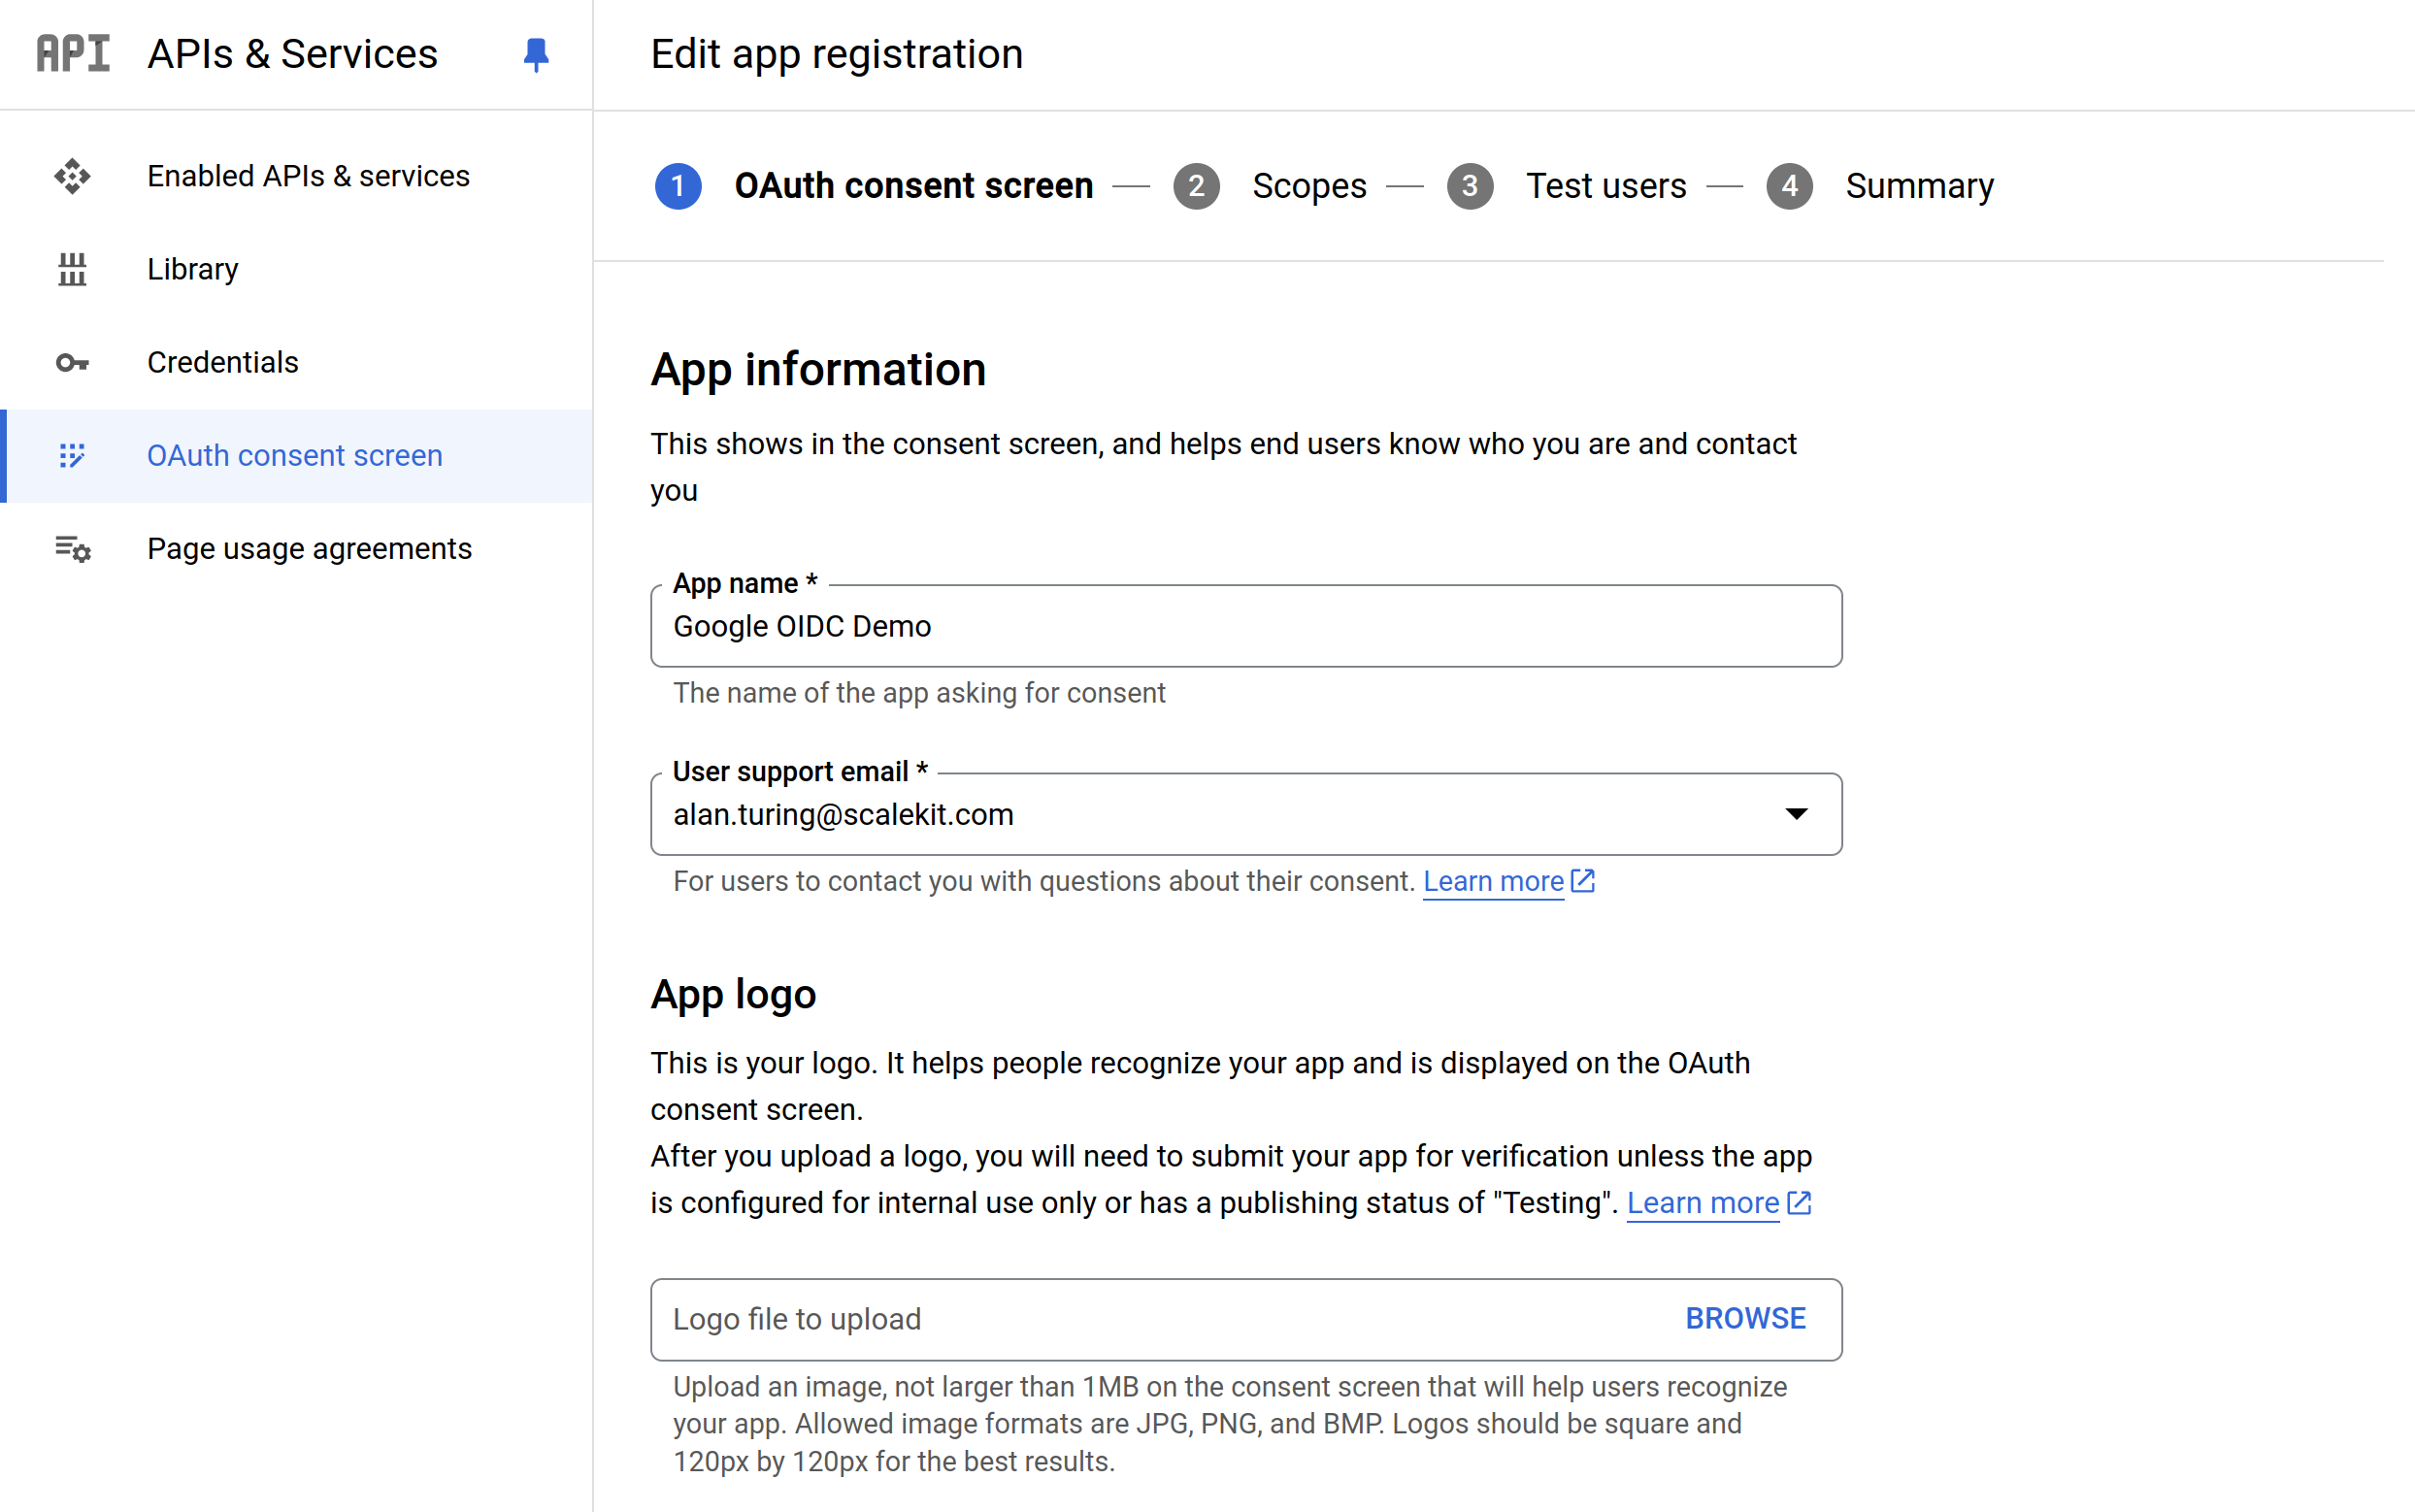
Choose "External" and click "Create." This will allow any user to log in to your application using Google OIDC. Fill out the form with the required details (e.g., App name, User support email), which will be displayed on the consent screen.
On the next screen, we will add the scopes. As Google defines it, “Scopes express the permissions you request users to authorize for your app and allow your project to access specific types of private user data from their Google Account.” In this case, we provide openid email and profile.
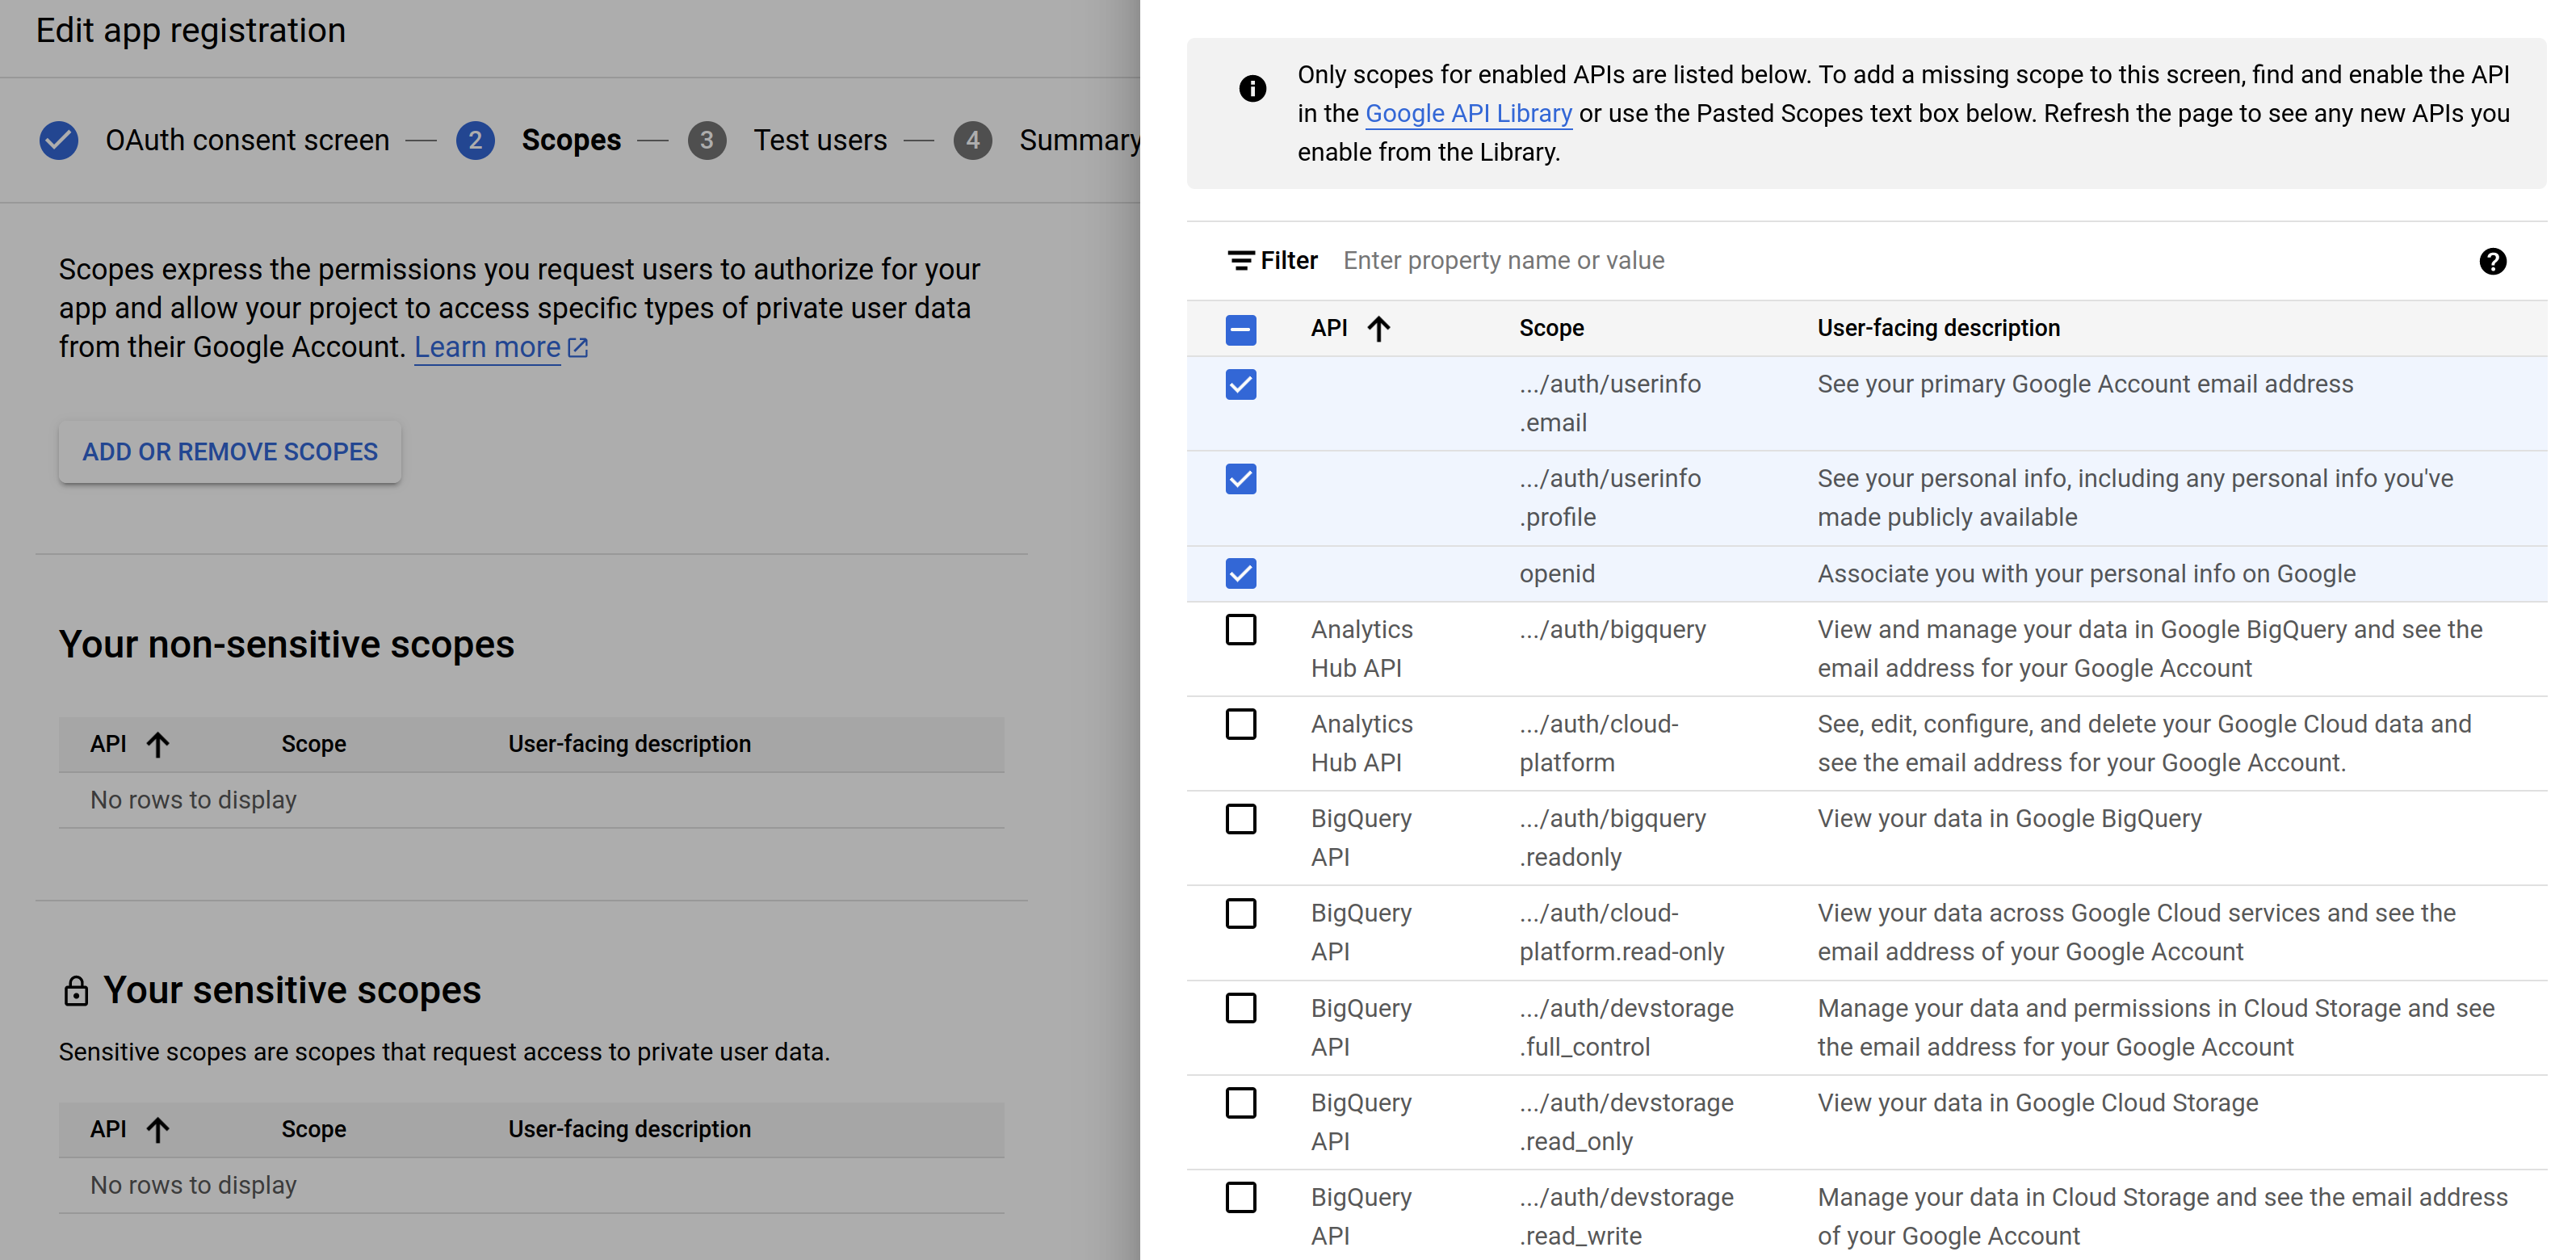
Press Save and continue.
We will not add any test users at this point and proceed to create the consent screen. After our consent screen is ready, we’ll create OAuth credentials that our web app will use to communicate with Google.
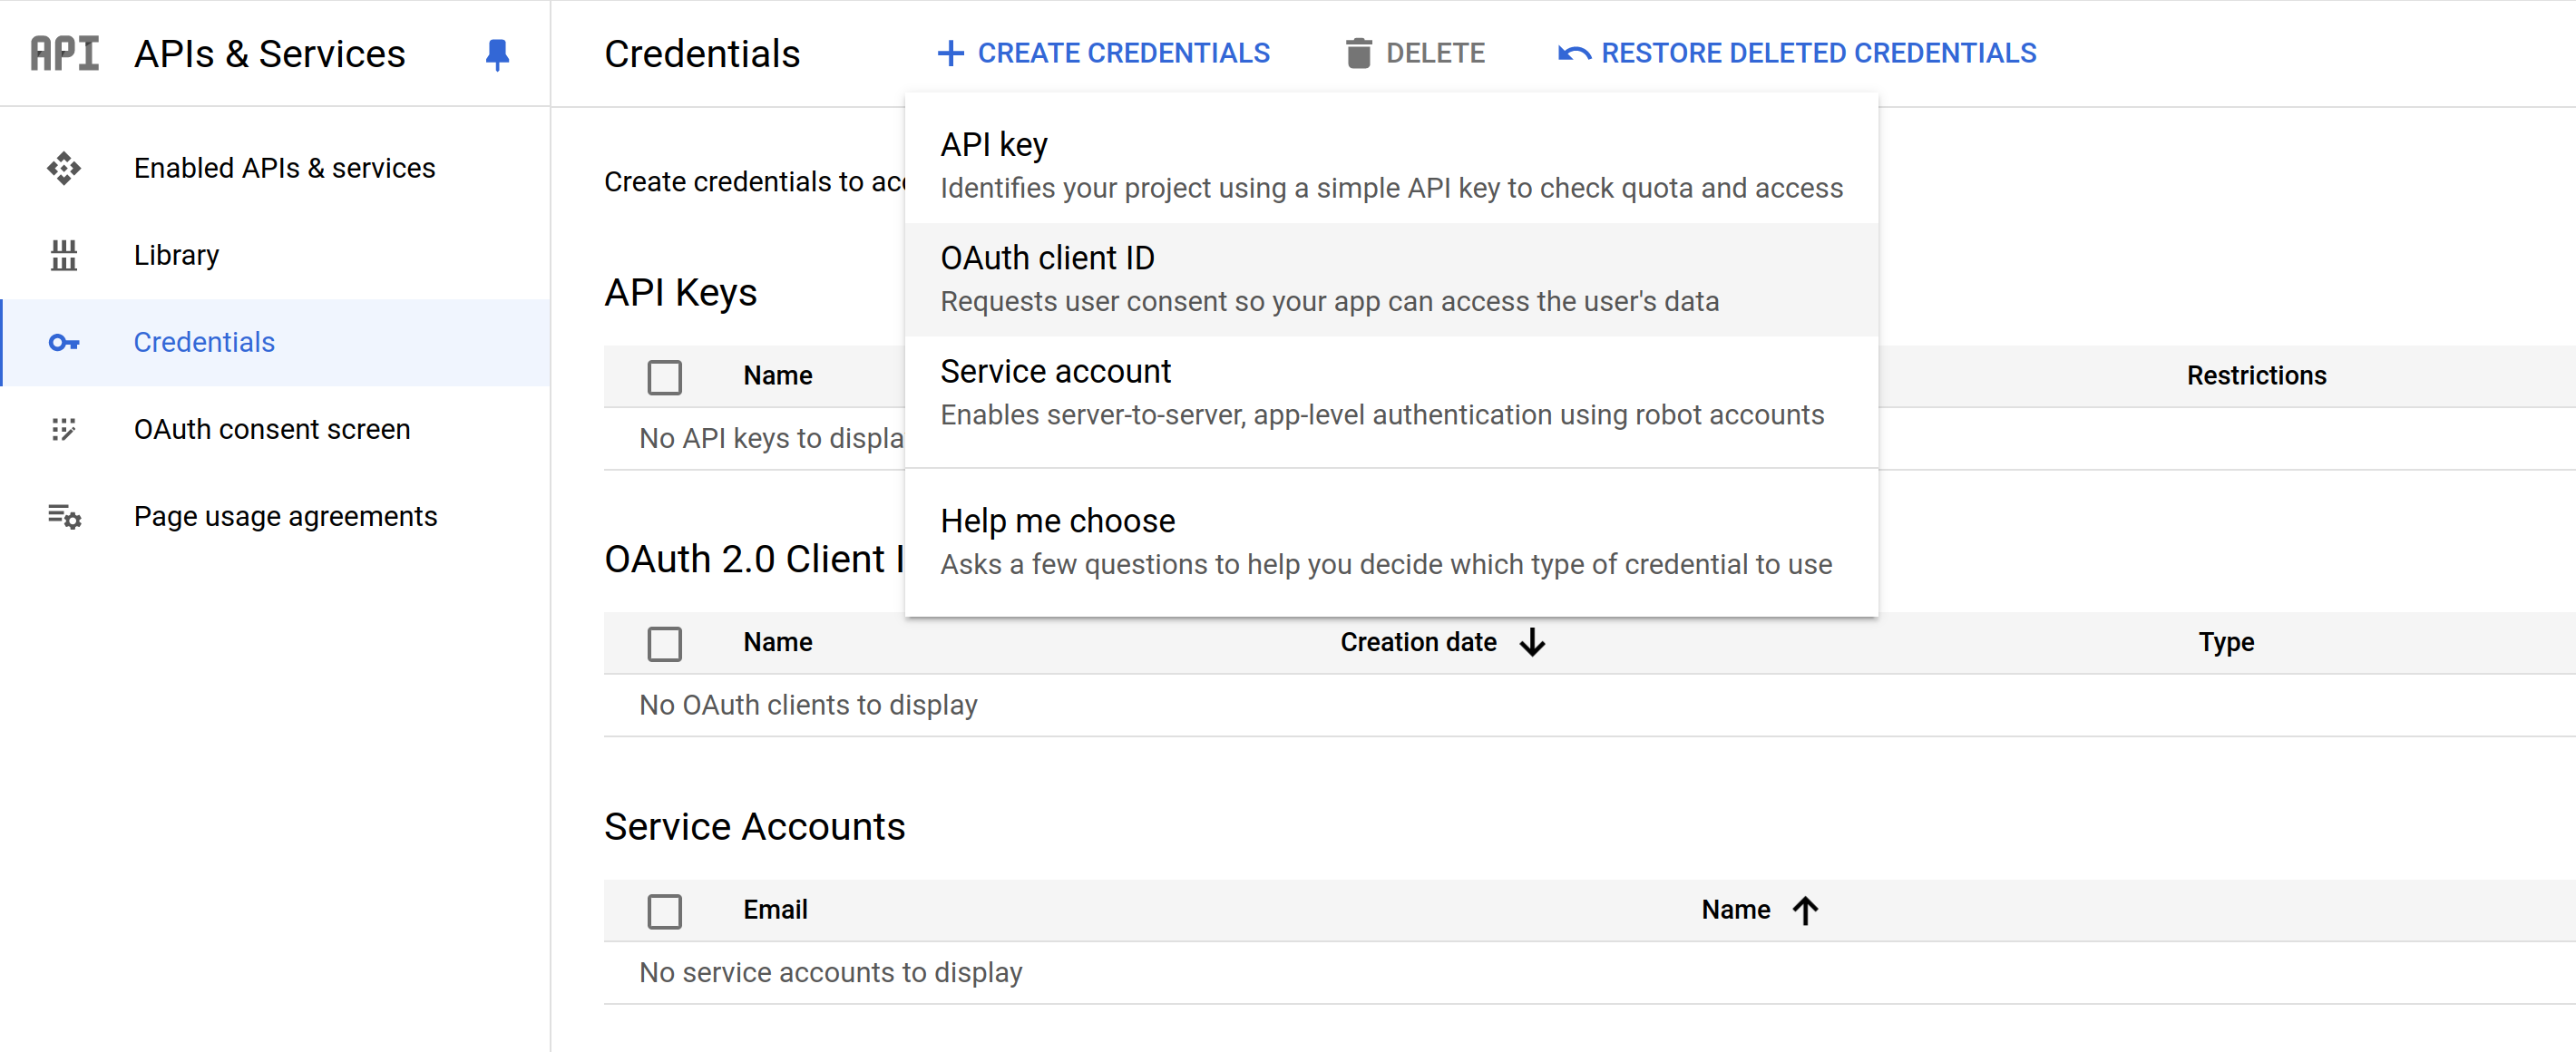
In the Cloud Console, go to APIs & Services > Credentials. Click "Create Credentials" and select "OAuth Client ID".
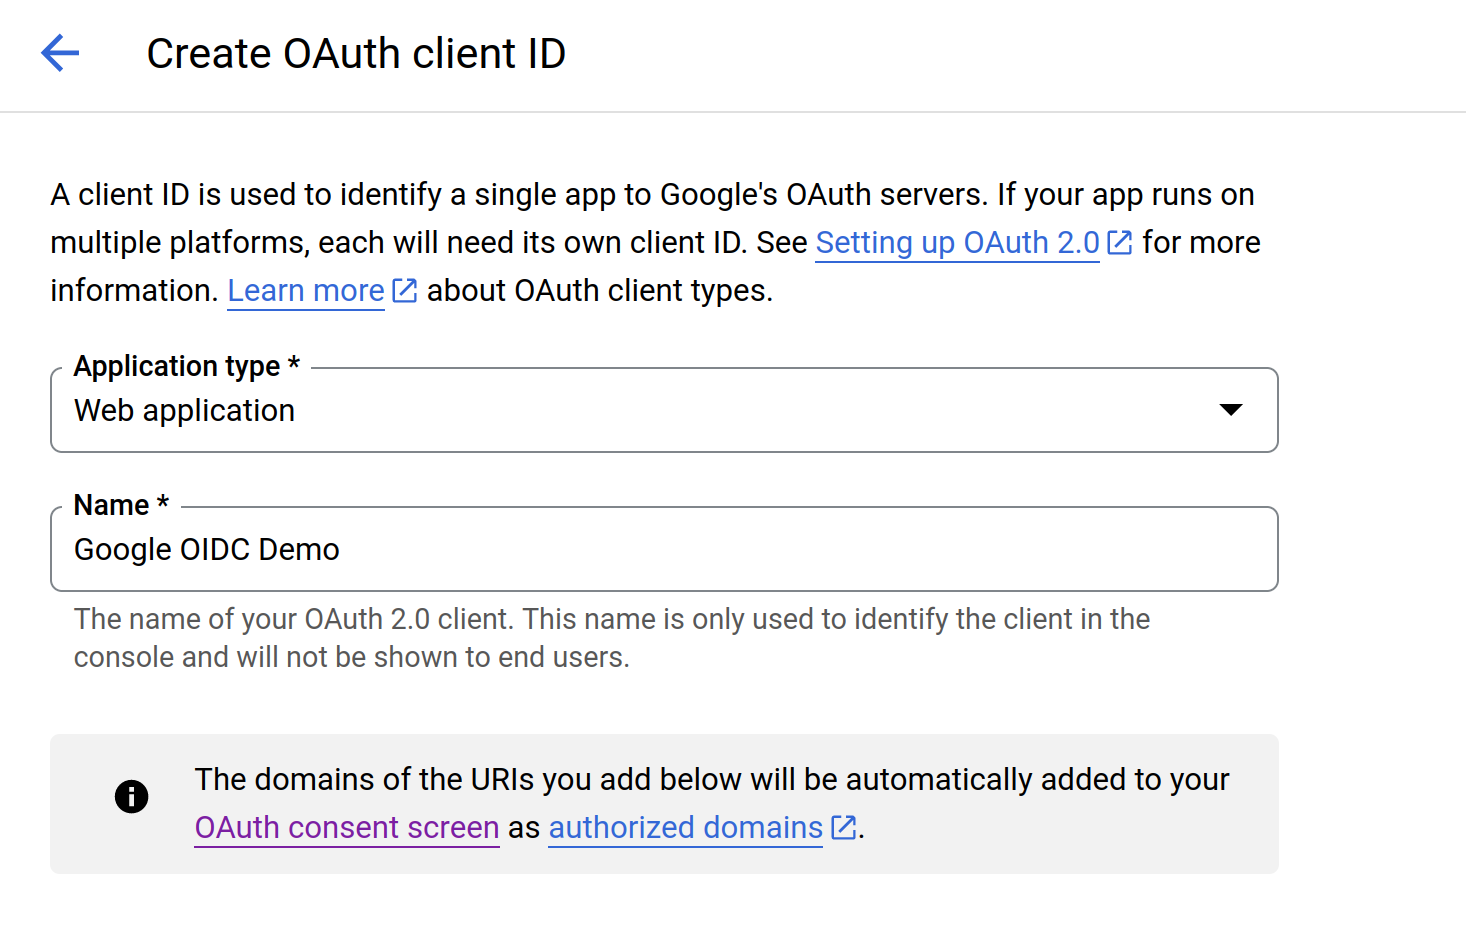
On the next screen, select "Web application" and provide a name for the client.
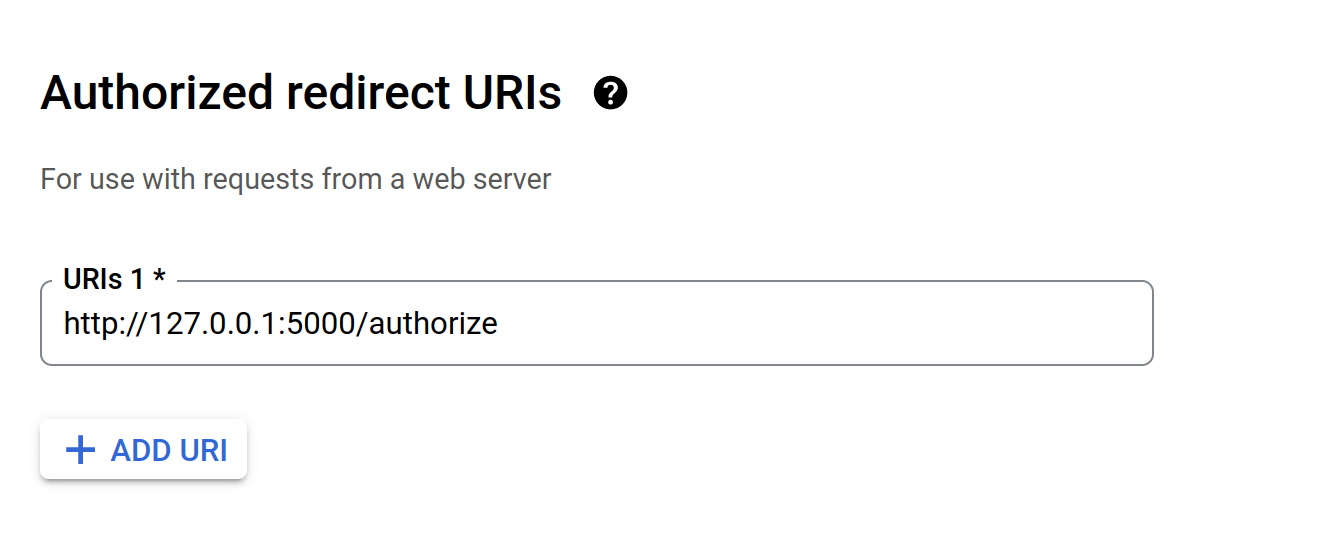
Under "Authorized redirect URIs," add the URI where Google will redirect after the user authenticates. Since we’ll be running this application on our localhost, we’ll provide http://127.0.0.1:5000/authorize
Once you save this, it will show you the Client ID and the Client secret that you’ll use to configure your application.
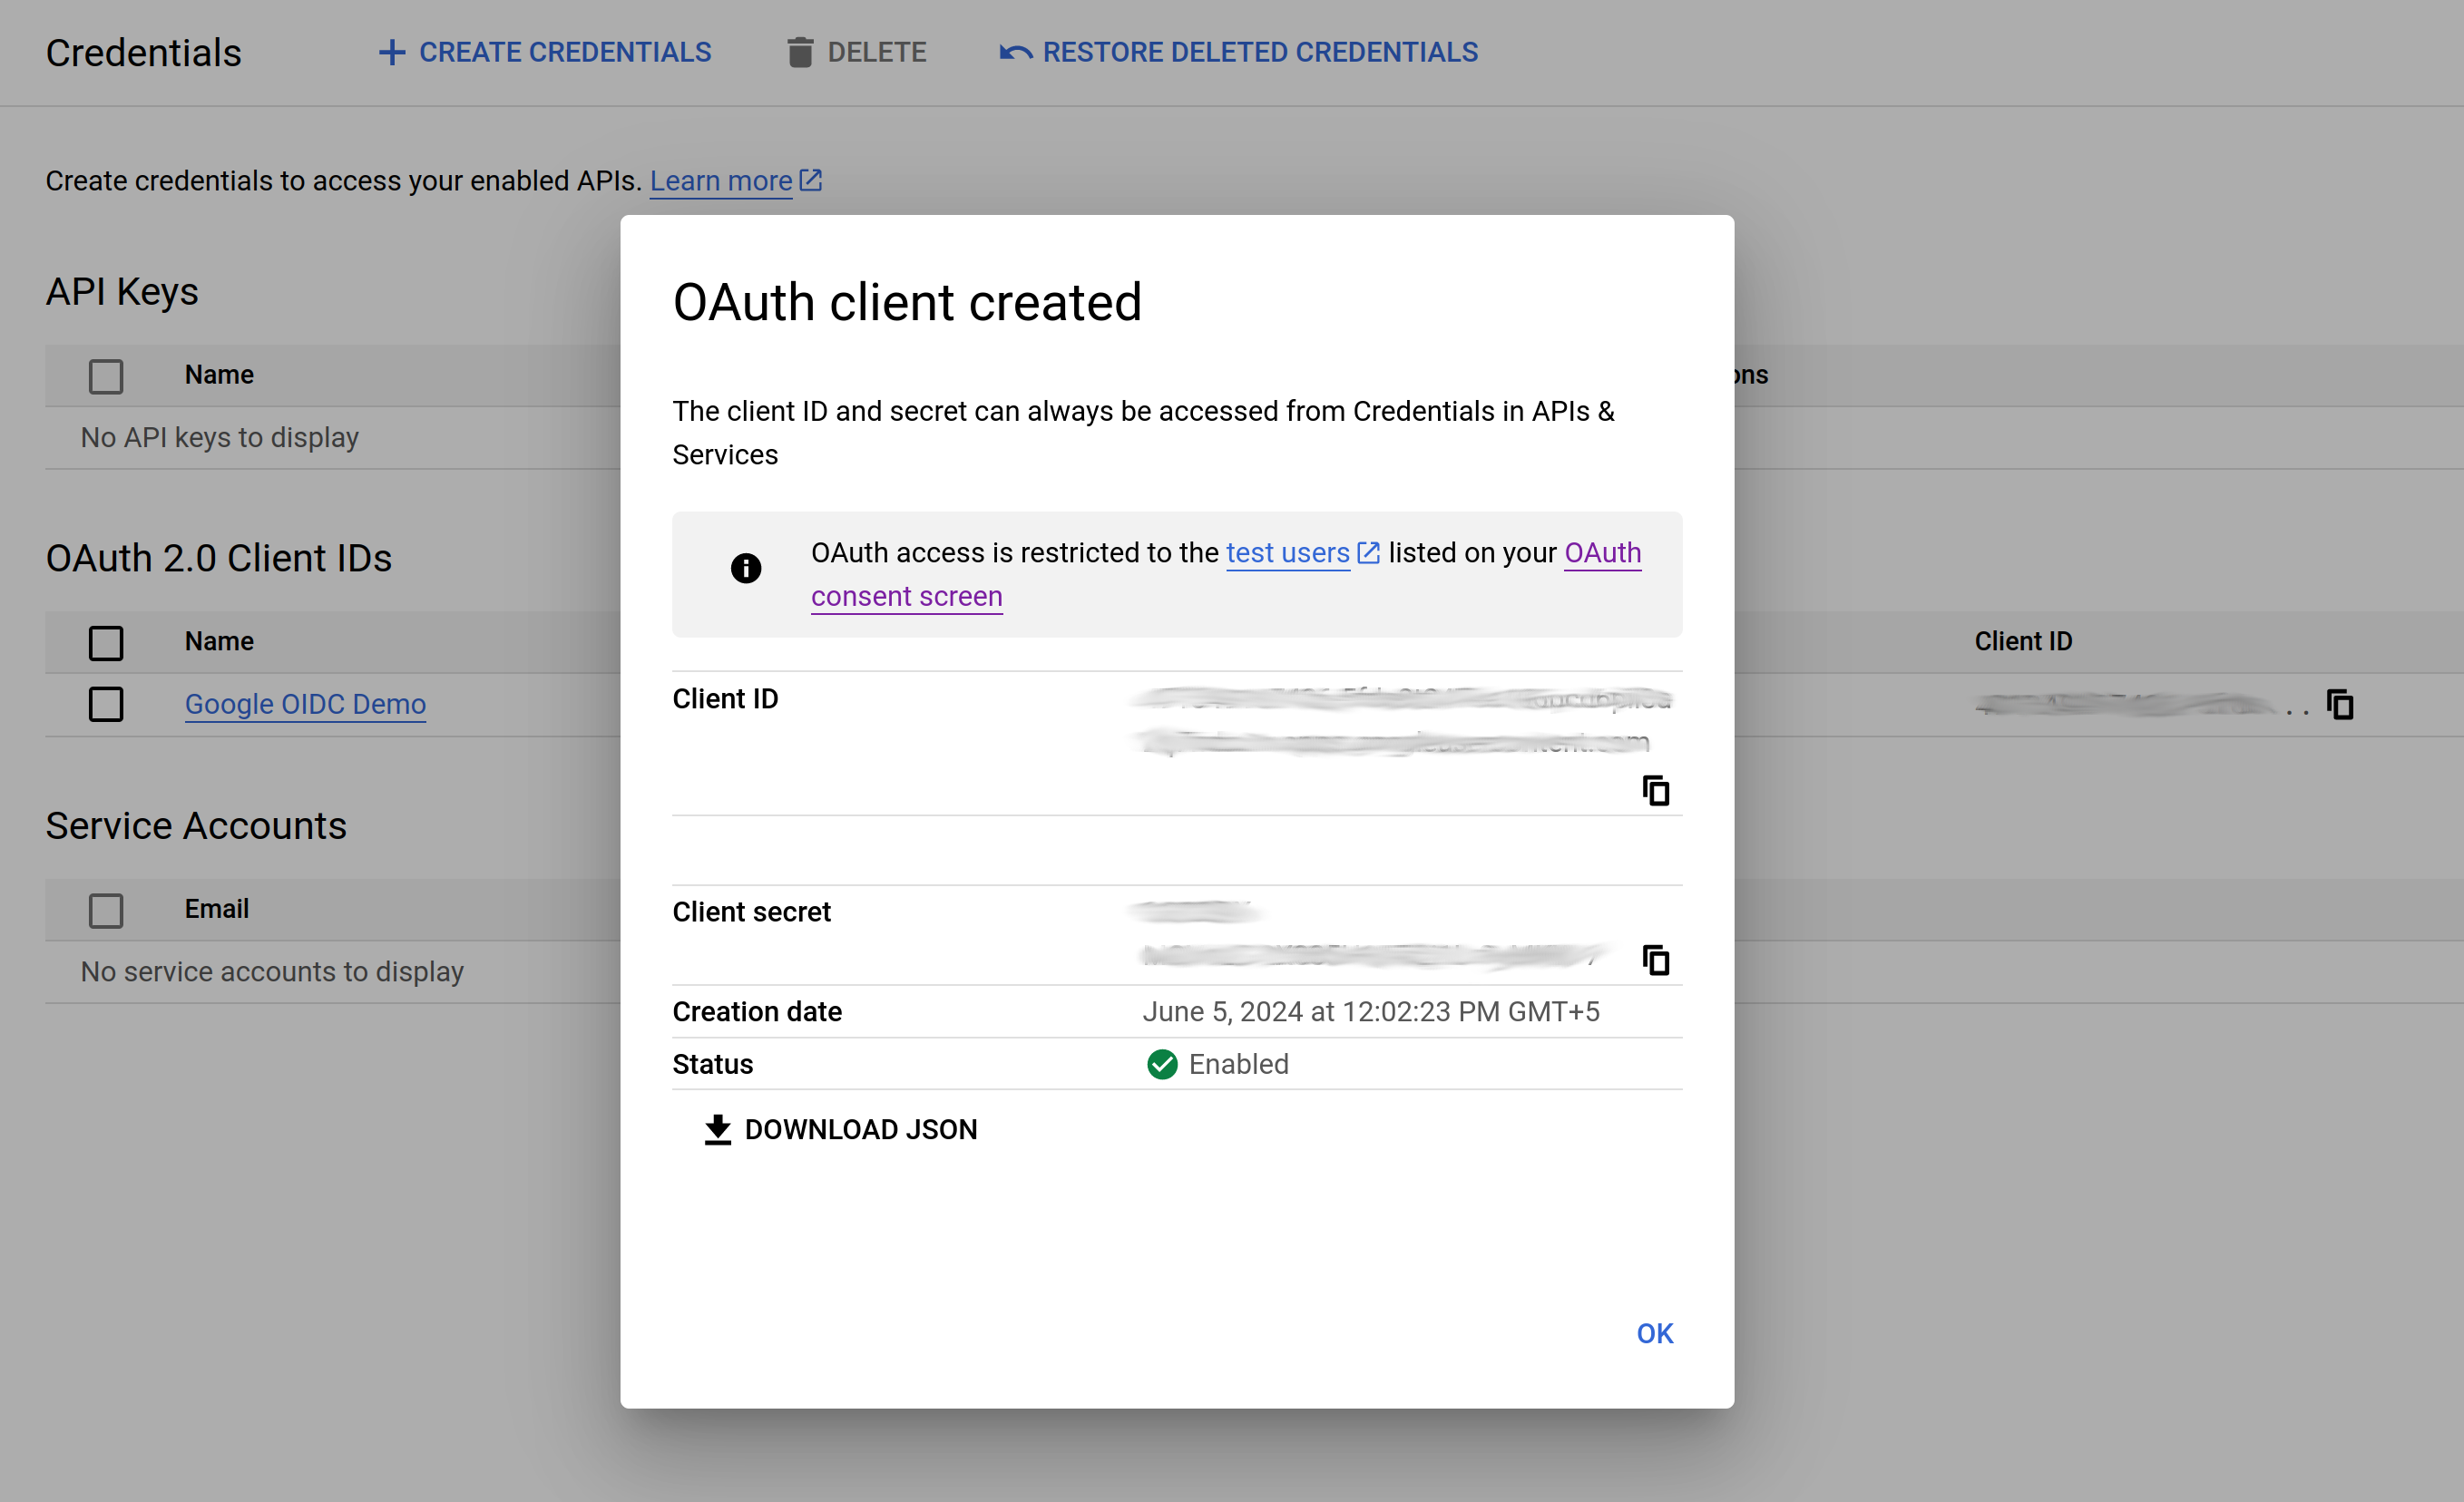
At this point, we have created the consent screen, Client ID, and Client secret required by the application. We are done with all the configuration steps on Google.
Let’s now move to the web application.
Configure the Web App
As mentioned above, we have built a simple web application using Python and Flask. We have also used AuthLib, a library that handles OAuth and OIDC-related functionalities.
Firstly, create a config.py file using the Client ID and Client secret we obtained above (refer to Create OAuth Client in Google). We will create environment variables to store the credentials our web application will use.
In the app.py file, define the OAuth configuration to use Google as the OIDC provider and the scopes:
Next, create a route for /login where the request will come when the user clicks the “Login With Google” button on the Login page. Define the Redirect URL (redirect_uri) where the request will be redirected after returning from Google:
For /authorize, fetch the access token returned by Google to get user details to populate the profile page. AuthLib handles the access token exchange and fetching details:
The request will respond with the details we request based on the scope. In this case, it’s user profile data and pictures.
The /profile route redirects the request to the profile page after successful authentication, along with the session details. The profile page has a placeholder to display these details.
Lastly, the /logout route clears the session and logs out the user.
We’ve also created an optional dummy_login route allowing users to log in to the application using regular credentials. Please note we have hardcoded them as “admin” and “password”.
Below is how the app.py looks like with all code blocks:
The application's UI is an HTML form with a login form and a “Login With Google” button that allows the user to log in to the application using Google.
Execution
To execute this app, start the Flask server:
Then, navigate to http://127.0.0.1:5000/
To log in to the app, use admin as your username and password as your password.
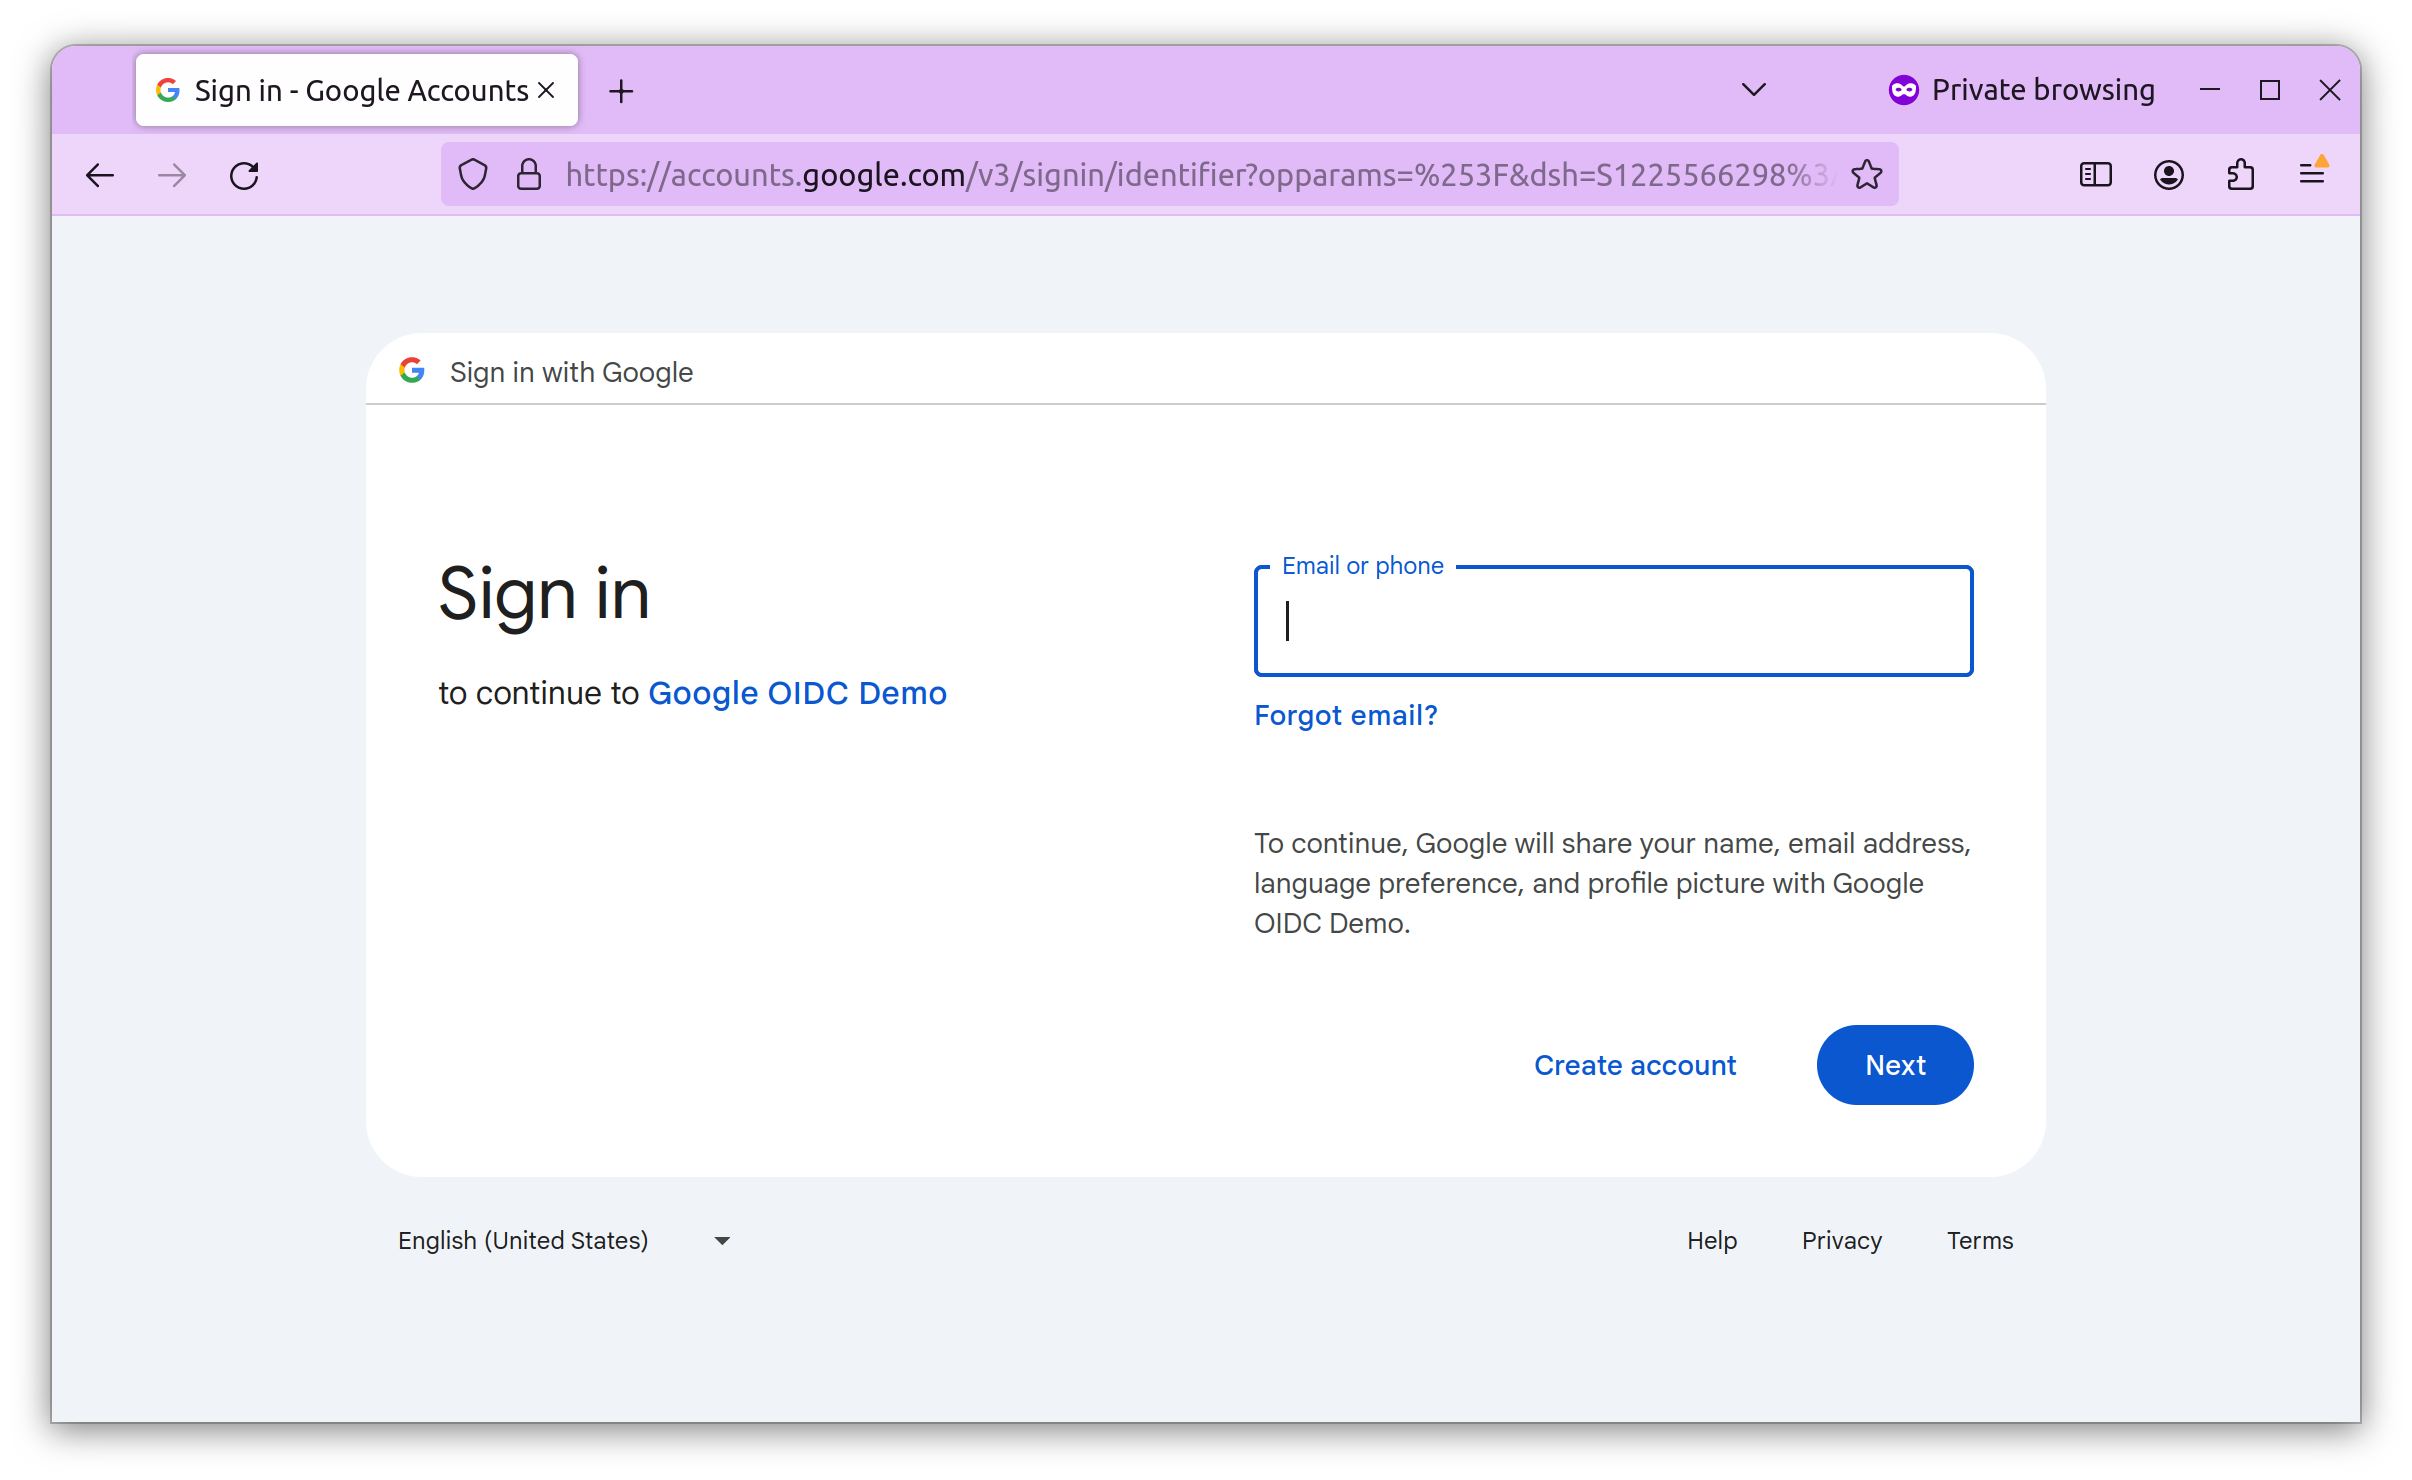
To test Google OIDC, click the “Login With Google” button. It will take you to Google’s login screen, where you can log in using your Google account. Notice the name of our client that we provided earlier as “Google ODIC Demo”.
After providing your credentials, you will see the consent screen we created in the first step.

Clicking “Continue” will process the request and allow the user to log in to our web app. The response will include the details we requested based on the scope.
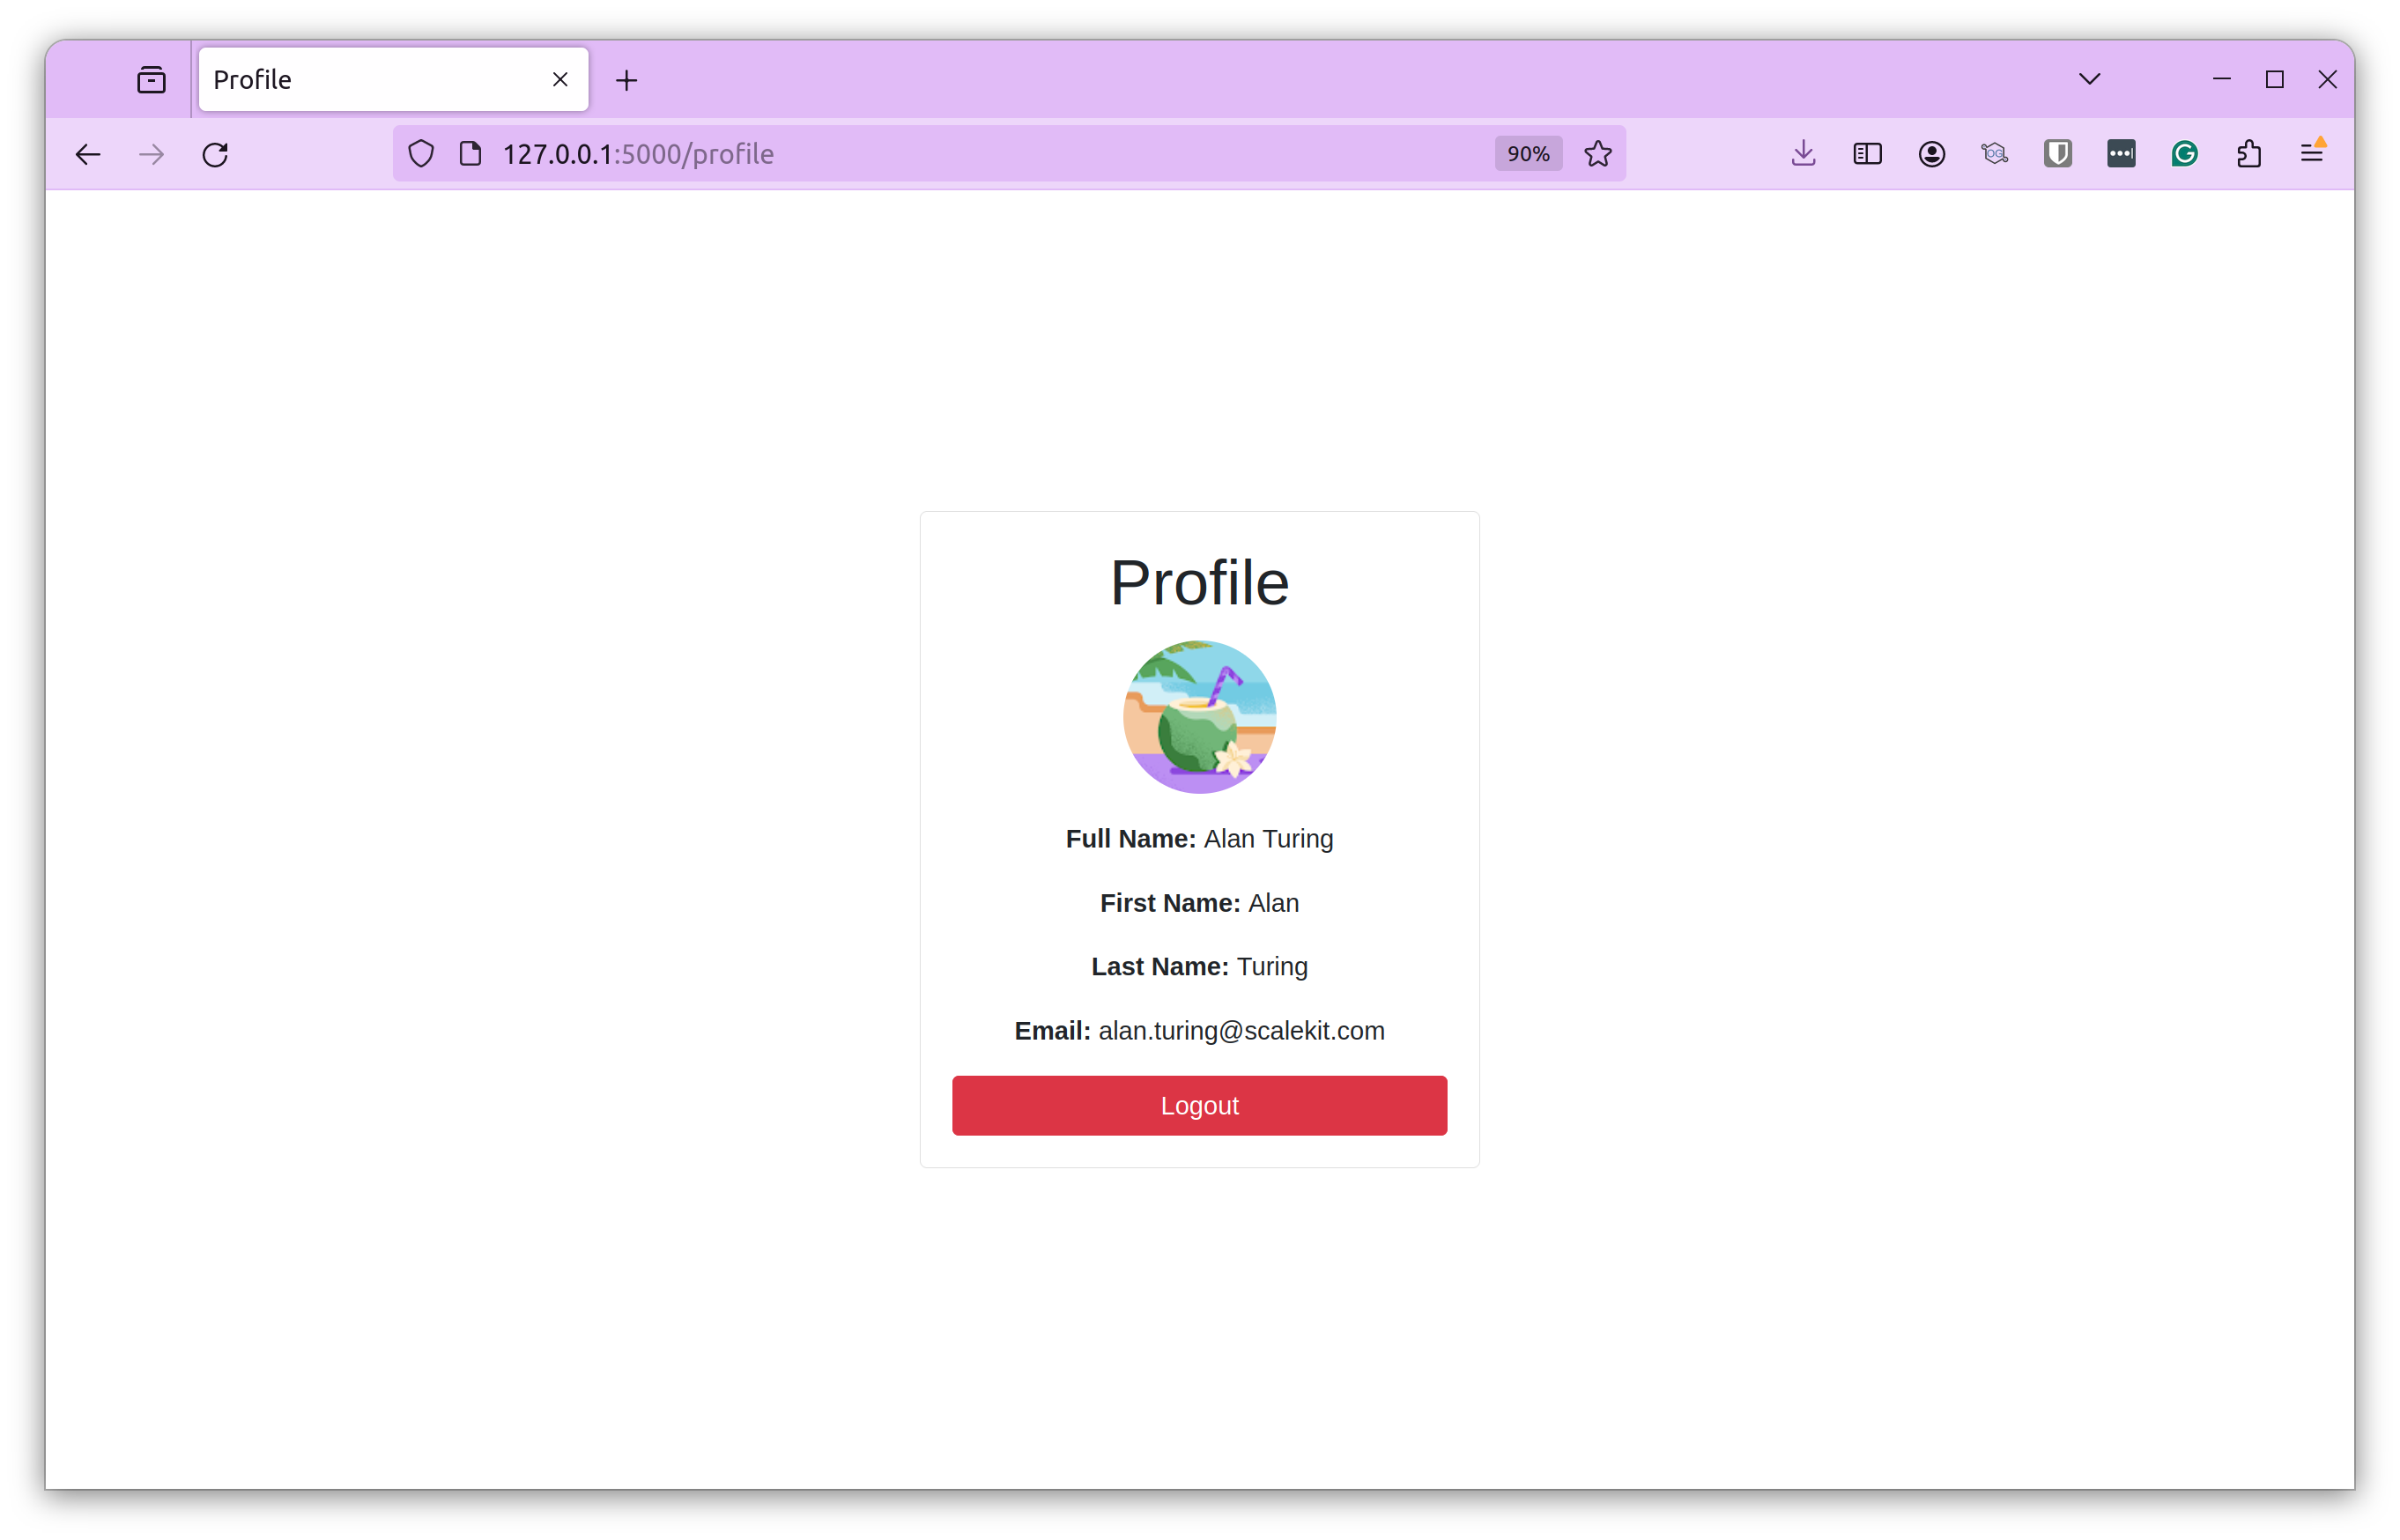
After a successful login, you can see the Profile Picture, Full Name, First Name, Last Name, and Email.
That’s how you configure Google OIDC for a web application. You can replicate this for any other web or mobile application.
OIDC best practices
The example above was a simple web app integrated with Google OIDC for illustration purposes. However, a production setup involves many more applications, users, and complex workflows.
Here are some best practices for implementing OIDC:
- Secure client secrets: Client secrets are credentials for your app to authenticate with the OIDC provider. Hence, it’s crucial to safeguard them. Store them securely as secure environment variables or in key management software. Don’t store them as plain text or commit them to source control.
- Token validation: By default, Do Not Trust the tokens received by the OIDC provider. Always validate those tokens. Check their authenticity and integrity by validating the issuer, signature, and expiration times. Not validating tokens can make your app vulnerable to token replay attacks.
- Secure token storage: Store access and refresh tokens securely using encrypted databases and server-side storage mechanisms. Avoid insecure locations like client-side storage.
- Using HTTPS: To maintain data confidentiality and integrity, ensure all communications between your app and the OIDC provider and associated endpoints are done over HTTPS.
- Enable logging and monitoring: Implement robust logging and monitoring to track authentication attempts, failures, and other security-related events. This will help your team respond to security incidents and prepare for the unexpected.
- Follow the least privilege principle: Request only the necessary claims or scopes from the OIDC provider for your application's functionality. Don’t request additional and unnecessary data.
- Implement user consent and privacy controls: Clearly communicate to users about the collected data and how it will be used. This allows the user to control the information they want to share.
By following these best practices, you can enhance the overall security of your application and ensure a seamless and secure user experience.
Elevating user trust and experience with OIDC
Implementing a robust authentication solution is no longer an option but a necessity. B2B organizations today deal with multiple applications and services, making the benefits of using SSO evident. Using OIDC, organizations can centralize authentication, reduce the risk of password reuse and weak passwords, and streamline access to critical resources, all while providing a good user experience.
We demonstrated how simple it is to implement Google OIDC in our web application, but a typical production setup is far more complex. Multiple applications, complex workflows, and different IDPs make the process more tedious, error-prone, and time-consuming for SaaS teams.
That’s where Scalekit comes into the picture. Designed specifically for SaaS teams, it allows them to integrate authentication into their applications quickly with straightforward configurations. This reduces the risk of errors and helps them ship products to their customers faster.
Ship enterprise authentication in days by using Scalekit
Centralizing authentication with OIDC reduces password reuse and streamlines access across your SaaS apps . But production OIDC setups—especially with multiple apps and identity providers—can become tedious, error‑prone and time‑consuming . Sign up for a free Scalekit account to integrate OIDC quickly using prebuilt connectors and straightforward configurations , and book time with our experts to ensure a smooth rollout.
FAQs
How does OIDC differ from the OAuth 2.0 framework?
While OAuth 2.0 is an authorization framework designed to grant applications access to user data without sharing credentials, OpenID Connect is an identity layer built on top of it. OIDC standardizes the authentication process, allowing users to sign in to multiple applications using a single identity provider. It introduces the ID Token, a JSON Web Token containing user profile information known as claims. This distinction is vital for B2B SaaS architects who must ensure that their systems handle both identity verification and resource access permissions securely across diverse enterprise environments.
What information does an OIDC ID Token typically contain?
An ID Token is a cryptographically signed JSON Web Token issued by the OpenID Provider to the Relying Party. It contains specific assertions about the authenticated user, referred to as claims. Common claims include the user unique identifier, name, email address, and profile picture. For engineering teams, these claims allow the application to identify the user and personalize the experience without needing to query a separate resource server. Validating these tokens is a critical security step to ensure the integrity and authenticity of the identity data before granting access to sensitive B2B application features.
Why are scopes important in an OIDC configuration?
Scopes define the specific permissions and types of user data that a client application requests from the identity provider. In a standard OIDC flow, scopes like openid, email, and profile are used to request access to the user identity and basic contact details. Following the principle of least privilege, developers should only request the minimum scopes necessary for the application functionality. This minimizes the risk of exposing sensitive user data. For CISOs, ensuring that applications request limited scopes is a fundamental part of maintaining a robust security posture and adhering to modern data privacy regulations.
How should developers manage OIDC client secrets securely?
Client secrets act as credentials that allow your application to authenticate with the OIDC provider. They must never be stored as plain text or committed to version control systems like GitHub. Instead, use secure environment variables or dedicated secret management services. If a secret is compromised, an attacker could impersonate your application to the identity provider. Technical architects recommend regular rotation of these secrets and using encrypted storage mechanisms to ensure that only authorized server-side processes can access them, protecting the trust relationship between the SaaS application and the identity provider.
Why is it necessary to validate tokens from providers?
You should never assume a token is valid just because your application received it. Validating tokens involves checking the digital signature to ensure it was issued by the trusted OpenID Provider and verifying that the token has not expired. You must also check that the audience claim matches your client ID to prevent token replay attacks. Failing to perform these checks can leave your application vulnerable to malicious actors who might inject forged tokens. Implementing robust validation logic ensures the identity of the user is authentic and the data contained within the token remains untampered.
How does OIDC enhance security for B2B SaaS applications?
OIDC enables centralized authentication, allowing B2B organizations to implement Single Sign On across their entire software suite. By reducing the need for users to manage multiple sets of credentials, it significantly lowers the risk of password fatigue and the use of weak or reused passwords. For CTOs, this centralization simplifies user lifecycle management and improves the overall security posture. Furthermore, OIDC provides a standardized protocol that works across different platforms, making it easier for SaaS teams to integrate with various enterprise identity providers while maintaining a consistent and secure login experience for their customers.
How does OIDC support machine to machine authentication?
While OIDC is primarily focused on user authentication, the underlying OAuth 2.0 framework provides the client credentials grant type for machine to machine scenarios. In modern AI and agentic workflows, M2M authentication allows autonomous agents or services to securely interact with APIs. By using OIDC compatible providers, developers can issue tokens to these agents, ensuring that every interaction is authenticated and authorized. This is increasingly important for engineering managers building MCP servers or AI applications where secure service to service communication is a prerequisite for protecting sensitive data and maintaining strict audit trails in complex architectures.
What is the purpose of the authorized redirect URI?
The authorized redirect URI is a security measure that tells the OIDC provider where to send the user and the authorization code after a successful login. By registering specific URIs, you prevent attackers from redirecting sensitive authentication responses to malicious domains. This configuration ensures that tokens are only delivered to trusted endpoints managed by your application. During development, you might use local addresses, but production environments must use secure HTTPS endpoints. Correctly managing these URIs is a critical step for developers to prevent open redirect vulnerabilities and ensure the integrity of the entire authentication flow.
Why should teams use Scalekit for OIDC integration?
Manually implementing OIDC for multiple enterprise customers can become complex and error prone due to varying identity provider requirements and configurations. Scalekit simplifies this process by providing a unified platform to manage diverse authentication workflows and prebuilt connectors. This allows engineering teams to ship enterprise ready authentication in days rather than months. By abstracting the underlying protocol complexities, Scalekit helps developers focus on core product features while ensuring a secure, scalable, and compliant login experience. For CISOs, this means faster deployments with reduced security risks and improved visibility into the authentication layer of their B2B SaaS products.


