How to implement sign in with Google: User authentication guide


Imagine you’re building an app that requires user authentication. You begin with the email/password method but soon face issues like forgotten passwords and weak password usage, which adds security risks to your production environment. As a developer, this means extra work managing resets, validating passwords, and enhancing security.
That’s where social sign-in providers like Google Sign-In, Microsoft, and Salesforce come in. Using Google OAuth 2.0, users can sign in with their existing accounts, eliminating the need to remember yet another password and offering a fast, secure sign-in experience with just a few clicks.
Why is Google Sign-In one of the top choices for secure user authentication?
- 2-factor authentication: Adds an extra layer of security with 2-step authentication, ensuring better protection.
- Strong security and privacy: Google Sign-In integrates strict security practices to safeguard user data. User information or activity is not used for ads, ensuring privacy protection and responsible data practices.
- Smooth user experience: The authentication process is quick, with no need for new passwords or forms, making the authentication step seamless for users.
However, while Google Sign-In simplifies user authentication, as your app grows, you may need to integrate additional social providers. This can introduce new challenges. Managing tokens, setting up redirect URIs, and handling security configurations for each provider can quickly become a time-consuming task.
This is where Scalekit steps in to simplify the integration process. With Scalekit, you can integrate Google OAuth and other providers using a unified SDK, minimizing redundant code and making the integration more efficient. Whether you're working on the application frontend or backend, Scalekit streamlines the entire authentication workflow, ensuring a smooth and secure setup.
In this tutorial, we’ll walk you through implementing secure user authentication using Google Sign-In and Scalekit SDK, ensuring a simple and effective solution for your app.
Introduction to Google Sign-in
Google Sign-in offers a streamlined way for users to access your Android app using their existing Google Accounts. With just a few taps, users can sign in or create a new account, eliminating the hassle of remembering yet another username and password. This not only makes it easier for users to get started with your app, but also helps developers by simplifying the authentication process and reducing the need to manage password security.
By integrating Google Sign-in, you enable users to quickly create a new account or sign in to an existing one, improving the overall user experience and making it easier for users to access your app’s features. For Android apps, Google Sign-in is a powerful tool that helps both users and developers by providing a secure, fast, and user-friendly authentication solution.
Integrating social sign-in like Google Sign-In is straightforward with Scalekit. Rather than managing complex Google OAuth configurations manually, Scalekit simplifies the process, helping you establish a fast and secure authentication flow for both internal applications and public-facing apps. Scalekit also helps manage authentication with third-party services, including handling terms of service requirements associated with Google Accounts and Google Cloud projects.
Why opt for Scalekit when integrating Google Sign-In?
- Saves time: automates generating authorization URLs and managing token exchanges, speeding up Google OAuth integration.
- Simplifies integration: The SDK handles everything from token management to retrieving user profiles for any application type, including web apps and Mobile devices, without custom coding.
- Enhances security: Scalekit follows OAuth standards, reducing token mishandling and securing your app’s authentication process.
With the Scalekit SDK, you can integrate Google Sign-In quickly and easily while also adding support for other providers like Microsoft and Salesforce as your application scales.
Configuring OAuth Clients
To implement Google Sign-in in your Android app, you’ll first need to configure OAuth clients in the Google Cloud Console.
Start by creating a new OAuth client ID specifically for your Android app. This client ID uniquely identifies your app and is required to authorize access to Google APIs. During setup, you’ll also configure the Google consent screen, which presents your app’s logo, name, and privacy policy to users when they sign in. It’s important to use the same package name for your Android app and the OAuth client ID to ensure that authentication works correctly.
Setting up these credentials and consent details not only helps users recognize your app during the sign-in process, but also ensures secure and authorized access to Google services. Proper configuration of your OAuth client is a crucial step in enabling Google Sign-in and providing a smooth authentication experience for your users.
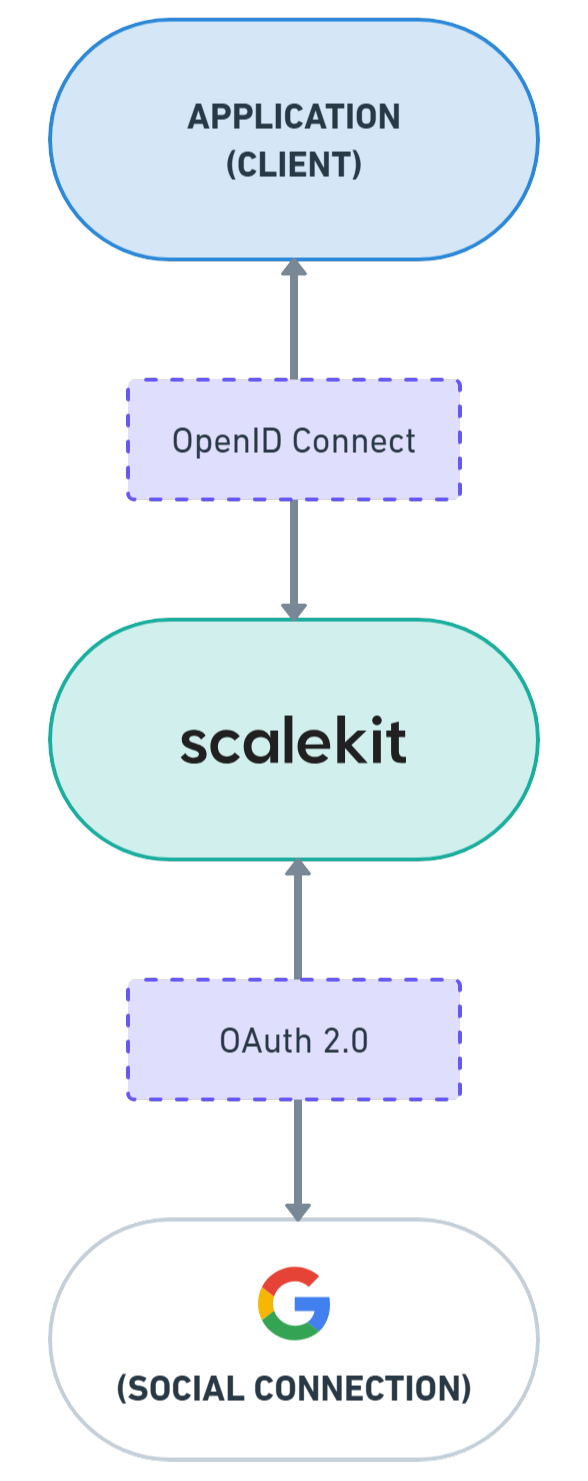
Now that we’ve understood why Google Sign-In is essential for modern web apps let’s dive into the implementation using Scalekit SDK. Here, we’ll focus on implementing sign-in functionality by integrating Google Sign-In with Scalekit. Scalekit integrates both OpenID Connect (OIDC) for user authentication and OAuth 2.0 for authorization.
In this section, we’ll walk through the steps required to set up Google Sign-In in your app, making the process smooth, secure, and efficient. With Scalekit, the integration is not only faster but also avoids common pitfalls that arise when setting up the authentication protocol manually.
Prerequisites
Note: When setting up OAuth credentials, make sure to configure both a web client and an android client in the Google Developer Console. Each client should be given a unique name to help identify it in the Google Cloud Console. A common pitfall is forgetting to configure the Android client, which is required for app verification and API access.
Before we jump into the code, you’ll need to set up a few things:
Scalekit account and API setup
Start by signing into your Scalekit Dashboard and selecting the "Development" environment. You’ll find the following important credentials under the "API Config" section by using “Generate new secret”. Once the credentials are created, they will be used in the following setup steps.
- Environment URL: The base URL for API calls (development or production).
- Client ID: Your app's unique identifier.
- Client Secret: A private key used for authenticating API requests.
Google developer console: Creating a project and obtaining OAuth credentials
Set up OAuth consent using this guide on Google Developer Console and get your Client ID and Client Secret. Be sure to create both a web client and an Android client, and assign each a unique name to easily identify them later. We are now ready to set up a social connection within Scalekit.
Step 1: Configure Google Social Sign-in using Scalekit
To set up a social connection with Google and Scalekit, follow these simple steps:
Access social sign-in settings:
- Open the Scalekit dashboard.
- Navigate to the social sign-in section.
Configure Google connection:
- Click "Add Connection".
- Select “Google” from the list of providers.
- Enter your Google Developer Console credentials
- Client ID
- Client Secret
Finalize and verify:
- Save your settings.
- Use the "Test Connection" feature. This helps you test IDP integration quickly without doing an end-to-end login flow.
- Sign in with your Google account to confirm everything works correctly.
By following these steps, you’ll have Google Sign-In configured and ready to go.
Step 2: Store Scalekit API credentials in your .env file
In your backend environment, securely store your Scalekit credentials in a configuration file. This can vary depending on your tech stack, but the goal is to keep sensitive information secure.
For example, in Node.js, you can store these credentials in a .env file:
Step 3: Set up Scalekit SDK in your backend
Let’s implement the Scalekit SDK in our application’s backend. The backend server is responsible for handling OAuth authentication and API interactions. This setup will manage the generation of the authorization URL and the exchange of the authorization code for retrieving user details. During this exchange, the backend server retrieves a Google ID token as part of the authentication process. Users authenticate and give consent to our application at the authorization URL, whereas exchanging code ensures our app receives correct information about the users.
After receiving the token, verification of the user's identity is performed to ensure secure authentication. To improve security and prevent replay attacks, consider using a nonce or similar technique during the sign-in process.
Scalekit handles the connection with Google on behalf of our app, making the process simple and secure.
Curious about the details behind OAuth2.0 and OpenID connect? Check out this implementation guide to see how you can set up a Google sign-in for your app using these protocols.
Depending on the tech stack you’re using, here are some ways to install the Scalekit SDK for your projects.
1. Install the Scalekit SDK
2. Consent screen to authorize the user
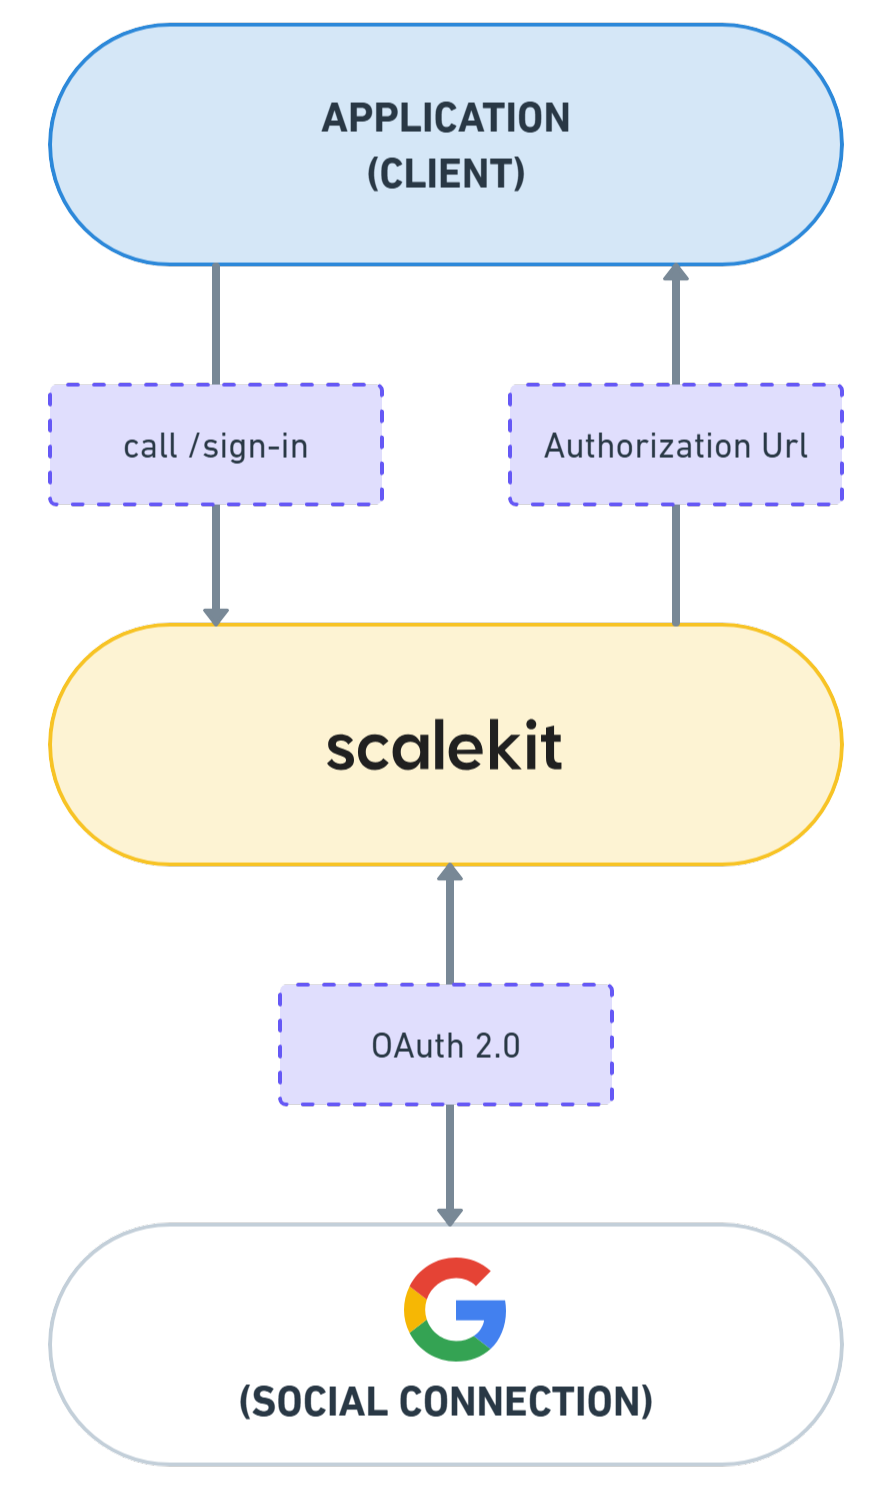
To allow users to sign in, your app needs to redirect them to an Authorization URL. This URL sends users to Scalekit, which seamlessly takes them to the OAuth sign-in configured for social sign-in.
On the consent screen, users are prompted to grant access and select their account. The app logo is displayed on the consent screen to help users recognize your app, and the app homepage URL is included for user reference. Additionally, you must provide the app's privacy policy URL as part of the consent screen setup to ensure transparency and compliance.
After user consent, Google sends the details to Scalekit, which in turn redirects the users, thus signing them into the app.
Now, set up your app to redirect users to the Scalekit Authorization URL along with the redirect_uri and necessary parameters.
Pass in a `redirect_uri` and `provider` to generate the Authorization URL.
- redirect_uri: An endpoint your app owns where Scalekit will send users back after signing in. Register it in Scalekit API Config and define it in your app.
- provider: Pass “google” as the option to tune our Authorization URL to initiate the sign-in with Google.
The following are code snippets of the sign-in endpoint that our frontend will use to get the authorization URL from the backend, which will then be used to redirect the users to the OAuth consent screen and prompt them to sign in or select an account.
For a complete list of authorization URL parameters you can pass, refer to the authorization URL parameters guide.
We successfully added the capability to allow our app to generate a URL that lets them see the consent screen. However, we have yet to do two more things — define an endpoint to consume the user information after the OAuth consent screen and tie our front end to initiate sign-in.
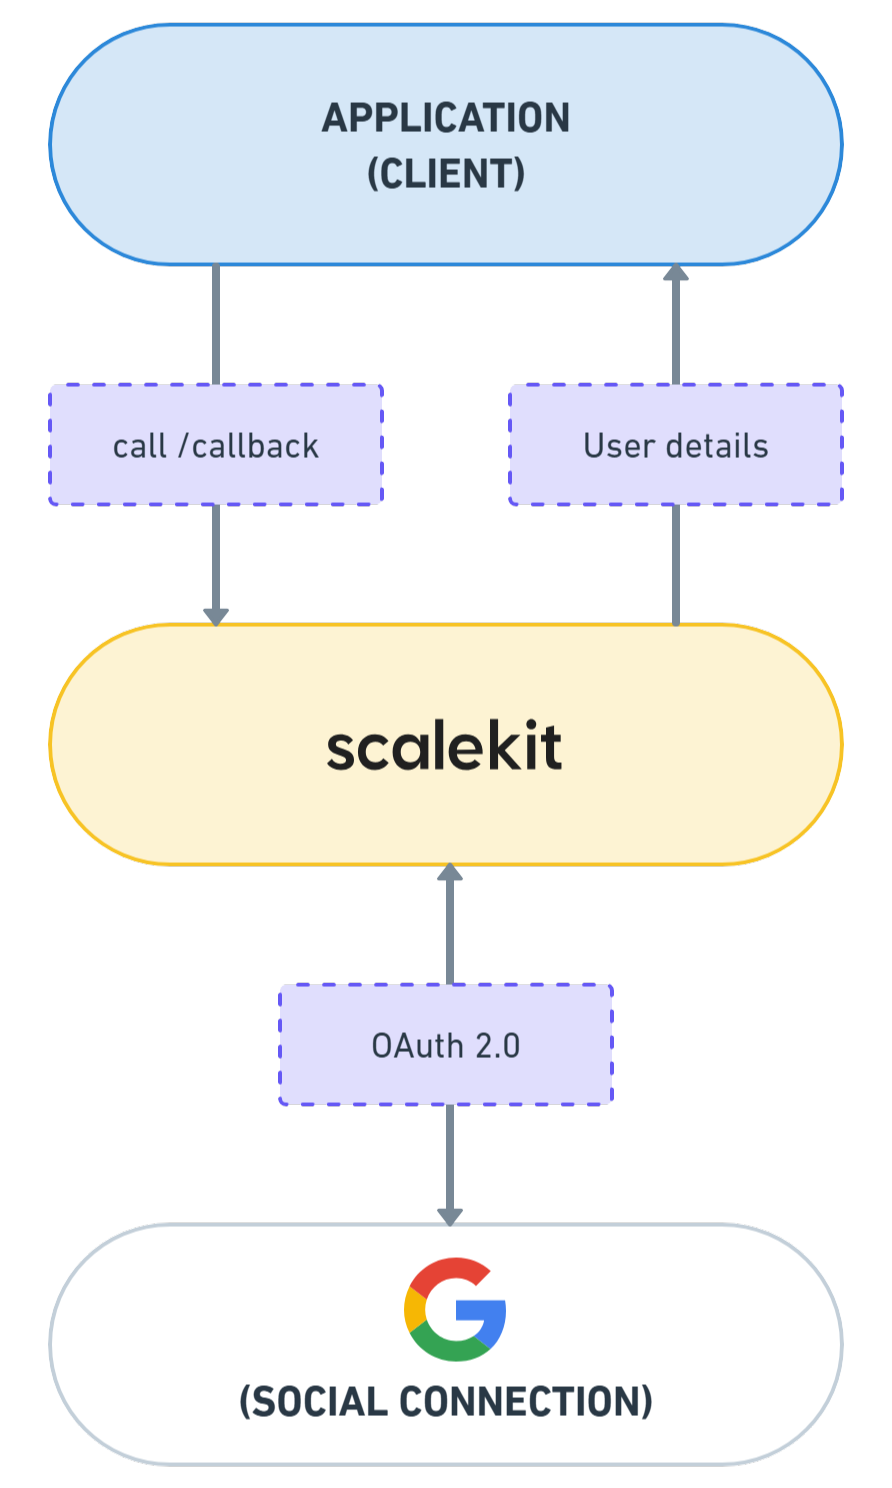
3. Fetch user details after sign in using redirect URI
As the user gives OAuth2 consent, Google sends the necessary tokens to Scalekit. Scalekit handles and redirects them back to your redirect_uri endpoint with a unique authorization code. The next step is to exchange this code via Scalekit to fetch the user's details from Google, such as their email and profile information.
The following code snippets show how to set up the callback endpoint that will be used to exchange the authorization code with Scalekit to retrieve the user’s details.
Step 4: Implement the frontend to initiate the Google sign-in flow
Now that the backend is ready, it’s time to set up the frontend to initiate the Google sign-in process using Scalekit.
Index.js
Here's how the process works:
- The frontend sends a request to the backend's /sign-in when the user clicks the "Sign-in" button.
- The /sign-in endpoint responds with an authorization URL that you can use to redirect the user to the OAuth2 consent screen.
This flow ensures a smooth user experience while securely handling the sign-in in the background.
Step 5: Fetching and Displaying User Attributes
After a successful Google Sign-In, the next step is to retrieve and display the user's details. This process begins when the user is redirected back to your app’s callback URL, which is configured in Scalekit as http://localhost:5000/callback. This URL includes a unique authorization code received upon successful completion of the sign-in flow.
The backend /callback endpoint then handles this code by communicating with Scalekit to retrieve the user's details, such as their email and name. These details then can be rendered on the frontend.
signedIn.js
This ensures that the user’s profile details, such as their name and email, are displayed immediately after they sign in with Google, providing a seamless experience.
For more details on how to handle this, refer to Scalekit’s Guide on Handling User Profiles.
Step 6: Testing and debugging: Testing the integration with real Google accounts
Now that your setup is complete, it's time to test! Follow these steps to ensure everything works as expected:
- Run everything locally and sign in using a real Google account.
- Ensure the entire flow works smoothly, from the consent screen to displaying user details.
- Monitor your logs for any errors during the process to catch potential issues early.
- Double-check that your Google Client ID is correctly set.
- Ensure that any required application environment variables are properly configured for this basic Google Sign-In integration.'
- Test the sign-in flow on multiple devices, including both virtual devices and physical devices, to ensure compatibility and a seamless experience across all device types.
- Confirm that the integration is working as expected by checking for successful sign-in and user data retrieval.
By following these steps, you can ensure your integration works as intended before going live.
Comparison with traditional OAuth implementations
Using traditional OAuth setups can be a complicated process, especially when working with multiple identity providers (IdPs) like Google, Microsoft, or Salesforce.
Here’s how Scalekit simplifies the process:
By using Scalekit, you simplify the integration process, cut down on development time, and ensure a smoother, more secure user authentication experience.
Supporting new users
Google Sign-in makes it incredibly easy for new users to get started with your app. Instead of filling out lengthy registration forms, users can create a new account with just a few taps using their Google Account. This streamlined onboarding process reduces friction and encourages more users to sign up, helping your app grow its user base. For developers, supporting new users through Google Sign-in means less time spent on building and maintaining custom registration flows, and more time focusing on your app’s core features. Additionally, returning users can quickly sign in without having to remember separate credentials, ensuring a smooth experience every time they access your app.
Improving app security
Implementing Google Sign-in significantly improves your app’s security by leveraging Google’s robust authentication infrastructure. By using secure tokens and the credential manager API, your app can protect against common threats like replay attacks and unauthorized access. Google helps safeguard user data by handling sensitive authentication details, so your app never needs to store or manage passwords directly. This reduces the risk of data breaches and ensures that both new and returning users benefit from advanced security features, such as automatic sign in and two-factor authentication. By following best practices and using authorized redirect URIs, you can further enhance your app’s security and provide peace of mind for your users.
Providing a consistent experience
With Google Sign-in, your app delivers a consistent and familiar authentication experience across all devices and platforms. The use of the recognizable Google button, your app’s logo, and the standardized Google consent screen ensures that users always know they are signing in securely with their Google Account. This consistent experience builds trust and makes the authentication flow intuitive, whether users are accessing your app on Android, iOS, or the web. By providing a seamless and unified sign-in process, you not only improve user satisfaction but also reinforce your app’s brand identity every time users log in.
Comparison with traditional OAuth implementations
Using traditional OAuth setups can be a complicated process, especially when working with multiple identity providers (IdPs) like Google, Microsoft, or Salesforce. Here's what you need to implement:
- Separate setup for each IdP, increasing complexity
- One SDK for multiple providers
- Code grows with each added provider
- Manually handle tokens for each provider
- Token management
- Maintain patches to stay secure
By using Scalekit, you simplify the integration process, cut down on development time, and ensure a smoother, more secure user authentication experience.
Conclusion
In this tutorial, we’ve explored how to implement Google Sign-In using Scalekit. From setting up the backend to retrieving user details, Scalekit simplifies the entire process, making it easy to integrate multiple identity providers with minimal effort. Whether working on a client application or scaling to a larger platform, Scalekit provides a secure and efficient way to handle social sign-in.
Frequently Asked Questions:
How does Google OAuth work?
Google OAuth lets users sign in to third-party apps using their Google account without sharing their passwords. Here’s the quick process:
- The user clicks the Google Sign-In button and is redirected to Google’s Authorization page.
- They grant permission for the app to access their account info.
- Google sends back an authorization code, which the app exchanges for an access token through secure server interactions to retrieve user details.
This way, the app never handles passwords, keeping things secure and reducing the risk of breaches.
Is Google OAuth free?
Yes, Google OAuth is free to use. Google provides OAuth 2.0 as part of its platform services, allowing developers to integrate Google Sign-In into their apps at no cost. However, it's worth noting that if your app makes a high number of API requests, there might be rate limits, but most apps will not need to worry about this.
What is OAuth and how does it work?
OAuth (Open authorization) is a standard protocol used for secure token-based authentication and authorization. It is a secure way for apps to access user information without needing their passwords. Here’s how it works:
- The user gives the app permission on an authorization page.
- The app gets an authorization code and exchanges it for an access token.
- The access token allows the app to access the user’s data—no need for sign-in credentials.
It’s a safe way to let apps share data without storing sensitive information like passwords.
What is the difference between SSO and OAuth?
SSO (Single Sign-On) and OAuth are related but serve different purposes:
- SSO lets users sign in once and access multiple apps without needing to sign in again, simplifying the user experience.
- OAuth is focused on authorization, allowing apps to access specific user data without needing their password, based on permissions granted.
In short, SSO manages sign-in across platforms, while OAuth securely grants apps access to user data. SSO can be achieved using OAuth, as is the case with Google Sign-In. For more information around SSO implementation make sure you check out our Blueprint for SSO Implementation.
Long registration forms lead to high user drop‑off rates; social login dramatically reduces friction at sign‑up . Scalekit makes it easy to add “Sign in with Google” by providing prebuilt connectors, customizable login flows and analytics for a consistent user experience . Sign up for a free Scalekit account to integrate Google sign‑in quickly.


